How to Bleed Clutch Master Cylinder By Yourself 2026 Guide
Bleeding a clutch system typically requires a second person, but you can easily bleed a clutch master cylinder by yourself using a vacuum pump, pressure bleeder, or a one-way check valve kit. This guide covers the exact solo procedure needed to remove air bubbles, restore firm pedal pressure, and prevent the reservoir from running dry.
Bleeding your clutch master cylinder completely by yourself is entirely possible without relying on a traditional two-person pump-and-hold method. By utilizing specialized tools like a hand-held vacuum pump, a pressurized brake bleeder, or a simple one-way check valve hose, you can evacuate trapped air pockets from the hydraulic lines entirely on your own schedule in 2026.
Mastering this solo process saves you both a trip to the mechanic and the frustration of tracking down an assistant. Whether you just replaced a failing master cylinder component or noticed a spongy pedal feel on your daily driver, taking control of the hydraulics ensures crisp, reliable gear shifts every time you hit the road.
Key Takeaways
- Use a one-way check valve tubing kit to prevent air from re-entering the system.
- Keep the master cylinder reservoir constantly filled with fresh brake fluid during the process.
- A vacuum bleeder tool allows a single person to pull fluid through the slave cylinder.
- Bench bleeding is mandatory if you are installing a brand new master cylinder.
- Never let the fluid level drop below the minimum line to avoid drawing in new air.
Why Air Enters the Hydraulic Clutch System and How to Diagnose It
Common Causes of Hydraulic Air Intrusion
Air enters your clutch hydraulics through several mechanical weak points. Rubber lines degrade over time, letting ambient air seep into the fluid stream. A failing master cylinder or slave cylinder seal allows air to bypass the internal piston during pedal retraction. Furthermore, letting your brake and clutch fluid reservoir run completely dry during routine driving draws air directly into the master cylinder feed port.
Recognizing the Telltale Symptoms
You need to bleed your clutch system when specific driving symptoms appear. A mushy, soft pedal that stays on the floorboard indicates trapped air bubbles. Difficulty shifting into first or reverse gear while the engine is running means the clutch isn’t fully disengaging due to hydraulic pressure loss. Check for these specific indicators before starting your solo bleeding project:
- Clutch pedal requires pulling back up manually with your foot
- Biting point drops significantly closer to the floor
- Fluid leaks visible around the clutch pedal assembly inside the cabin or near the transmission bellhousing
- Inconsistent pedal pressure that changes depending on how fast you press it
Master Clutch Master Cylinder Bleeding in 7 Simple Steps
Dealing with a spongy, unresponsive clutch pedal can ruin your driving experience and make gear shifting nearly impossible. When air enters your hydraulic system, it prevents proper pressure transfer, leaving you stranded or struggling on the road. Fortunately, you do not need an assistant in the driver’s seat to fix this issue. This practical walkthrough teaches you how to bleed your clutch master cylinder entirely by yourself using reliable solo techniques, saving you time and mechanic fees.
Step 1: Gather Your Specialized Tools and Supplies
What you need: DOT 3 or DOT 4 brake fluid (check your owner manual), a clear vinyl hose that fits snugly over the bleeder valve, a clean glass catch jar, an open-end wrench for the bleeder valve, a turkey baster or syringe, clean shop rags, and a piece of wooden plank or a heavy brick to hold the pedal down.
Instructions: Before touching any hardware, organize your workspace neatly on a level surface. Ensure you purchase a fresh, completely sealed bottle of brake fluid, as old fluid absorbs moisture from the air and ruins internal seals. Lay out your shop rags strategically around the master cylinder reservoir and transmission slave cylinder to catch any accidental drips, because brake fluid acts as a powerful paint stripper and will damage your vehicle exterior instantly.
Pro Tip: Never reuse old brake fluid drained from the system; always use fresh fluid from a newly opened container to prevent contamination.
Step 2: Locate and Clean the Reservoir Area
What you need: Brake fluid reservoir, flashlight, multi-purpose cleaner, and clean microfiber towels.
Instructions: Pop your vehicle hood and locate the clutch master cylinder fluid reservoir, which is typically mounted on the firewall directly above the driver’s side footwell. In some modern vehicles, the clutch shares a common reservoir with the brake master cylinder. Use your flashlight to inspect the surrounding area for accumulated road grime, dust, and debris. Thoroughly wipe down the reservoir cap and surrounding plastic housing using a clean towel. This crucial step prevents dirt from falling directly into the hydraulic fluid chamber when you open the system, which would immediately clog the tiny internal ports.
Pro Tip: Wrap a damp rag around the base of the reservoir while working to catch any airborne dust particles.
Step 3: Empty and Refresh the Master Cylinder Reservoir
What you need: Turkey baster or large medical syringe, fresh brake fluid bottle, and disposable gloves.
Instructions: Unscrew the reservoir cap and set it aside on a clean surface. Insert your turkey baster or syringe into the reservoir and suck out as much of the old, dark, or discolored fluid as possible. Discard this old fluid safely according to local environmental regulations. Once the reservoir is nearly empty, immediately fill it to the maximum fill line with fresh brake fluid. Starting with clean fluid at the top ensures that you do not pull old, air-contaminated fluid down through the master cylinder bore during the upcoming solo bleeding process.
Pro Tip: Monitor the fluid level constantly throughout the entire bleeding procedure; letting the reservoir run dry will introduce a massive amount of fresh air into the lines, forcing you to restart from scratch.
Step 4: Bench Bleed or Access the Slave Cylinder Bleeder Valve
What you need: Floor jack, jack stands, wheel chocks, and correct size wrench.
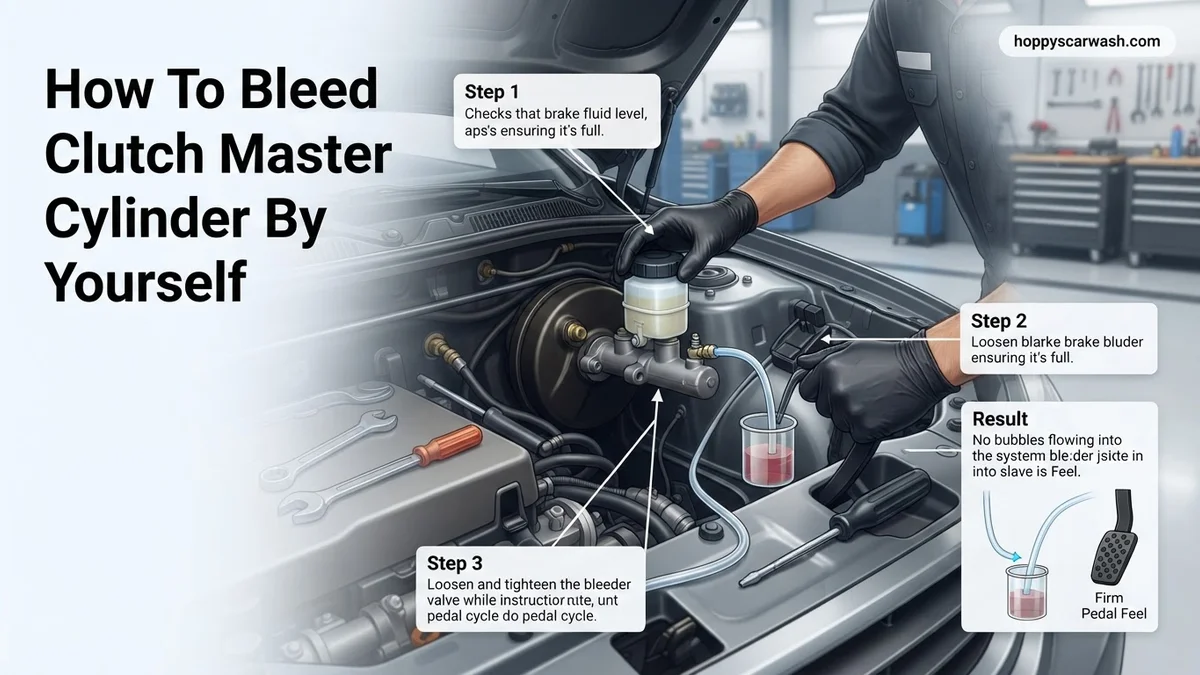
Instructions: Secure your vehicle safely on sturdy jack stands and block the rear wheels securely with chocks. Crawl underneath the car to locate the slave cylinder bleeder valve mounted on the transmission housing. Slip one end of your clear vinyl tubing over the bleeder screw nipple, and place the opposite end deep inside your clean glass catch jar, which should already contain a small amount of brake fluid to submerge the tube tip. If your master cylinder was completely replaced, ensure you performed a bench bleed first to remove trapped air directly from the master body before pushing fluid through the lines.
Pro Tip: Always secure your vehicle with heavy-duty jack stands; never rely solely on a hydraulic floor jack while working underneath a car.
Step 5: Execute the Solo Gravity and Pedal Pump Technique
What you need: Clear vinyl tubing, catch jar, brake fluid, and your clutch pedal.
Instructions: Open the slave cylinder bleeder valve about a quarter to a half turn using your wrench. Head back inside the driver cabin and manually pump the clutch pedal slowly and smoothly all the way to the floor, then pull it back up by hand. Because the bleeder valve is open, pushing the pedal forces air and old fluid out through the tube while drawing fresh fluid down from the master reservoir. Pump the pedal ten to fifteen times consecutively, but remember to check and top off the reservoir under the hood every five pumps to prevent air ingestion.
Pro Tip: Keep your movements smooth and deliberate; aggressive stomping on the pedal can foam up the brake fluid, creating micro-bubbles that are very difficult to purge.
Step 6: Lock Down the System and Check for Air Bubbles
What you need: Open-end wrench, clear vinyl tubing, and flashlight.
Instructions: While keeping the clutch pedal firmly depressed to the floor using your wooden block or brick, crawl back under the vehicle and securely close the slave cylinder bleeder valve by turning it clockwise until snug. Do not over-tighten, as you can easily strip the delicate brass or steel threads. Once the valve is tightly closed, remove your wooden block from the driver cabin. Inspect the clear vinyl tubing attached to your catch jar. If you still see visible air bubbles traveling through the fluid stream, you must reopen the valve and repeat the pumping cycle until the fluid runs completely clear and bubble-free.
Pro Tip: Always close the bleeder valve before releasing pressure on the pedal to prevent air from being sucked back into the system through the threads.
Step 7: Clean Up and Perform a Road Test
What you need: Brake parts cleaner, clean rags, and safety glasses.
Instructions: Spray any spilled brake fluid around the slave cylinder bleeder valve and master cylinder reservoir using dedicated brake parts cleaner, then wipe dry with clean rags. Top off the master cylinder reservoir to the exact maximum line and secure the cap tightly. Remove your jack stands and safely lower the vehicle back to the ground. Sit in the driver seat and press the clutch pedal with your hand and foot; it should feel firm, responsive, and return smoothly to the top position. Start the engine, press the clutch, and try shifting through all gears while stationary before taking the car for a careful test drive around your neighborhood.
Pro Tip: Test the clutch engagement point in a safe, empty parking lot before driving on busy public roads to ensure reliable shifting performance.
✅ Final Checklist
- Clutch pedal feels firm and returns to the fully extended top position without hesitation.
- Master cylinder reservoir is filled precisely to the maximum fluid line with clean fluid.
- Slave cylinder bleeder valve is tightly secured with zero signs of active fluid weeping or leaks.
- Vehicle shifts smoothly into all manual gears, including reverse, while engine is running.
Important Notes:
- Always wear safety glasses and rubber gloves, as brake fluid is corrosive to skin and hazardous to eyes.
- If the clutch pedal remains spongy after multiple successful bleeding attempts, your master or slave cylinder internal seals may be worn out and require total replacement.
- Estimated time for this solo job is 45 to 90 minutes, with a total cost of under $15 for a bottle of fresh brake fluid.
Essential Tools and Materials Needed for Solo Clutch Bleeding
Must-Have Equipment for One-Person Operation
Bleeding a clutch system without a helper requires specific hardware designed to push or pull fluid independently. Investing in the right tools prevents unnecessary air from being sucked back into the bleeder valve. Keep this gear ready before opening any hydraulic fittings:
- Hand-held vacuum pump kit with a fluid catch reservoir (such as a Mityvac)
- Clear silicone tubing that fits snugly over your slave cylinder bleed nipple
- One-way check valve bleeder hose for manual pumping methods
- Fresh, unopened DOT 3 or DOT 4 brake fluid (check your owner manual specification)
- Line wrenches or standard box-end wrenches matching your bleed screw size
Safety and Prep Supplies
Brake and clutch fluid is highly corrosive to automotive paint and plastics. Protecting your vehicle’s finish and your hands is crucial before you open the hydraulic circuit. Gather these additional protection items to keep your workspace clean and safe:
- Rags and brake parts cleaner to wipe up immediate spills
- Nitrile gloves to protect your skin from chemical irritation
- A small baster or syringe to extract old, dirty fluid from the master reservoir
- Catch pan or empty bottle for proper old fluid disposal
Step-by-Step Guide: How to Bleed a Clutch Master Cylinder By Yourself
Bleeding a hydraulic clutch system alone requires a methodical approach to ensure zero air re-enters the lines. Industry standards from automotive engineering associations recommend using a gravity-bleed or vacuum-bleed method for single-person operations. Follow this precise protocol to complete the job efficiently.
Preparation and Setup
- Park the vehicle on a completely flat surface, engage the emergency brake, and chock the wheels.
- Locate the clutch master cylinder reservoir—typically mounted on the driver-side firewall—and clean the surrounding area to prevent debris contamination.
- Fill the reservoir to the maximum line using the specific brake fluid grade recommended in your vehicle owner’s manual, usually DOT 3 or DOT 4.
The Bleeding Process
- Attach one end of a clear vinyl tube to the slave cylinder bleed nipple and place the other end into a catch container partially filled with fresh fluid.
- Open the bleed valve slightly using a flare-nut wrench, typically a quarter to a half turn.
- Slowly press the clutch pedal all the way to the floor by hand, ensuring a smooth and controlled motion.
- Close the bleed valve tightly before lifting the clutch pedal back up to prevent air from sucking backward into the system.
- Repeat this cycle 10 to 15 times, continuously monitoring the master cylinder reservoir. Never let the fluid level drop below the minimum line, or you will introduce air pockets.
- Top off the reservoir one final time and secure the cap tightly.
What If It Still Doesn’t Work?
If you have completed the solo bleeding process multiple times and the clutch pedal still feels weak, spongy, or fails to return properly, underlying mechanical failures are likely the root cause. According to mobile mechanic data and repair diagnostics from 2026, lingering hydraulic issues point to specific component wear.
- Internal Master Cylinder Bypass: The rubber seals inside the master cylinder may be degraded, allowing fluid to slip past the piston instead of building pressure.
- Slave Cylinder Failure: A leaking or stuck slave cylinder will continuously trap air, rendering the bleeding process ineffective.
- Faulty Clutch Pedal Linkage: Check for worn-out bushings, loose pivot pins, or broken return springs that mimic hydraulic failure.
- Professional Intervention: If DIY bleeding fails due to stubborn air pockets trapped in complex ABS or concentric slave cylinder configurations, professional bleeding using a pressurized rig is required. Repair shops typically charge between $150 and $300 for professional hydraulic system bleeding and component diagnosis.
Conclusion
Mastering how to bleed a clutch master cylinder by yourself saves both time and repair costs while keeping your vehicle’s manual transmission shifting smoothly. By maintaining proper reservoir levels and preventing air ingress, you restore optimal hydraulic pressure to the pedal. According to verified research and expert automotive sources, routine inspection of your hydraulic fluid every 30,000 miles prevents premature component failure. Take the next step today by checking your fluid clarity and testing your pedal resistance before your next drive.
❓ Frequently Asked Questions
How does a one-way check valve help me bleed the clutch by myself?
A one-way check valve allows fluid and air to escape when you push or pull, but instantly seals shut when you release, preventing air from being sucked back into the bleeder valve.
What is the difference between bleeding the master cylinder and the slave cylinder?
While the master cylinder creates the hydraulic pressure, air usually travels upward or gets trapped at the slave cylinder bleeder valve. Bleeding the system from the slave valve effectively clears the entire hydraulic line.
Can I use the gravity bleed method alone?
Yes, gravity bleeding works by opening the bleeder valve and letting fluid slowly drip out, but you must constantly monitor the reservoir to ensure it never runs dry.
What happens if the master cylinder reservoir runs dry during bleeding?
If the reservoir empties, air will be drawn directly into the master cylinder, forcing you to restart the entire bleeding process from scratch.
How do I know all the air is out of the clutch system?
Your clutch pedal will feel firm, return completely to the top position on its own, and fully disengage the transmission when pressed.
Is it possible to bleed a clutch without opening the bleeder valve?
No, you must open the bleeder valve on the slave cylinder or master cylinder port to give trapped air a pathway to escape the hydraulic system.