How to Tighten Spark Plug Without Torque Wrench 2026
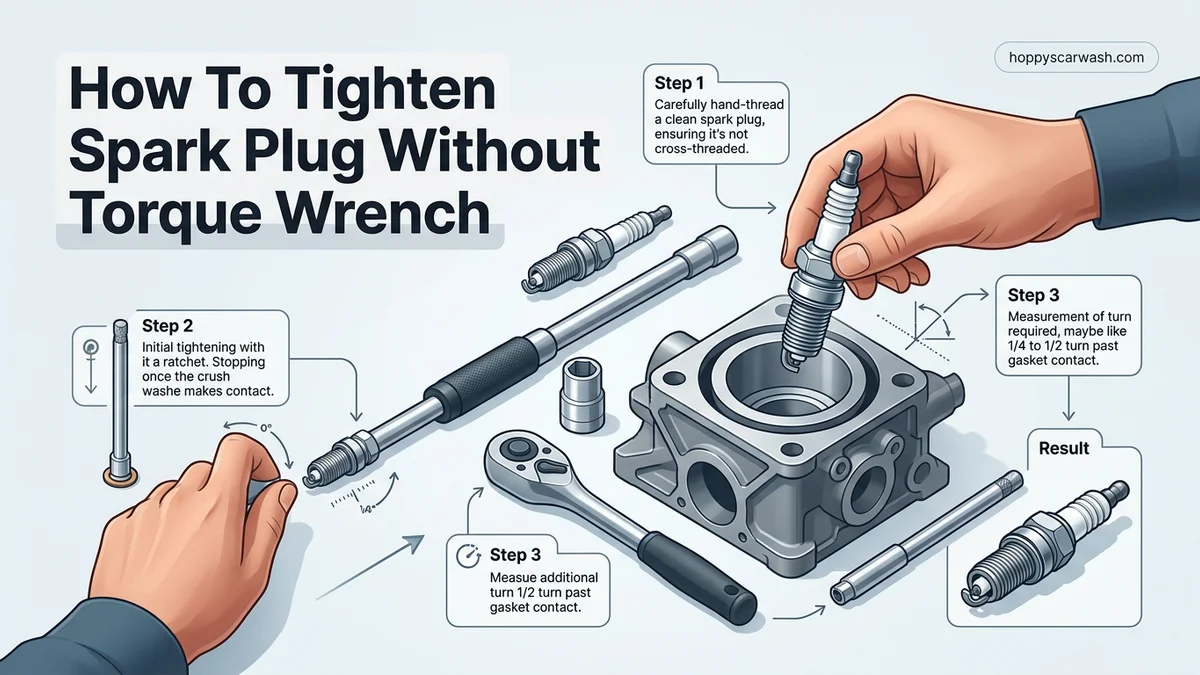
Tightening a spark plug without a torque wrench requires the finger-tight plus fraction-of-a-turn method to ensure proper seating. Missing this technique risks either stripping expensive aluminum cylinder head threads or having a plug blow out under high compression. Knowing the exact rotation depends entirely on whether the spark plug features a crush washer or a tapered seat.
You can successfully tighten a spark plug without a torque wrench by using the reliable finger-tight plus a fraction of a turn method. Professional mechanics have relied on this tactile technique for decades. It bypasses the need for specialized tools while keeping your engine running smoothly in 2026.
The secret lies in understanding how the crush washer or tapered seat compresses inside the cylinder head. As long as you start the threads cleanly by hand, you can achieve the exact clamping force needed using only a standard ratchet and your mechanical feel.
Key Takeaways
- Always screw the spark plug in by hand first to prevent cross-threading.
- New spark plugs with crush washers require roughly 1/2 to 2/3 of a full turn past finger-tight.
- Previously used spark plugs with crush washers only need about 1/16 to 1/8 turn past finger-tight.
- Tapered seat spark plugs require a much tighter initial feel, usually just 1/16 turn past finger-tight.
- Use a permanent marker on the socket to visually track the exact rotation angle.
What Causes Spark Plug Thread Damage and Improper Tightening Risks
Spark plug installation errors usually happen because of haste or poor technique rather than a lack of expensive tools. Aluminum cylinder heads found in modern 2026 vehicles are particularly unforgiving when you make a mistake.
The Dangers of Over-Tightening
Torquing a spark plug down too far stretches the metal shell and crushes the gasket beyond its design limit. This creates several severe engine problems:
- Stripping the delicate aluminum threads inside the cylinder head port
- Snapping the threaded metal portion of the spark plug off inside the engine
- Causing microscopic cracks in the cylinder head near the combustion chamber
The Dangers of Under-Tightening
Stopping too soon is just as dangerous as going too far. A loose spark plug fails to seal the combustion chamber properly, leading to dangerous operational risks:
- Compression leaks that blow past the seating area and destroy the plug gasket
- Engine misfires and noticeable power loss during acceleration
- Thermal damage that can melt the ground electrode over time
Master Spark Plug Tightening in 6 Simple Steps
Installing spark plugs correctly is vital for engine performance, fuel efficiency, and preventing costly cylinder head damage. While a calibrated torque wrench is the gold standard, you can achieve the exact same precision using the manufacturer-approved turn-of-the-nut method. This comprehensive guide walks you through safely tightening spark plugs by hand without specialized torque tools, ensuring a reliable seal every time.
Step 1: Prep and Inspect the Spark Plug Wells
What you need: Compressed air can, clean microfiber towel, and a flashlight.
Instructions: Before touching the new spark plugs, you must ensure the surrounding engine bay and spark plug wells are completely free of dirt, leaves, or old oil. Shine your flashlight down into the deep plug wells. If you spot debris, use a burst of compressed air to blow it out. This prevents harmful particles from falling directly into the open combustion chamber the moment you extract the old plug, which could severely score your cylinder walls and ruin the engine.
Pro Tip: Always clean the area before removing the old plugs. Never use a liquid cleaner inside the well unless the engine is completely cool and you are certain the plug is tightly sealed.
Step 2: Understand the Crush Washer and Seating Types
What you need: Your new spark plugs and a magnifying glass if needed.
Instructions: Examine your new spark plugs to identify their seating style, as this dictates how far you must turn them. Most modern passenger vehicles use spark plugs with a crush washer (a metal ring near the threads) designed to flatten upon tightening. Other applications, typically found in lawnmowers or older specialized engines, use a tapered seat without a washer. Knowing which type you have is critical because crush washers require a specific rotation angle to deform properly and create an airtight combustion seal.
Pro Tip: Never reuse a spark plug crush washer. Once compressed, it loses its springiness and cannot guarantee a proper seal a second time.
Step 3: Hand-Thread the Spark Plug All the Way
What you need: Spark plug socket, rubber-lined extension bar, and your bare hands.
Instructions: Insert the new spark plug into your magnetic or rubber-lined socket attached to an extension bar. Carefully lower it straight down into the plug well. Turn the extension counter-clockwise slightly until you feel the threads click into alignment, then turn it clockwise purely by hand. The plug should spin effortlessly with zero resistance. If you feel any binding or heavy friction, immediately back it out. Cross-threading an iron or aluminum engine head will destroy the threads and require an expensive helical insert repair.
Pro Tip: Never attach a ratchet handle during this initial phase. Using your bare hand on the extension guarantees you can feel if the threads are catching smoothly.
Step 4: Bring the Plug to the Fully Seated Position
What you need: A standard ratchet or breaker bar attached to your spark plug socket.
Instructions: Once the spark plug is hand-threaded as far as it will comfortably go, attach your ratchet. Continue turning the ratchet clockwise slowly and gently until you feel a sudden, distinct increase in resistance. This moment indicates that the spark plug has bottomed out—meaning the crush washer has made full, flat contact with the cylinder head seating surface, or the tapered seat has locked into place. Stop turning immediately the exact moment you feel this solid resistance wall.
Pro Tip: Pay close attention here. Stopping at the exact point of seating is the vital baseline reference point for calculating your final turns.
Step 5: Execute the Correct Additional Turn Rotation
What you need: A visual reference point on your ratchet handle.
Instructions: Now that your spark plug is fully seated, you must apply the final tightening rotation based on its design. For a brand new spark plug with a crush washer in a standard aluminum head, rotate the ratchet between 1/2 to 2/3 of a full turn (180 to 240 degrees). If you are installing a plug with a flat gasket that has already been compressed once, or a tapered seat plug, a mere 1/16 to 1/8 of a turn is required. Visualize a clock face to track your rotation accurately from your stopping point.
Pro Tip: Never guess this step. Over-tightening an aluminum cylinder head can strip the threads completely, while under-tightening can cause the plug to blow out under compression.
Step 6: Reconnect Ignition Components and Test
What you need: Ignition coils or spark plug wires, dielectric grease (optional).
Instructions: With all your spark plugs securely tightened to the proper rotational spec, it is time to reverse the disassembly process. Apply a tiny dab of dielectric grease inside the rubber boot of your ignition coil or spark plug wire to prevent moisture intrusion and ease future removals. Push the coil or wire straight down onto the top terminal of the spark plug until you hear or feel a distinct positive click. Reinstall any retaining bolts, plug in electrical harnesses, and start the engine to verify smooth idle performance.
Pro Tip: Listen carefully to the engine upon startup. A ticking sound or rough idle often indicates a loose spark plug leaking compression or a poorly seated ignition boot.
✅ Final Checklist
- All spark plug wells verified clean and free of debris
- Every plug hand-threaded smoothly without cross-threading
- Plugs turned precisely to the correct seating angle (1/2 to 2/3 turn for new crush washers)
- Ignition coils or spark plug wires firmly clicked into place
- Engine tested for smooth idling and normal acceleration
Important Notes:
- Always allow the engine to cool completely before working on spark plugs to avoid burns and damaged head threads.
- Seek professional mechanic assistance if you feel abnormal resistance while hand-threading or suspect a stripped cylinder head.
- Estimated time: 45 to 90 minutes. Cost: $0 (using standard tools you already own, minus the cost of new spark plugs).
How to Clean the Spark Plug Port and Seat the Plug by Hand
Before you even touch a ratchet, preparation dictates whether your installation succeeds. Dirt, carbon buildup, and old debris prevent the plug from seating squarely against the cylinder head.
Cleaning the Port and Checking Threads
Take a few moments to inspect the work area before dropping the new plug into place. Debris trapped in the port creates a false sense of tightness.
- Blow out any loose dirt or oil from the spark plug well using compressed air
- Inspect the internal threads for visible damage, carbon, or old anti-seize residue
- Ensure the mating surface deep inside the port is flat and smooth
Seating the Plug Correctly by Hand
You must always thread the spark plug into the cylinder head entirely by hand. Using a wrench from the very start risks cross-threading the soft aluminum.
- Place the spark plug into your socket extension so you can guide it smoothly down the well.
- Turn the extension counterclockwise until you feel the plug drop slightly into the thread lead.
- Rotate the extension clockwise with your fingertips, ensuring it spins with zero resistance.
- Continue turning by hand until the washer or tapered seat makes firm contact with the cylinder head.
Step-by-Step Guide on How to Tighten Spark Plug Without Torque Wrench
Executing the turn-of-the-wrench method requires precision and a clean engine bay. Mechanics emphasize starting every spark plug thread entirely by hand to prevent cross-threading the aluminum cylinder head.
Step 1: Clean and Prepare the Port
Ensure the spark plug well is free of debris, oil, and dirt before installation. Debris trapped on the seating surface prevents proper sealing and alters the final compression angle.
Step 2: Hand-Thread the Spark Plug
Screw the spark plug into the cylinder head using only your fingers or an extension bar without the ratchet attached. If you encounter heavy resistance immediately, back it out and restart to avoid stripping the threads.
Step 3: Apply the Crush Washer Rule
- For a brand new spark plug with a crush washer, use a ratchet to turn it until the gasket makes firm contact with the cylinder head face.
- From that exact contact point, turn the plug an additional 90 degrees (1/4 turn) for a 14mm thread size, or 1/2 to 2/3 turn for a 10mm or 12mm thread size.
- For tapered-seat spark plugs (common in many modern vehicles), turn only 1/16 of a turn past finger-tight, as excessive force ruins the seal.
What If It Still Feels Too Loose or Doesn’t Seat Correctly
Even without specialized digital tools, installation errors occasionally occur. If the plug spins freely, feels spongy, or fails to torque down, address the issue immediately before starting the engine.
- Inspect for stripped threads: If the plug keeps turning without tightening, the cylinder head threads may be damaged. A professional mechanic can install a thread repair insert (such as a Helicoil) with repair costs typically ranging from $150 to $350 depending on engine accessibility.
- Verify the crush washer: Check if an old crush washer was left inside the spark plug port. Stacking two washers prevents proper seating and causes compression leaks.
- Check the plug reach: Ensure the replacement part matches the exact thread length and pitch specified in your vehicle service manual. An incorrect reach prevents proper seating entirely.
- Seek professional assistance: If you suspect cracked cylinder head material or stripped threading, stop working immediately and have a certified technician tow or inspect the vehicle to avoid catastrophic engine damage.
Conclusion
Tightening a spark plug without a torque wrench relies on understanding thread pitch, crush washer dynamics, and the reliable quarter-turn rule. By avoiding over-tightening, you protect fragile aluminum engine threads from costly damage. According to verified research and automotive service data from leading manufacturers, precision hand-tightening remains a reliable roadside and garage technique when calibrated tools are unavailable. Take the next step by verifying your vehicle manual’s specific thread specifications before picking up your ratchet.
❓ Frequently Asked Questions
How many turns past finger-tight should a brand new spark plug be?
For a brand new spark plug equipped with a crush washer, you should turn it between 1/2 and 2/3 of a full rotation using a standard ratchet. This flattens the washer completely to create a proper gas-tight seal.
How do tapered seat spark plugs differ during installation?
Tapered seat spark plugs do not use crush washers and rely on a metal-to-metal conical seal. Because of this design, they only require about 1/16 of a turn past finger-tight.
Why is it dangerous to use a breaker bar when tightening spark plugs?
Breaker bars provide excessive mechanical leverage that makes it far too easy to exceed safety limits and strip the cylinder head threads. Always use a standard-length ratchet or a simple socket extension by hand.
How can a permanent marker help when installing spark plugs without a torque wrench?
You can make a small reference mark on the edge of the socket and a corresponding mark on the engine valve cover once the plug reaches finger-tight. This allows you to visually track exact fractions of a turn like 1/4 or 1/2.
Should the engine be hot or cold when replacing spark plugs?
Always change and tighten spark plugs when the engine is completely cold to prevent stripping the delicate aluminum threads in the cylinder head, which expand when hot.
What should I do if the spark plug feels gritty while screwing it in?
Stop immediately and back the plug out. A gritty feeling indicates carbon buildup or dirt in the threads, which requires cleaning with a thread chaser before attempting installation again.