Do You Need an Alignment After Replacing CV Axle 2026 Guide
Whether you need a wheel alignment after a CV axle replacement depends entirely on which suspension components were disconnected during the repair. If bolts tied to the steering knuckle, strut, or ball joints were loosened or removed, steering geometry will shift, making an alignment essential to prevent rapid tire wear and a crooked steering wheel.
The short answer is: not always, but most of the time, yes. While unbolting and sliding out a front-constant velocity axle does not strictly require you to alter your steering geometry on paper, the practical reality of modern auto repair in 2026 says otherwise. Because mechanics must frequently disconnect suspension components to free the old shaft, your wheel angles often shift.
Skipping this step to save a quick $100 to $150 at the shop can quietly destroy a pair of front tires within a few thousand miles. If your steering feels slightly off, or if your steering knuckle had to be completely uncoupled from the strut assembly during the repair, you cannot afford to skip an alignment check.
Key Takeaways
- Disconnecting suspension knuckles or struts during axle removal always requires a wheel alignment.
- A crooked steering wheel or vehicle pulling indicates shifted steering geometry.
- Skipping a necessary alignment leads to rapid, uneven tire wear and ruined tread.
- Replacing an axle without disturbing suspension bolts means you can safely skip the alignment.
- Check vehicle tracking immediately after the repair on a flat, straight road.
What Causes Steering Misalignment After a CV Axle Replacement
Suspension Disassembly and Shifted Bolts
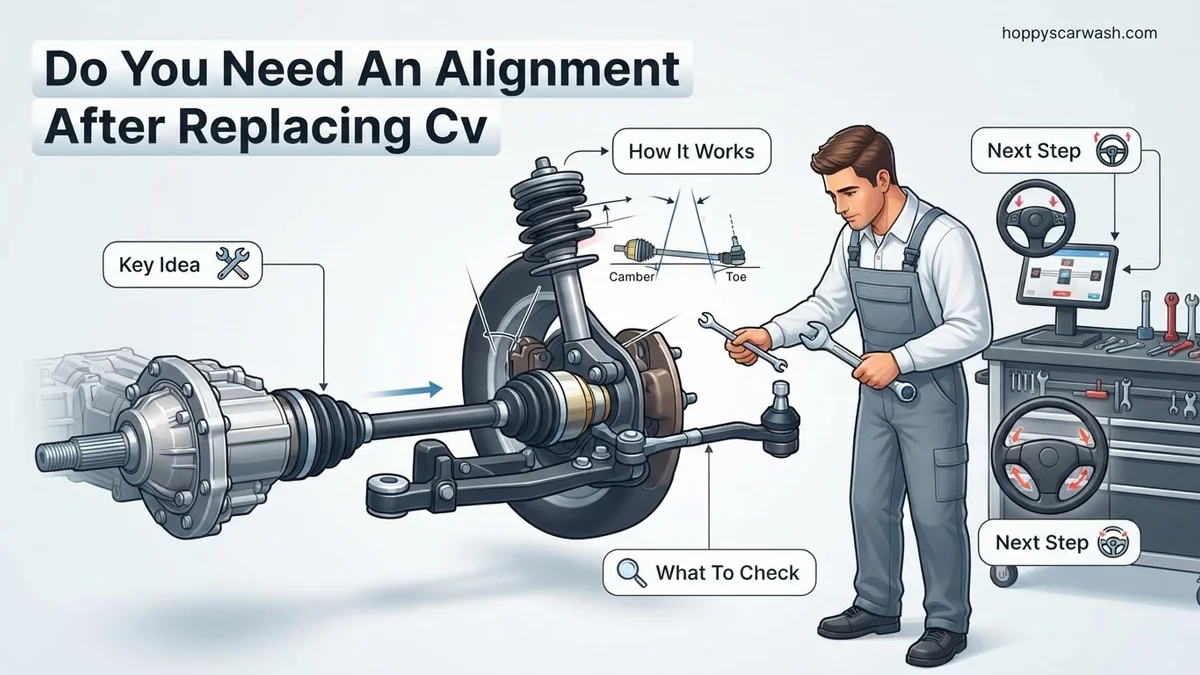
To pull an old CV axle out of the transmission and wheel hub, a technician rarely gets lucky enough to just slide it past the suspension. Most modern vehicles require dropping the lower control arm, popping the lower ball joint, or completely unbolting the strut assembly from the steering knuckle. When these parts go back together, even minor shifts in bolt holes can alter your camber and toe settings. If your repair invoice lists suspension disassembly, your alignment angles have almost certainly moved.
Subframe Loosening and Factory Tolerances
On certain front-wheel-drive and all-wheel-drive platforms, mechanics must slightly lower the engine subframe to gain clearance for the inner CV joint housing. Any time a subframe moves—even by a millimeter—the entire spatial geometry of your front wheels changes relative to the rear thrust angle. Modern 2026 alignment specifications leave zero margin for error, meaning factory tolerances will be thrown off once that subframe is re-torqued.
CV Axle Replacement Alignment: What Causes It and How to Fix It
Replacing a Constant Velocity (CV) axle is a common repair for front-wheel drive and all-wheel drive vehicles, but it often leaves DIY mechanics and car owners wondering whether a wheel alignment is strictly necessary afterward. This comprehensive guide walks you through the mechanical realities of front-end suspension work, helping you understand how steering geometry is affected during the axle swap and providing a clear, actionable plan to determine if your vehicle requires professional alignment adjustments to prevent premature tire wear and pulling issues.
Step 1: Understand How the CV Axle Interacts with Suspension Geometry
What you need: Basic knowledge of automotive steering components and a service manual for your specific vehicle make and model.
Instructions: Before picking up a wrench, you must understand why an axle replacement sometimes impacts your alignment. When you remove a CV axle, you typically have to disconnect suspension or steering components such as the lower ball joint, outer tie rod end, or strut-to-knuckle bolts. Disconnecting these components alters the exact position of the steering knuckle and wheel hub. Even a microscopic shift in these mounting points changes your camber, toe, and caster angles. Front-wheel-drive vehicles are particularly sensitive to toe alignment changes, meaning even slight disturbances during the axle extraction and insertion process can throw off your straight-line tracking.
Pro Tip: Never assume that putting bolts back in the exact same visual spot guarantees factory alignment tolerances; minor manufacturing tolerances in bolt hole clearances allow for slight shifts.
Step 2: Inspect and Disconnect the Suspension Components Safely
What you need: Floor jack, jack stands, wheel chocks, socket set, breaker bar, and a torque wrench.
Instructions: Secure your vehicle on sturdy jack stands and remove the front wheels. To pull the old CV axle out of the transmission and wheel hub, you will likely need to unbolt the lower control arm from the steering knuckle or separate the outer tie rod. As you disassemble these parts, pay meticulous attention to factory alignment cams or eccentric bolts if your vehicle is equipped with them. Mark the exact orientation of these bolts using a paint pen or a chisel scratch before loosening them. Keeping track of these original positions will help maintain your baseline alignment settings as closely as possible during reassembly.
Pro Tip: Taking high-resolution reference photos with your smartphone before loosening any suspension hardware can save you hours of guesswork later.
Step 3: Complete the CV Axle Swap Carefully
What you need: New CV axle assembly, pry bar, hammer, gear oil (if manual or differential fluid loss occurs), and clean rags.
Instructions: Remove the old axle by popping it out of the transaxle using a brass drift or specialty pry bar, and slide it out of the wheel hub spline. Slide the new axle into place, ensuring the internal circlip clicks securely into the transmission differential to prevent fluid leaks or dislodgement. Reconnect the suspension components you removed in Step 2. Torque all suspension bolts to manufacturer specifications while the suspension is loaded (if possible) or using standard torque sequences. Ensure that cotter pins and locking nuts are securely fastened before moving on to the next phase of the repair.
Pro Tip: Be extremely careful not to damage the rubber boots on your new CV axle against sharp suspension edges during installation, as a torn boot leads to immediate joint failure.
Step 4: Perform a Manual Post-Installation Inspection
What you need: Flashlight, measuring tape, and a clear, flat driveway or empty parking lot.
Instructions: Lower the vehicle back to the ground and torque your wheel lug nuts to the proper specification (typically 80-100 lb-ft for passenger cars). Before taking the car out on a high-speed road test, conduct a visual inspection of the front wheels. Look down the side of the vehicle to check for any glaring “toe-in” or “toe-out” misalignment. Next, roll the vehicle forward and backward slowly for about 20 feet to allow the suspension bushings and steering components to settle completely into their resting positions after being jacked up.
Pro Tip: If your steering wheel is visibly crooked by more than 5 degrees when the front wheels are pointing straight ahead, your alignment has definitely been altered.
Step 5: Conduct a Controlled Test Drive
What you need: A safe, low-traffic road with smooth pavement and varying speeds up to 50 MPH.
Instructions: Take your car for a careful test drive. Pay close attention to how the vehicle handles. Does it pull hard to the left or right when you gently let go of the steering wheel on a flat road? Does the steering wheel return freely to the center position after completing a turn? Listen for any clunking, binding, or scraping sounds from the front end. If the car tracks straight and true, and the steering wheel remains centered, your alignment may still be within acceptable tolerances, though a professional check is still recommended as preventive maintenance.
Pro Tip: Strong crosswinds or heavily crowned roads can mimic alignment pull, so test your vehicle in both directions on the same stretch of road to get an accurate assessment.
Step 6: Evaluate Tire Wear Patterns Over the Next Week
What you need: Tread depth gauge, flashlight, and a keen eye for rubber textures.
Instructions: Even if the car drives relatively straight, micro-adjustments in your front suspension can cause rapid, uneven tire wear. Over the first week or roughly 100 miles of driving following your CV axle replacement, inspect the inner and outer edges of your front tires. Run your hand across the tread blocks from front to back; if you feel a sharp “feathering” or scalloped texture (often called cupping), your toe or camber is off. Catching this early prevents you from ruining a brand-new set of tires over a misaligned front end.
Pro Tip: Feathered tread edges indicate that the tires are scrubbing sideways as they roll, which drastically reduces tire lifespan.
Step 7: Schedule a Professional Wheel Alignment
What you need: Local trusted alignment shop, appointment scheduling, and a budget of $80 to $150.
Instructions: If you had to unbolt the strut, lower control arm, or steering knuckle during your axle replacement, the golden rule of automotive repair is to get a professional wheel alignment. Drive your vehicle to a reputable alignment shop that utilizes a computerized laser alignment rack. Inform the technician that a CV axle was recently replaced and specify which suspension components were unbolted. The technician will adjust your toe, camber (if adjustable), and caster back to exact factory specifications, ensuring optimal handling, maximum fuel efficiency, and even tire wear for thousands of miles to come.
Pro Tip: Many national tire and alignment chains offer lifetime alignment packages, which can pay for themselves if you plan on keeping your vehicle long-term.
✅ Final Checklist
- All suspension bolts, ball joints, and tie rod ends torqued to factory specifications
- CV axle securely seated in transmission and wheel hub with no fluid leaks
- Wheel lug nuts torqued to exact manufacturer specifications
- Test drive completed with no abnormal steering pull or strange vibrations
- Professional computerized alignment performed to protect tire investment
Important Notes:
- Always support the vehicle securely with rated jack stands; never work under a vehicle supported only by a hydraulic floor jack.
- If you lack the specialized tools required to torque suspension fasteners under a loaded load, seek professional assistance immediately.
- Estimated professional alignment cost ranges from $80 to $150, taking approximately 45 to 60 minutes to complete.
How to Determine If You Actually Need an Alignment
Visual and Tactile Driving Cues
You do not have to guess whether your alignment survived the repair. Take your car out onto a safe, straight stretch of road and pay close attention to how it handles. Key warning signs include:
- The steering wheel sits crooked when your front tires are pointing perfectly straight ahead.
- Your vehicle continuously pulls or drifts to the left or right the moment you let go of the wheel.
- The steering wheel feels loose, lazy, or fails to snap back to center efficiently after completing a turn.
Tire Wear and Professional Measurement
Sometimes the misalignment is too subtle to feel through the steering wheel, but it will aggressively chew up your rubber. Inspect the inner and outer tread blocks of your front tires one week after the axle replacement. If you spot feathering, cupping, or rapid edge wear, your toe angle is out of spec. If you cannot spot these physical clues, a local alignment shop can easily throw your car onto a laser alignment rack in 2026 to verify if your thrust angles are still within factory safety limits.
How to Fix Alignment Issues and Reset Steering Geometry
When an alignment is required following a CV axle replacement, professional technicians follow a strict protocol to restore factory steering geometry. Skipping these steps can lead to rapid tire wear and unsafe vehicle handling on 2026 roadways.
Step-by-Step Alignment Correction
- Inspect suspension components: Mechanics evaluate the ball joints, tie rod ends, and control arm bushings for wear before touching alignment adjusters.
- Mount laser sensors: High-definition optical sensors attach to all four wheels to measure camber, caster, and toe angles in real time.
- Adjust the front toe: Because the outer tie rod must be disconnected to remove the CV axle, the technician recalibrates the front toe setting to match manufacturer specifications.
- Center the steering wheel: The steering column is locked into a dead-center position while adjustments are made to the tie rod sleeves.
- Perform a road test: A final test drive verifies that the vehicle tracks straight and the steering wheel returns smoothly to center.
According to suspension specialists, correcting the front toe after a half-shaft repair usually takes between 30 to 60 minutes on a modern alignment rack.
What If Your Car Still Pulls After Getting an Alignment?
If your vehicle continues to pull to one side or exhibits steering vibration even after a post-repair alignment, underlying mechanical issues may be present. Modern chassis systems require meticulous troubleshooting when standard adjustments fail.
Troubleshooting Persistent Steering Pull
- Check for a defective replacement part: A remanufactured CV axle with an improperly balanced shaft can introduce high-speed vibrations that mimic alignment problems.
- Inspect tire wear and pressure: Unevenly worn tire treads or a shifted internal belt can cause a vehicle to pull, even with perfect alignment specs.
- Evaluate the steering rack: Internal damage or binding within the electronic or hydraulic power steering rack can prevent the wheels from centering correctly.
- Consult professional suspension shops: If DIY troubleshooting yields no results, take the vehicle to a certified alignment specialist for a diagnostic check. Professional diagnostic fees typically range from $100 to $200.
Conclusion
While replacing a CV axle does not automatically throw off a vehicle’s geometry, the required removal of the outer tie rod frequently necessitates a front-end alignment. Addressing this maintenance item promptly protects your tires from premature wear and ensures predictable handling. According to verified research and automotive engineering data from major manufacturers, scheduling a professional toe adjustment immediately after half-shaft service preserves optimal steering control. As a final next step, check your tire tread depth and schedule an alignment check if you notice any steering pull.
❓ Frequently Asked Questions
Why would a CV axle replacement affect my wheel alignment?
Mechanics often have to disconnect components like the lower ball joint, outer tie rod, or strut assembly to pull the old axle out of the steering knuckle. Disturbing these fasteners changes the camber and toe angles, which alters your vehicle’s tracking.
Can a mechanic swap a CV axle without messing up the alignment?
In some vehicle designs, technicians can pop the axle out of the transmission and wheel hub by only removing the axle nut and minor hardware, leaving the core suspension geometry untouched. If no suspension alignment bolts were loosened, an alignment is technically unnecessary.
What are the long-term consequences of skipping an alignment?
If your steering geometry shifted during the repair and you neglect an alignment, your tires will experience feathering, cupping, or severe edge wear. This drastically shortens tire lifespan and hurts fuel economy.
How long should I wait after a CV axle replacement to get an alignment?
You should get an alignment as soon as possible after the repair, preferably on the same day. Driving for extended periods with misaligned wheels leads to irreversible tire damage.
Will a bad CV axle itself cause my car to pull?
Generally, a worn CV axle causes clicking, popping, or severe vibrations during acceleration rather than pulling. If your car pulls significantly, it usually points to a suspension or alignment issue.
Should I get a two-wheel or four-wheel alignment after the repair?
Since CV axles are front-wheel drive components, a front-end alignment is usually sufficient. However, if your vehicle has an independent rear suspension that utilizes adjustable control arms, a four-wheel alignment ensures maximum stability.