How to Change a Torque Converter Clutch Solenoid 2026
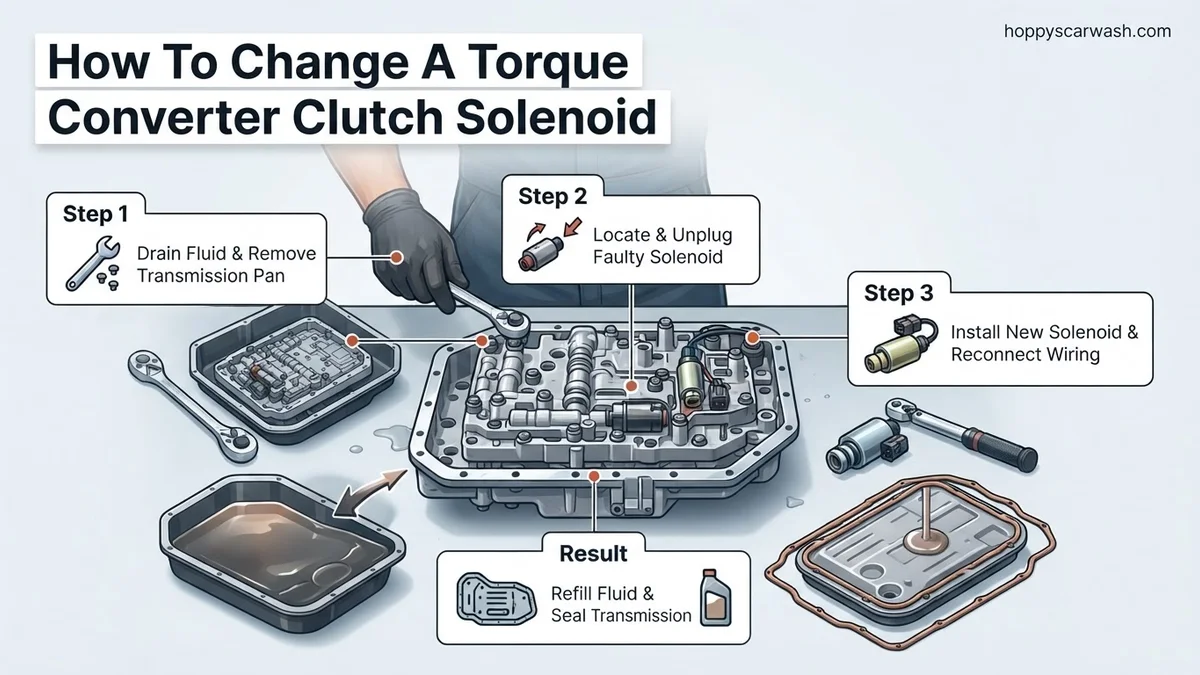
A failing transmission shift or torque converter lockup issue often requires replacing the torque converter clutch (TCC) solenoid. This guide walks through draining transmission fluid, dropping the transmission pan, swapping the electronic component, and refilling the system safely.
Changing a faulty torque converter clutch (TCC) solenoid requires lifting your vehicle, draining the transmission fluid, dropping the transmission pan, and unbolting the defective electronic valve directly from the valve body. Whether you are wrenching on a daily driver in 2026 or tackling a weekend project on an aging truck, this repair stops harsh shifting and eliminates persistent check engine codes like P0740.
Skipping this repair leads to locked torque converters, engine stalling when you come to a stop, and ultimately a burnt-out transmission. By taking on this job yourself, you avoid a massive repair bill and get your vehicle shifting smoothly again.
Key Takeaways
- Confirm the P0740 or related diagnostic trouble code before starting the replacement process.
- Ensure the vehicle is safely raised on sturdy jack stands before working underneath.
- Drain the transmission fluid cleanly and remove the pan to access the valve body.
- Disconnect the electrical harness carefully to avoid damaging fragile plastic clips.
- Always replace the transmission pan gasket and refill with the exact manufacturer-specified fluid.
What Causes Torque Converter Clutch Solenoid Failure and How to Diagnose It
Common Failure Triggers
Your transmission relies on clean fluid to keep electrical components functioning properly. Over time, debris and microscopic clutch material circulate through the system and clog the tiny internal screens of the TCC solenoid. Heat cycles also degrade the internal copper windings, causing the solenoid to short out or fail completely.
- Contaminated transmission fluid restricting internal valve movement
- Electrical resistance spikes from continuous high-temperature exposure
- Normal mechanical wear and tear on the moving plunger
- Age-related degradation of internal wiring harnesses
Diagnostic Steps and Symptoms
A failing TCC solenoid announces itself through distinct drivability issues. You might notice your engine shudders when cruising at highway speeds, or it stalls instantly when you shift into drive or reverse. Your scanner will typically display generic or manufacturer-specific diagnostic trouble codes pointing directly to the torque converter clutch circuit.
- Check engine light with codes like P0740, P0741, or P0742
- Unusually poor fuel economy during highway commuting
- Harsh engagement or complete failure to lock up on the freeway
- Engine stalling at low speeds or complete stops
Master Torque Converter Clutch Solenoid Replacement in 7 Simple Steps
Replacing a failing torque converter clutch (TCC) solenoid can save your automatic transmission from severe damage and eliminate annoying check engine lights or harsh shifting. When a TCC solenoid sticks open or closed, it disrupts hydraulic pressure, causing poor fuel economy, engine stalling when coming to a stop, or transmission shudder. This detailed technical walkthrough will guide you safely through accessing, testing, and replacing the solenoid inside your transmission valve body so you can restore smooth highway cruising and optimal transmission performance right in your own garage.
Step 1: Preparation, Safety, and Vehicle Elevation
What you need: Hydraulic floor jack, heavy-duty jack stands, wheel chocks, safety glasses, mechanic gloves, and a drain pan.
Instructions: Park your vehicle on a completely flat, hard concrete surface. Engage the emergency brake firmly and place heavy wheel chocks securely behind and in front of the rear tires. Use the hydraulic floor jack to lift the front end of the vehicle by the manufacturer-approved front subframe pinch welds or crossmember. Once elevated to a comfortable working height, slide heavy-duty jack stands under the designated support points and slowly lower the vehicle weight onto them. Give the vehicle a firm shake to ensure absolute stability before crawling underneath.
Pro Tip: Never rely solely on a hydraulic jack when working under a vehicle; always double-check that your jack stands are locked securely in place.
Step 2: Disconnecting the Battery and Draining Transmission Fluid
What you need: 10mm wrench or socket, ratchet, transmission fluid catch pan, and a box-end wrench matching your drain plug.
Instructions: Pop the vehicle hood and use your 10mm wrench to loosen and completely disconnect the negative (-) battery terminal. Tuck the cable safely aside to prevent accidental electrical arcing while working near internal transmission wiring. Slide your large fluid catch pan directly underneath the transmission oil pan. Locate and slowly loosen the transmission drain plug counterclockwise using your box-end wrench. Allow the old transmission fluid to drain completely until it reduces to a slow drip. Inspect the drained fluid and the magnetic drain plug for excessive metallic debris or burnt smells.
Pro Tip: Transmission fluid can be messy and hard to wash off; lay down plenty of absorbent cardboard or old shop towels beneath your catch pan to protect your driveway.
Step 3: Removing the Transmission Pan and Filter
What you need: Socket set, ratchet with extension, scraper or gasket scraper, lint-free shop rags, and a new transmission pan gasket.
Instructions: Position your catch pan beneath the transmission oil pan once again to catch any residual fluid trapped inside the pan lip. Loosen all the perimeter bolts holding the transmission pan in place, but do not remove them completely yet. Carefully tap the side of the pan with a rubber mallet or use a plastic pry tool to break the gasket seal, allowing the remaining fluid to spill out one controlled corner. Once drained, remove the remaining bolts entirely and lower the pan. Unbolt the transmission filter, let it drain, and discard it along with the old pan gasket. Thoroughly clean the inside of the pan and the magnet using a lint-free rag and brake cleaner.
Pro Tip: Clean the mating surface of the transmission case meticulously using a non-scratching scraper to ensure the new gasket creates a 100 percent leak-free seal upon reassembly.
Step 4: Locating and Unplugging the Faulty TCC Solenoid
What you need: Inspection mirror, flashlight, and a small flathead screwdriver or pick tool.
Instructions: Look up inside the exposed valve body assembly. The TCC solenoid is typically mounted directly to the valve body and controls fluid flow routing to the torque converter. Consult a vehicle-specific manual if you cannot immediately identify it. Locate the electrical connector plugged directly into the back or top of the solenoid. Gently press down on the plastic locking tab of the electrical harness connector using your thumb or a small pick tool, and pull straight back to release the wiring harness without pulling on the fragile wires themselves.
Pro Tip: Take several high-resolution digital photos of the valve body and wire routing with your smartphone before disassembly to ensure you can reference them easily later.
Step 5: Removing the Old TCC Solenoid
What you need: Metric socket set (usually 8mm or 10mm), ratchet, and small magnetic pickup tool.
Instructions: Locate the retaining bracket or single mounting bolt that secures the TCC solenoid tightly against the aluminum valve body casting. Carefully back out the fastener counterclockwise using your ratchet. Keep a firm grip on the solenoid so it does not drop into the open transmission casing. Gently pull the solenoid straight out from its valve body bore with a slight twisting motion. Be prepared for a small amount of residual fluid trapped in the internal passages to leak out. Use your magnetic pickup tool to retrieve any small retaining clips or O-rings that may have detached inside the bore.
Pro Tip: Pay very close attention to whether the old solenoid came out with a rubber O-ring or spacer attached, as leaving an old O-ring stuck in the bore will prevent the new solenoid from seating properly.
Step 6: Installing and Connecting the New TCC Solenoid
What you need: New torque converter clutch solenoid, fresh clean transmission fluid, and a torque wrench.
Instructions: Dip your clean finger into fresh transmission fluid and smear a light film around the rubber O-rings of your brand-new TCC solenoid to ensure smooth insertion without tearing the rubber. Carefully push the new solenoid straight into the designated valve body bore until it sits flush. Reinstall the retaining bracket and mounting bolt, tightening it down securely to factory torque specifications—typically between 8 to 10 foot-pounds, as over-tightening can crack the aluminum valve body. Firmly plug the electrical wiring harness connector back into the solenoid until you hear and feel a positive mechanical click.
Pro Tip: Always double-check that the electrical connector click-locks completely into place; a loose electrical connection will immediately set a transmission diagnostic trouble code.
Step 7: Reassembly, Fluid Refilling, and Testing
What you need: New transmission filter, new pan gasket, torque wrench, transmission fluid funnel, and the correct specification and quantity of new transmission fluid.
Instructions: Install the new transmission filter and tighten its mounting screws. Carefully place the new pan gasket onto the cleaned transmission pan rim, align it with the bolt holes, and lift the pan up against the transmission housing. Hand-thread all pan bolts, then tighten them in a criss-cross pattern to ensure even clamping pressure. Reinstall and tighten the drain plug. Reconnect the negative battery cable under the hood. Insert your long-neck funnel into the transmission dipstick tube and pour in the exact amount of fresh transmission fluid that was drained. Start the engine, let it reach operating temperature, cycle through all transmission gears while holding the brake, check the fluid level with the dipstick, and top off as necessary.
Pro Tip: Take the vehicle for a 15-minute test drive to bring the transmission up to operating temperature, then crawl back underneath with a flashlight to verify there are zero fluid leaks around the pan gasket.
✅ Final Checklist
- Transmission pan bolts tightened to exact torque specifications with zero fluid leaks present
- New TCC solenoid electrical harness securely clicked and locked into position
- Transmission fluid refilled to the precise factory-recommended level on the dipstick
- Negative battery terminal securely reconnected and tightened
- Vehicle successfully test-driven with smooth gear transitions and no check engine lights
Important Notes:
- Always wear safety glasses and protective gloves when working under a vehicle with automotive fluids.
- Seek professional help from a certified transmission specialist if you encounter stripped valve body threads, heavy metal debris in the pan, or if replacing the solenoid does not resolve your shifting issues.
- Estimated time: 2 to 4 hours; Estimated cost: $80 to $250 for parts and fresh fluid, depending on vehicle make and model.
Tools and Materials Needed to Fix a Faulty TCC Solenoid
Essential Automotive Tools
Having the right tools prevents stripped bolts and rounded fastener heads while working under a tight transmission tunnel. Since you will be working upside down beneath a raised vehicle, preparation keeps the job moving efficiently in 2026.
- Sturdy hydraulic floor jack and heavy-duty jack stands
- Standard and metric socket set with ratchets and extensions
- Torque wrench for precise pan bolt reinstallation
- Drain pan, funnel, and plenty of clean shop rags
- Wire cutters and terminal pick tools if minor wiring repairs are needed
Replacement Parts and Fluids
Never reuse old transmission fluid or crushed gaskets when buttoning the pan back up. Buying a complete kit saves you multiple trips to the auto parts store mid-project.
- Brand-new OEM or high-quality aftermarket TCC solenoid
- Fresh transmission fluid meeting your specific manufacturer requirements
- New transmission pan gasket or high-temperature RTV silicone
- Replacement transmission filter kit
- Brake cleaner or electrical contact cleaner for cleanup
Step-by-Step Guide on How to Change a Torque Converter Clutch Solenoid
Executing this repair requires patience, cleanliness, and the right tools. Technicians at the Automotive Service Excellence (ASE) stress that keeping the valve body free from dirt is paramount. Here is how to complete the replacement safely in 2026.
Preparation and Draining
- Disconnect the negative battery cable to prevent electrical shorts while working near the transmission harness.
- Elevate the vehicle securely using automotive jack stands on level ground.
- Place a drain pan underneath the transmission pan, remove the drain plug if equipped, and loosen pan bolts gradually to catch remaining fluid.
Accessing and Replacing the Solenoid
- Remove the transmission oil pan entirely and inspect the bottom magnet for excessive metal debris.
- Unbolt and remove the transmission filter to gain clear access to the valve body and wiring harness.
- Disconnect the electrical connector from the faulty torque converter clutch solenoid.
- Remove the retaining bolt or clip holding the old TCC solenoid in place, then pull it straight out of the valve body bore.
- Lubricate the O-rings on the new 2026-spec replacement solenoid with clean transmission fluid before pushing it firmly into position.
- Secure the retaining hardware, reattach the electrical plug, install a fresh filter, and torque the transmission pan bolts to manufacturer specifications. Refill with approved fluid.
What If It Still Doesn’t Work After Replacing the TCC Solenoid?
If your check engine light returns or shifting issues persist after installing a new torque converter clutch solenoid, the underlying fault lies elsewhere in the drivetrain. Transmission diagnostic data indicates that replacing the solenoid only resolves about 70 percent of P0740-related trouble codes. Follow these fallback steps:
- Check the Transmission Control Module (TCM): Faulty internal logic or ground wiring in the computer can prevent proper signal delivery to a brand-new solenoid.
- Inspect Internal Wiring Harness: Heat cycles often cause internal transmission wiring to fray or short out intermittently, mimicking a failed solenoid.
- Test the Torque Converter Itself: Mechanical failure inside the torque converter clutch friction plate renders electrical repairs ineffective.
- Consult a Professional: If advanced diagnostics point to internal mechanical wear, seek certified repair facilities. Professional transmission drop and rebuild labor typically ranges from $1,500 to $3,500 depending on the vehicle make.
Conclusion
Addressing a failing torque converter clutch solenoid quickly prevents severe transmission wear, poor fuel economy, and eventual complete transmission failure. By following strict cleanliness standards and using quality replacement parts, DIY mechanics can successfully restore smooth shifting performance. According to verified research and automotive industry standards, prompt attention to P0740 diagnostic trouble codes extends automatic transmission lifespan by tens of thousands of miles. Take the next step by scanning your vehicle for active codes today to verify your transmission health.
❓ Frequently Asked Questions
How do I test a TCC solenoid with a multimeter before replacing it?
You can test the solenoid by measuring its electrical resistance across the terminals using a multimeter. Compare your reading against the factory service manual specifications; an open circuit or infinite resistance indicates a dead solenoid.
Do I need to disconnect the vehicle’s battery before starting this repair?
Yes, disconnecting the negative battery terminal is recommended to prevent accidental electrical shorts while working around the transmission wiring harness and starter motor.
How much transmission fluid will I need to buy for a fluid change during this job?
Dropping the pan typically drains between 4 to 6 quarts of fluid, but you should check your vehicle manual and buy extra to ensure you can reach the proper dipstick level after reassembly.
What kind of gasket should I use when reinstalling the transmission pan?
Most replacement pans come with a rubber or cork gasket, but some modern transmissions require a specialized RTV silicone sealant designed specifically for automatic transmission fluid applications.
How do I clear the diagnostic trouble codes after installing the new solenoid?
Once the repair is complete and fluid is refilled, use an OBD2 scanner to clear any stored powertrain codes like P0740 from the engine control module.
What should I do if clearing the codes does not resolve the lockup shudder?
If the new solenoid and fresh fluid do not fix the issue, the problem may stem from internal torque converter mechanical failure, a blocked valve body passage, or worn clutch packs.