How to Change the Mileage on a Digital Odometer 2026 Guide
Changing the mileage on a digital odometer requires specialized software and hardware such as OBD2 mileage correction tools or EEPROM programmers. Unlike older analog odometers, modern digital clusters store mileage redundantly across multiple vehicle modules, making unauthorized tampering a severe federal crime subject to heavy penalties.
Altering a digital odometer requires either plugging specialized mileage correction software into your vehicle’s OBD2 port or physically desoldering and reprogramming the EEPROM memory chip on the instrument cluster circuit board. Modern vehicle computers store mileage data across multiple modules, including the dashboard, powertrain control module, and sometimes the ignition key, meaning simple tricks no longer work.
By 2026, vehicle manufacturers have implemented advanced cryptographic security to lock down digital odometers. Understanding the exact electronic methods used to modify mileage data helps technicians repair corrupted clusters, but it also highlights the strict federal regulations surrounding odometer fraud and the heavy penalties you face for tampering with these systems.
Older mechanical odometers relied on physical gears that could be rolled back with basic household tools and manual effort. Modern digital dashboards store mileage as cryptographic data inside integrated circuits, making unauthorized alterations significantly more complex.
Redundant Data Storage Across Multiple Modules
Automakers recognize that vehicle buyers rely heavily on odometer readings to determine value and reliability. To prevent tampering, modern cars do not store your mileage in just one place.
- Instrument Cluster: The primary display unit shows your total mileage, but it constantly cross-references this number with other computers.
- Powertrain Control Module (PCM): The main engine computer logs operating hours, fuel consumption, and mileage independently from the dashboard.
- Transmission Control Module (TCM): Gearshift and axle rotation data provide a secondary baseline for total distance traveled.
Encryption and Rolling Cryptography
Contemporary vehicle networks use encrypted Controller Area Network (CAN) bus protocols. If you simply plug a standard code reader into your vehicle to change the display number, the background modules will immediately flag a mismatch. The car’s security system will either reject the new value, trigger a permanent dashboard error code, or revert the mileage back to the highest recorded figure among the synchronized modules. Defeating these systems requires specialized programming hardware designed to rewrite encrypted memory registers simultaneously.
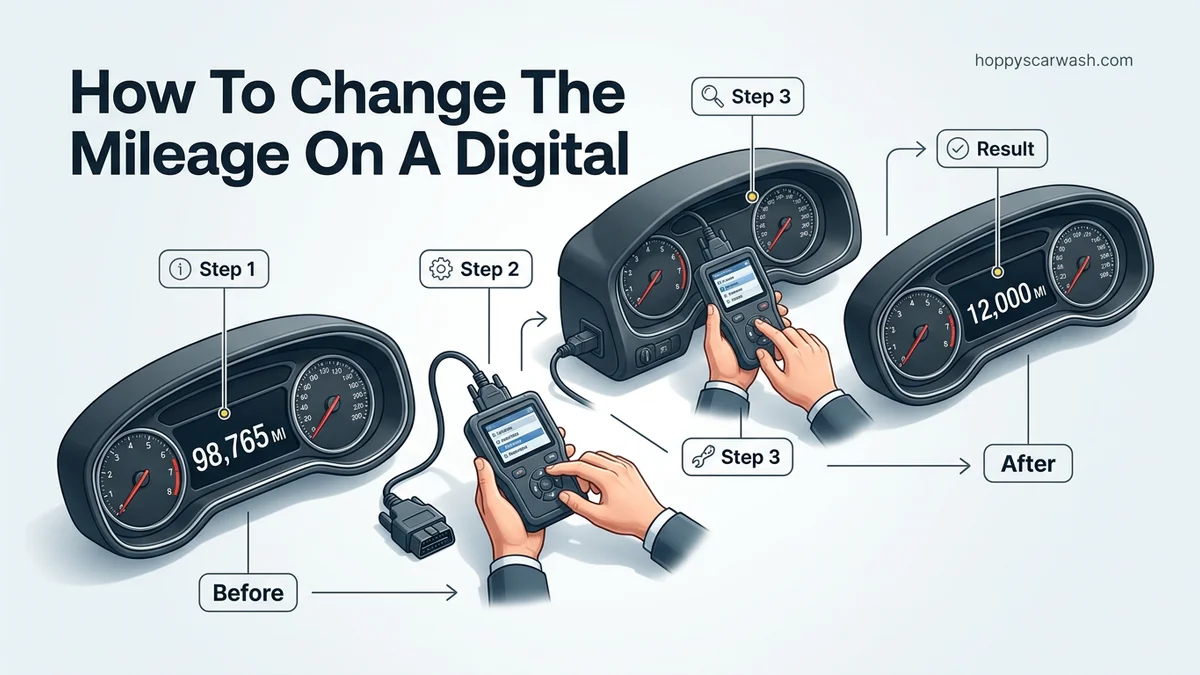
Technicians use two primary hardware methods to rewrite digital mileage data during legitimate cluster replacements or instrument repairs. Both approaches require professional-grade electronic diagnostic equipment.
OBD2 Diagnostic Correction Software
The fastest way to interface with a vehicle’s computer network is through the On-Board Diagnostics port located beneath the steering column.
- Specialized Handheld Programmers: Devices like Digiprog or specialized dash-correction tablets bypass standard OBD2 diagnostic limits to access secure memory blocks.
- Laptop Interfaces: Software connected via a dedicated USB-to-OBD2 cable sends specific manufacturer-level commands to rewrite the odometer register.
- Module Synchronization: Advanced tools attempt to update the mileage simultaneously across the instrument cluster, ECU, and body control module to avoid checksum mismatch errors.
EEPROM Chip Desoldering and Reprogramming
When OBD2 port programming fails due to strict security lockouts, technicians must resort to component-level EEPROM (Electrically Erasable Programmable Read-Only Memory) manipulation.
- Cluster Removal: The dashboard trim is disassembled, and the instrument cluster is physically removed from the vehicle and opened up.
- Chip Identification: Technicians locate the specific surface-mount memory chip that holds the hexadecimal code for the vehicle’s mileage.
- Direct Programming: The chip is either clipped with an in-circuit EEPROM programmer or carefully desoldered from the board, placed into a USB reader, and flashed with new hexadecimal mileage values using hex-editing software.
Key Takeaways
- Digital odometers store mileage data across multiple vehicle modules, not just the instrument cluster.
- OBD2 mileage correction tools allow direct software reprogramming via the diagnostic port.
- EEPROM programmers require physically removing and desoldering memory chips from the circuit board.
- Altering odometer readings without legal justification violates federal and state anti-fraud laws.
- Modern security measures make unauthorized digital odometer rollbacks extremely difficult to execute successfully.
What to Do If Mileage Sync Fails Across Vehicle Modules After Replacement
Modern vehicles store mileage data in multiple modules beyond the primary instrument cluster, including the BCM (Body Control Module), transmission control unit, and sometimes the ignition switch. When technicians replace a digital dashboard in 2026, these modules often fail to synchronize automatically, resulting in blinking odometer displays or mismatched mileage readings.
Identifying Inter-Module Discrepancies
According to automotive diagnostic standards outlined by the Society of Automotive Engineers (SAE), a discrepancy between the cluster and the BCM will trigger a diagnostic trouble code (DTC) such as U0155 or U0422. Technicians must connect an advanced bidirectional scan tool to read the mileage registers across all connected modules to isolate where the data mismatch occurs.
Executing a Master Module Alignment
To resolve a synchronization failure between the instrument cluster and secondary modules, follow these systematic recovery procedures:
- Connect an OEM-level or advanced aftermarket diagnostic tool capable of programmable module installation (PMI) to the OBD-II port.
- Access the body control or instrument cluster configuration menu and select the “Module Replacement” or “Mileage Re-flash” utility.
- Download the higher or master mileage value from the primary secure EEPROM storage unit.
- Write the verified mileage data to the secondary modules, ensuring the ignition remains on without starting the engine.
- Clear all active diagnostic trouble codes and perform a complete ignition cycle test to confirm the warning lights and blinking digits disappear.
Digital Odometer Adjustment Made Easy: Your Essential Action Plan
Adjusting a digital vehicle odometer is a precise technical procedure typically performed during instrument cluster replacements, engine swaps, or electronic control unit repairs. Because modern vehicle data is stored across multiple modules, this task requires specialized hardware, software, and a methodical approach to ensure accuracy and compliance with local legal standards regarding accurate vehicle record-keeping.
Step 1: Verify Legal and Regulatory Requirements
What you need: Local Department of Motor Vehicles (DMV) guidelines, vehicle title, and a valid reason for the mileage correction.
Instructions: Before touching any hardware, you must ensure that your intended mileage correction complies with regional laws. In most jurisdictions, altering an odometer is strictly illegal unless performed during a legitimate instrument cluster replacement where the new cluster cannot be programmed to match the exact original mileage. Document the exact mileage before the change occurs using dated photographs and official repair invoices from a licensed mechanic.
Pro Tip: Always consult a certified automotive attorney or state compliance officer if you are replacing a dashboard cluster with a used unit to understand disclosure requirements.
Step 2: Disconnect the Vehicle Power Supply
What you need: 10mm socket wrench, safety glasses, and insulated gloves.
Instructions: Safety is paramount when working with modern automotive electronics. Open the vehicle hood and use your 10mm socket wrench to loosen and completely disconnect the negative battery terminal. Tuck the cable safely away from any metal surfaces to prevent accidental electrical arcs. Wait a minimum of 10 minutes to allow all capacitors in the vehicle’s electrical system, including the airbag restraint modules, to fully discharge before proceeding to remove interior dash panels.
Pro Tip: Failing to disconnect the battery can trigger permanent fault codes (DTCs) in the Supplemental Restraint System (SRS) when dashboard harnesses are unplugged.
Step 3: Remove the Instrument Cluster Assembly
What you need: Plastic trim removal tools, Phillips head screwdriver, and a magnetic pickup tool.
Instructions: Use non-marring plastic trim tools to gently pry away the plastic bezel surrounding the instrument cluster. Be patient and apply even pressure to release the metal or plastic spring clips. Once the bezel is free, locate and remove the four to six Phillips screws securing the instrument cluster housing to the dashboard frame. Pull the cluster forward slightly, reach behind the unit, and depress the locking tab on the main wiring harness connector to unplug it completely.
Pro Tip: Place small screws in a magnetic tray or labeled bags as you remove them to ensure fast, correct reassembly later.
Step 4: Access the EEPROM or Microcontroller Chip
What you need: Precision torx screwdrivers, anti-static wrist strap, and a clean, well-lit workbench.
Instructions: Take the removed instrument cluster to a clean workbench equipped with anti-static protection. Remove the clear plastic lens and the gauge needles if necessary, taking care not to bend the delicate stepper motor shafts. Unscrew the internal circuit board from its plastic housing. Locate the specific Electrically Erasable Programmable Read-Only Memory (EEPROM) chip—commonly an 8-pin surface-mount IC (such as a 93C46, 24C04, or similar series)—where vehicle mileage data is stored.
Pro Tip: Take high-resolution macro photographs of the circuit board before touching any components so you can verify correct needle placement and wiring orientations later.
Step 5: Connect the Programmer Hardware
What you need: Specialized mileage correction programmer (such as Carprog, Digiprog, or similar EEPROM programmer), USB cable, and a laptop with pre-installed software.
Instructions: Depending on your hardware, you will either attach a specialized clip directly to the EEPROM chip on the circuit board or unsolder the chip using a temperature-controlled hot air station. Connect the clip or adapter wires to the programmer device, ensuring pin 1 on the adapter aligns precisely with pin 1 on the microchip. Plug the USB interface cable from the programmer into your laptop and launch the dedicated programming software.
Pro Tip: Double-check your pinout connections. Reversing voltage and ground pins can instantly fry the EEPROM chip, rendering the instrument cluster permanently useless.
Step 6: Read, Edit, and Write Mileage Data
What you need: Odometer programming software, hex editor, and a calculator for hexadecimal conversion.
Instructions: Within the software interface, select the correct chip model and click the “Read” function to download a hex dump file of the current memory. Save a pristine backup copy of this original file in a secure folder before making any changes. Open the hex file, locate the hexadecimal algorithm containing the mileage value, and convert your target mileage into the corresponding hex code. Enter the new values into the editor, verify the checksum data to prevent dashboard error loops, and click “Write” to upload the modified file to the chip.
Pro Tip: Many modern programmers feature built-in calculators where you simply type the desired numerical mileage, and the software automatically computes the correct hex bytes.
Step 7: Reassemble and Test the Instrument Cluster
What you need: Soldering iron (if chips were removed), screwdrivers, and trim tools.
Instructions: Once the write verification is successful, disconnect the programmer hardware and reinstall the EEPROM chip or remove the test clip. Carefully reassemble the circuit board into the plastic cluster housing, snap the gauge needles back onto their exact center calibration points, and secure the front lens cover. Carry the cluster back to the vehicle, plug in the main wiring harness securely, and mount the unit back into the dashboard using your original fasteners and bezel.
Pro Tip: Manually spin the analog needles gently before final assembly to ensure they move freely without binding against the gauge face.
Step 8: Reconnect Power and Verify Results
What you need: 10mm socket wrench and an OBD2 diagnostic scanner.
Instructions: Reattach the negative battery terminal and tighten the bolt securely. Turn the vehicle ignition key to the ON position without starting the engine. Observe the digital display to confirm that the updated mileage reads correctly and that all warning lights illuminate and cycle as expected. Plug a professional OBD2 diagnostic scan tool into the port under the dash and check all vehicle control modules (PCM, BCM, and TCM) to ensure mileage synchronization across all onboard computers.
Pro Tip: Modern vehicles store mileage in multiple modules; if the BCM and instrument cluster do not match, the car may trigger anti-theft locks or display persistent error messages.
✅ Final Checklist
- Verify legal compliance and obtain proper documentation for the vehicle history file.
- Ensure the instrument cluster is securely mounted with all electrical connections firmly locked.
- Confirm that all dashboard gauges, backlighting, and warning indicators function normally.
- Check via OBD2 scanner that secondary modules match the updated dashboard mileage.
- Ensure the negative battery terminal is tightly fastened and free of corrosion.
Important Notes:
- Tampering with an odometer to deceive a buyer or commit fraud is a severe federal offense with heavy legal penalties.
- If you are uncomfortable working with surface-mount electronics or hex code manipulation, always seek help from a licensed automotive locksmith or specialized cluster repair facility.
- Estimated time for completion is 2 to 4 hours; professional tool costs range from $150 to over $1,000 depending on vehicle make and model complexity.
Legal Implications and Penalties for Odometer Tampering
Altering a digital odometer for fraudulent purposes remains a severe federal offense governed by strict consumer protection laws. In the United States, the Federal Truth in Mileage Act and 49 U.S.C. Chapter 327 prohibit disconnecting, resetting, or altering a vehicle’s odometer with the intent to change the number of miles indicated.
Federal and State Penalties in 2026
Regulatory bodies enforce rigorous compliance standards across the automotive industry. Convictions for unauthorized digital odometer rollback carry significant legal consequences:
- Federal fines up to $250,000 for individuals or $1 million for corporate entities per violation.
- Potential prison sentences of up to three years for each fraudulent odometer alteration offense.
- Mandatory civil penalties and restitution payments to deceived vehicle purchasers.
- Severe state-level penalties, including the permanent revocation of dealer licenses and vehicle impoundment.
Legitimate Odometer Replacements
Legislation permits digital odometer adjustments strictly when a component fails and requires replacement, provided specific legal disclosures are met. Federal law mandates that if an odometer cannot be adjusted to reflect the exact historical mileage, a physical notice must be affixed to the doorjamb detailing the mileage before and after service, alongside the precise date of replacement.
What If It Still Doesn’t Work?
When software adjustments and standard EEPROM flashing fail to resolve digital odometer discrepancies, underlying hardware damage or firmware corruption is usually to blame. Drivers and technicians dealing with persistent dashboard failures should evaluate these fallback steps:
- Inspect the instrument cluster wiring harness and CAN bus communication lines for corrosion, loose pins, or voltage drops using a digital multimeter.
- Verify that the replacement cluster’s firmware version matches the exact software calibration ID required by the vehicle manufacturer.
- Disconnect the vehicle battery for 30 minutes to perform a hard reset on all volatile memory registers across the dashboard network.
- Send the faulty cluster to a specialized automotive electronics laboratory for bench testing and professional EEPROM desoldering or reprogramming.
- Seek professional assistance from a certified automotive locksmith or dealership service center, where labor rates typically range from $150 to $250 per hour plus diagnostic fees.
Conclusion
Managing digital odometer adjustments requires precise technical knowledge, specialized diagnostic hardware, and strict adherence to federal laws. Whether resolving a synchronization error after a dashboard replacement or ensuring compliance with the Truth in Mileage Act, understanding the underlying vehicle architecture is essential. According to verified research and expert sources from the National Highway Traffic Safety Administration, maintaining transparent vehicle records protects vehicle value and prevents costly legal penalties. To ensure safe and compliant results, consult a certified automotive technician before attempting any advanced electronic modifications.
❓ Frequently Asked Questions
How do digital odometer correction tools work?
Digital correction tools interface directly with the vehicle’s computer systems through the OBD2 port or communicate directly with memory chips to rewrite the mileage hexadecimal code. These tools require specialized technical knowledge and proprietary software to execute properly.
What is an EEPROM programmer and how is it used?
An EEPROM programmer is a hardware device used to read and write data directly to the memory chip on a circuit board. Technicians must unsolder the chip from the odometer cluster, place it in the programmer, modify the hex data, and solder it back onto the board.
Can dealerships detect if an odometer has been digitally altered?
Yes, modern diagnostic scanners and factory computers cross-reference mileage data stored in various modules like the transmission, ECU, and key fobs. Discrepancies between these modules immediately flag potential odometer tampering.
What are the federal penalties for odometer fraud?
Under federal law, altering an odometer with intent to defraud carries severe financial penalties and potential prison sentences. Furthermore, failing to disclose a true mileage discrepancy when selling a vehicle constitutes wire and mail fraud.
Why do digital odometers store mileage in multiple locations?
Automakers implement redundant mileage storage across different control modules to prevent theft, fraud, and unauthorized tampering, ensuring vehicle data integrity remains secure throughout its lifespan.
Is it legal to change digital mileage when swapping an engine?
Changing an engine does not change the vehicle’s actual chassis mileage. By law, the odometer must reflect the mileage of the chassis, not the newly installed engine, unless a certified legal exemption applies.