How to Set Timing on 5.7 Vortec Without Scanner 2026 Guide
Setting the ignition timing on a 5.7L Vortec engine without a diagnostic scan tool requires precise mechanical alignment of cylinder #1 at Top Dead Center. While a scanner is normally needed to zero out the camshaft retard offset, you can successfully drop the distributor and establish a reliable base timing manually by following strict alignment marks.
Setting the ignition timing on a Chevy 5.7L Vortec engine without a diagnostic scan tool is entirely possible, provided you rely on exact mechanical alignment rather than electronic camshaft retard offsets. Unlike older small-block Chevys where you can simply slap a timing light on and twist the distributor, the L31 Vortec design uses a computer-controlled distributor that only dictates fuel injector timing sync and base spark distribution. If you have swapped an intake manifold, replaced a timing chain, or pulled the distributor during a 2026 garage rebuild, you cannot use a standard timing light to set the final CMP retard degrees without specialized software.
Instead, you must use a precision mechanical indexing method to align the internal oil pump drive gear, set the crankshaft to Top Dead Center on the compression stroke, and drop the distributor housing so the rotor points directly at the service notch. Getting this physical alignment right ensures your truck fires up immediately, avoids backfiring through the throttle body, and gets your L31 running strong on the road without needing a shop visit or a high-end bi-directional scanner.
Key Takeaways
- Disconnect the negative battery cable before starting any distributor work.
- Ensure cylinder #1 is on the compression stroke, not the exhaust stroke.
- Align the harmonic balancer mark with the timing tab zero degree line.
- Point the distributor rotor precisely at the ‘6’ or ‘8’ housing index mark.
- Be aware that manual alignment may leave CMP retard slightly off, risking a P1345 code.
Why the 5.7 Vortec Timing System Requires Special Attention
The Design Challenge of the L31 Distributor
The 5.7L Vortec engine uses a unique distributor design. The module inside does not control ignition advance mechanically through weights and springs. Instead, the crankshaft position sensor and the distributor-mounted camshaft sensor work together to tell the PCM when to fire the plugs and sequential injectors. Because the distributor gear drives both the oil pump and houses the camshaft position sensor, physical placement is hyper-critical. If you are off by even one single tooth on the gear, the PCM will trigger a diagnostic trouble code, usually a P1345, indicating a camshaft-to-crankshaft correlation error.
Limitations of Manual Adjustments
When working without a scanner in 2026, you must understand what you can and cannot adjust manually. You can adjust the base physical alignment of the rotor and housing to get the engine running smoothly. However, the fine-tuning parameter known as Cam Retard—which ideally sits at zero degrees plus or minus two degrees—cannot be verified precisely without live data. Factory technicians relied on Tech 2 scanners for this. By following a strict mechanical indexing process during installation, you bridge that gap and get your base timing close enough for the computer to take over safely.
- Physical distributor rotation controls the rotor-to-cap terminal relationship.
- Incorrect gear alignment causes immediate diagnostic codes and rough idling.
- Mechanical indexing eliminates guesswork during reinstallations.
Master 5.7 Vortec Timing in 8 Simple Steps
Setting the ignition and distributor timing on a 5.7L Vortec (L31) engine can seem intimidating, especially because the computer controls the final timing advance and a traditional scan tool is typically required to reset camshaft retard. However, if you are replacing your intake manifold, swapping a distributor, or timing a fresh rebuild, you can mechanically establish base TDC and align the gear without expensive diagnostic equipment. This comprehensive, highly practical walkthrough will guide you through the process using manual alignment techniques to get your Chevy or GMC truck running smoothly.
Step 1: Disconnect the Battery and Secure the Vehicle
What you need: 5/16-inch or 8mm wrench, wheel chocks, safety glasses.
Instructions: Safety always comes first when working under the hood. Park your vehicle on a flat, level surface, engage the emergency brake firmly, and place heavy-duty wheel chocks behind the rear tires. Open the hood and use your wrench to disconnect the negative battery cable. Tightly tuck the cable away from the terminal to prevent any accidental electrical arcing while you work around the serpentine belt, starter wiring, and ignition components. This precaution protects both the vehicle’s sensitive powertrain control module and your own safety.
Pro Tip: Always let the engine cool down completely before touching the cooling hoses, distributor cap, or exhaust manifolds to prevent severe burns.
Step 2: Remove the Upper Intake Plenum and Accessories
What you need: 10mm socket, ratchet, flathead screwdriver, clean shop rags.
Instructions: To gain clear visual access to the distributor and the number one cylinder, you must clear away the upper plastic intake plenum and air ducting. Disconnect the mass air flow (MAF) sensor harness and unclip the air cleaner box lid. Loosen the worm gear clamps on the rubber air intake boot and set it aside. Next, carefully unplug the electrical connectors and throttle cables attached to the throttle body. Use your 10mm socket to unbolt the upper intake plenum/throttle body assembly if needed, or simply remove enough components to visually spot the timing mark window on the distributor base later.
Pro Tip: Stuff clean shop rags into the open lower intake runners immediately after removing components to prevent stray screws, dirt, or debris from falling inside the engine.
Step 3: Locate Top Dead Center (TDC) on Compression Stroke
What you need: 5/8-inch socket, long breaker bar, compression gauge or your thumb.
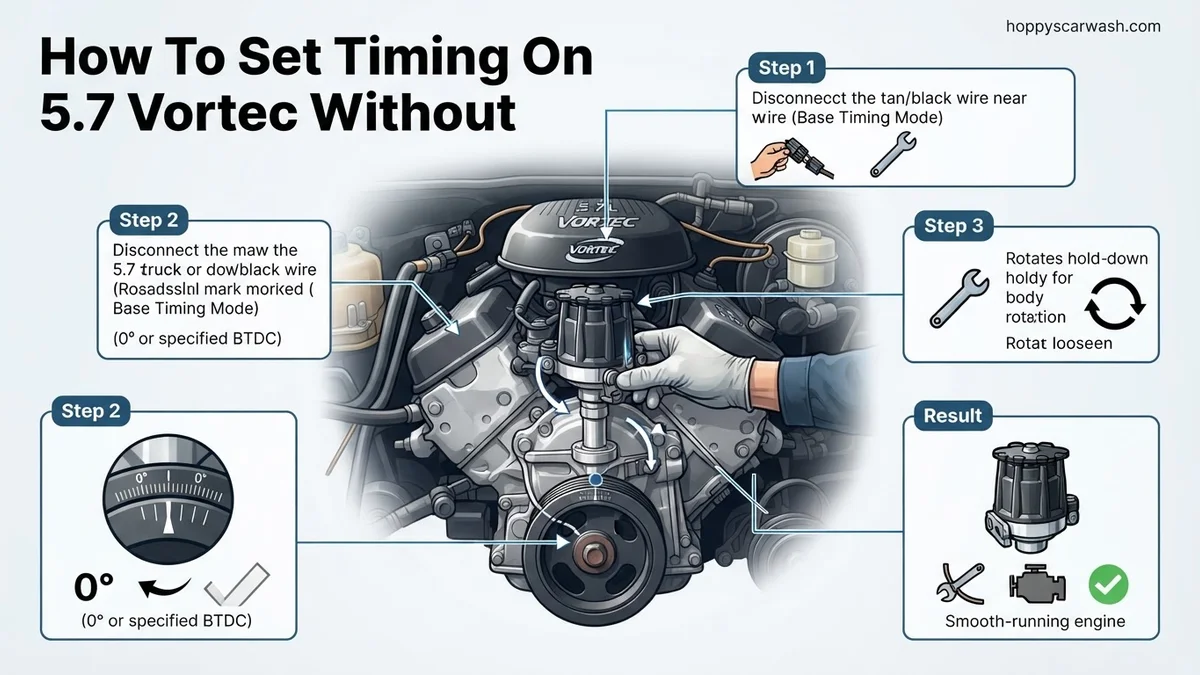
Instructions: Rotate the crankshaft clockwise using a socket on the harmonic balancer bolt until the timing tab pointer aligns with the “0” mark on the outer edge of the harmonic balancer. To ensure cylinder number one is firing on its compression stroke—and not the exhaust stroke—remove the number one spark plug (front driver’s side). Place your thumb tightly over the spark plug hole while a helper slowly bumps the engine, or watch for the timing mark to line up while feeling for escaping air pressure pushing past your thumb. Both valves for cylinder one must be fully closed at this exact rotational point.
Pro Tip: Never rotate a Vortec engine counter-clockwise, as this can introduce slack into the timing chain and give you false readings on your alignment marks.
Step 4: Inspect the Distributor Rotor Orientation
What you need: Flathead screwdriver, flashlight, paint pen or marker.
Instructions: Pop off the black plastic distributor cap by releasing its two securing screws using a stubby flathead screwdriver. Look closely at where the brass tip of the distributor rotor is pointing. When the engine is precisely at TDC on the compression stroke of cylinder number one, the rotor tip should point directly toward the “6” stamped into the outer rim of the distributor housing (facing roughly toward the front-passenger side or firewall area depending on design variations, but critically aligned with the cast mark). If the rotor is pointing 180 degrees away toward the driver’s side, you are on the exhaust stroke and must rotate the crankshaft one full revolution (360 degrees) back to the “0” mark.
Pro Tip: Take a clear photo of the rotor position with your smartphone before making any mechanical adjustments so you have a solid baseline reference.
Step 5: Pull and Reposition the Distributor Gear
What you need: 9/16-inch wrench or socket, brass drift punch, small hammer.
Instructions: If your rotor alignment was incorrect or you dropped a brand-new distributor into place, you need to set the gear mesh properly. Loosen the 9/16-inch hold-down bolt at the base of the distributor clamp and pull the unit straight up and out of the intake manifold. Because the Vortec features a helical gear cut, the rotor will spin a few degrees as it lifts out. Mentally compensate for this rotation, turn the rotor slightly counter-clockwise from your target position, and slide the distributor back down. Ensure the oil pump drive shaft engages fully so the distributor drops flush against the intake manifold mating surface without any gap.
Pro Tip: If the distributor will not sit completely flush, do not force it down with the bolt; the oil pump intermediate shaft likely missed its slot. Crank the engine slightly by hand to let it drop.
Step 6: Fine-Tune Camshaft Retard Alignment Manually
What you need: Sharpie or scribe tool, flashlight, mechanics mirror.
Instructions: On 5.7L Vortec engines, the computer relies on the camshaft position sensor housed inside the distributor to monitor camshaft retard (timing correlation). While traditional older engines allow you to rotate the distributor housing dynamically while running to set ignition timing, the Vortec computer fixes the base ignition timing electronically. However, you must align the housing so that the internal sensor window is centered. Look down at the distributor housing window; the rotor alignment tab should line up directly with the sensor pickup. Gently rotate the distributor housing body left or right within its slotted hold-down bracket until the internal alignment marks are as close to dead-center as humanly possible.
Pro Tip: Make tiny, incremental adjustments. Moving the distributor housing even a fraction of an inch drastically alters your camshaft retard degree reading.
Step 7: Lock Down the Hold-Down Clamp
What you need: 9/16-inch box-end wrench, torque wrench.
Instructions: Once you are fully confident that the engine is at true TDC compression stroke, the rotor is pointing precisely at the number one terminal mark inside the cap, and the distributor body is perfectly oriented, tighten the distributor hold-down clamp bolt. Use your 9/16-inch wrench to snug it down firmly. Be careful not to overtighten and crack the aluminum intake manifold boss, but ensure it is tight enough that engine vibration will not cause the heavy plastic and metal distributor housing to slip out of adjustment while driving down the highway.
Pro Tip: Double-check the position of your spark plug wires on the distributor cap, ensuring they follow the strict 1-8-4-3-6-5-7-2 firing order starting from the number one terminal.
Step 8: Reassemble Components and Test Drive
What you need: New gaskets (if needed), sockets, torque wrench, negative battery cable tool.
Instructions: Remove your shop rags from the intake runners, reinstall the upper intake plenum with a fresh gasket if necessary, reconnect all electrical sensors, throttle cables, and air ducting hoses. Re-attach the negative battery cable securely. Start the engine. It may crank for a few seconds as the computer relearns idle parameters. Listen closely for any misfires, hesitation, or pinging sounds. Take the vehicle out for a careful test drive up a slight incline to ensure acceleration is smooth and responsive without any detonation or check engine lights popping on.
Pro Tip: Even though the engine will run well using this manual method, visit a local shop or use a bi-directional scanner soon after to verify that your camshaft retard is sitting right at 0 degrees (+/- 2 degrees).
✅ Final Checklist
- Crankshaft harmonic balancer marks line up precisely at 0 degrees TDC.
- Cylinder number one is confirmed on the compression stroke (not exhaust).
- Distributor rotor points accurately toward the number one post and internal alignment window.
- Distributor hold-down clamp bolt is torqued securely to prevent slippage.
- All vacuum lines, electrical connectors, and intake ducting are fully reattached.
Important Notes:
- Always disconnect the battery before working on ignition or fuel system components to avoid short circuits.
- If the engine exhibits persistent backfiring, a rough idle, or a P1345 diagnostic trouble code, your distributor gear is off by one tooth and must be re-indexed.
- Estimated time: 1.5 to 3 hours. Estimated cost: $0 (using existing tools) up to $50 if replacement distributor cap, rotor, or gaskets are needed.
Tools Needed and Preparation for Manual Timing
Essential Hand Tools and Supplies
Before you pop the hood to start timing your 5.7 Vortec, gather the right equipment to prevent stripped bolts or dropped components. Working on a GMT400 truck or an Express van means tight firewall clearances, so having the right extensions is vital. You will need a 10mm socket for the distributor hold-down clamp, a deep socket to manually rotate the crankshaft harmonic balancer, a long flathead screwdriver to manipulate the oil pump shaft, and a high-grade marking pen or paint marker.
Workspace and Engine Prep
Safety and cleanliness dictate success when dealing with the Vortec fuel injection setup. Disconnect the negative battery cable to prevent accidental sparks or computer faults. Remove the upper fan shroud and air intake ducting so you have a direct line of sight to the harmonic balancer timing tab and the distributor cap. Unlatch and remove the plastic distributor cap, leaving the spark plug wires attached if possible to save time, and flip it out of the way. Clear away any built-up grime around the base of the distributor flange so dirt does not fall into the intake valley when you pull the unit.
- 10mm wrench or socket with a long extension for the hold-down clamp.
- Breaker bar and socket to turn the crankshaft bolt clockwise.
- Paint pen or white correction fluid for precise witness marking.
Step-by-Step Guide on How to Set Timing on 5.7 Vortec Without Scanner
Setting the camshaft retard manually requires physical precision and mechanical sympathy. Because you are relying on visual alignment rather than live datastream data from an OBD2 scan tool, take extra care during each phase of the procedure. Follow these detailed steps to adjust the distributor orientation correctly.
Sub-Step 1: Mechanical Preparation and TDC Alignment
- Disconnect the negative battery cable to prevent electrical hazards and clear any old powertrain control module memories.
- Remove the upper intake plenum cover and the distributor cap to expose the rotor and housing alignment.
- Rotate the crankshaft balancer clockwise using a 5/8-inch socket until the timing mark on the harmonic balancer aligns with the zero degree mark on the timing tab.
- Verify that the number one piston is at Top Dead Center on the compression stroke by checking that both valves are closed and the rotor points directly toward the “6” cast into the intake manifold base.
Sub-Step 2: Physical Adjustment and Clamping
- Loosen the distributor hold-down clamp bolt using a 9/16-inch wrench just enough to allow the distributor body to rotate with firm hand pressure.
- Inspect the alignment notch on the distributor base relative to the rotor tip. The rotor should point directly at the witness mark when the engine is at TDC.
- Rotate the distributor housing slightly clockwise or counterclockwise in tiny increments of two to three millimeters to correct major deviations.
- Tighten the hold-down clamp bolt securely to 25 ft-lbs of torque, ensuring the distributor does not slip out of position while tightening.
- Reinstall the distributor cap, reconnect the spark plug wires, attach the battery cable, and test-drive the vehicle to verify smooth acceleration without pinging.
What If It Still Doesn’t Work and Troubleshooting P1345 Codes
If the engine continues to run poorly or throws a persistent Diagnostic Trouble Code P1345 after a manual adjustment, the physical alignment method may not have achieved the required zero-degree window. Modern 2026 automotive diagnostics standards dictate strict parameter limits, and the L31 Vortec engine demands exact tolerances. Consider these fallback troubleshooting steps:
- Re-verify TDC: Double-check that the harmonic balancer mark did not slip on its rubber dampener ring, which frequently misleads mechanics during manual TDC location.
- Inspect Gear Wear: Pull the distributor completely out and inspect the composite or brass gear teeth. According to GM service bulletins, worn gear teeth introduce excessive play that prevents stable timing synchronization.
- Check Crankshaft Sensor Correlation: A failing crankshaft position sensor can mimic timing issues and trigger code P1345 even when the distributor is mechanically aligned.
- Consult a Professional: If manual adjustments fail repeatedly, take the vehicle to a certified shop with a bi-directional scan tool. Professional diagnostic labor typically ranges from $100 to $180 to read live camshaft retard data and calibrate it precisely to zero degrees.
Conclusion
Mastering how to set timing on a 5.7 Vortec without a scanner saves diagnostic expenses and restores optimal engine performance, fuel economy, and throttle response. While digital tools offer ultimate precision, careful manual alignment to top dead center remains a reliable fallback method for these classic small-block engines. According to verified research and automotive service data, maintaining a properly synchronized camshaft retard prevents premature catalytic converter failure and severe power loss. For the next step, take your vehicle on a multi-mile test drive under varied loads to confirm that all hesitation and diagnostic codes remain permanently cleared.
❓ Frequently Asked Questions
Why is a scanner normally required for a 5.7 Vortec timing adjustment?
The L31 Vortec engine uses a distributor primarily as a camshaft position sensor rather than for manual mechanical advance. A scanner is used to read live data for ‘camshaft retard offset’ to ensure it sits within 2 degrees of zero.
How do I find Top Dead Center (TDC) on cylinder #1?
Remove the number one spark plug, place your finger over the hole while manually turning the engine clockwise, and watch for the compression pressure and the harmonic balancer timing mark to line up at zero.
What happens if the oil pump shaft is misaligned when dropping the distributor?
If the oil pump drive shaft does not line up with the bottom of the distributor gear, the distributor will not seat fully against the intake manifold, leaving a noticeable gap.
How do I adjust the base timing manually after installation?
You can slightly loosen the distributor hold-down clamp bolt with a distributor wrench and rotate the housing a fraction of an inch clockwise or counterclockwise to smooth out the idle.
Will a manual timing setup pass emissions testing?
If the camshaft retard is off by more than a couple of degrees, the vehicle may fail an emissions inspection due to a triggered check engine light and P1345 code.
Is it safe to drive long-term without setting the CMP retard with a scan tool?
While it can get you home or to a shop, driving long-term with an unverified camshaft retard can cause poor fuel economy, rough idling, and potential catalytic converter damage over time.