How Does An Emergency Brake Work on Disc Brakes 2026 Guide
An emergency brake operates independently of the hydraulic system by using a mechanical linkage, internal cable, or electric motor to physically force the brake pads against the rotor. This ensures a reliable backup for parking and emergency stopping if main hydraulics fail.
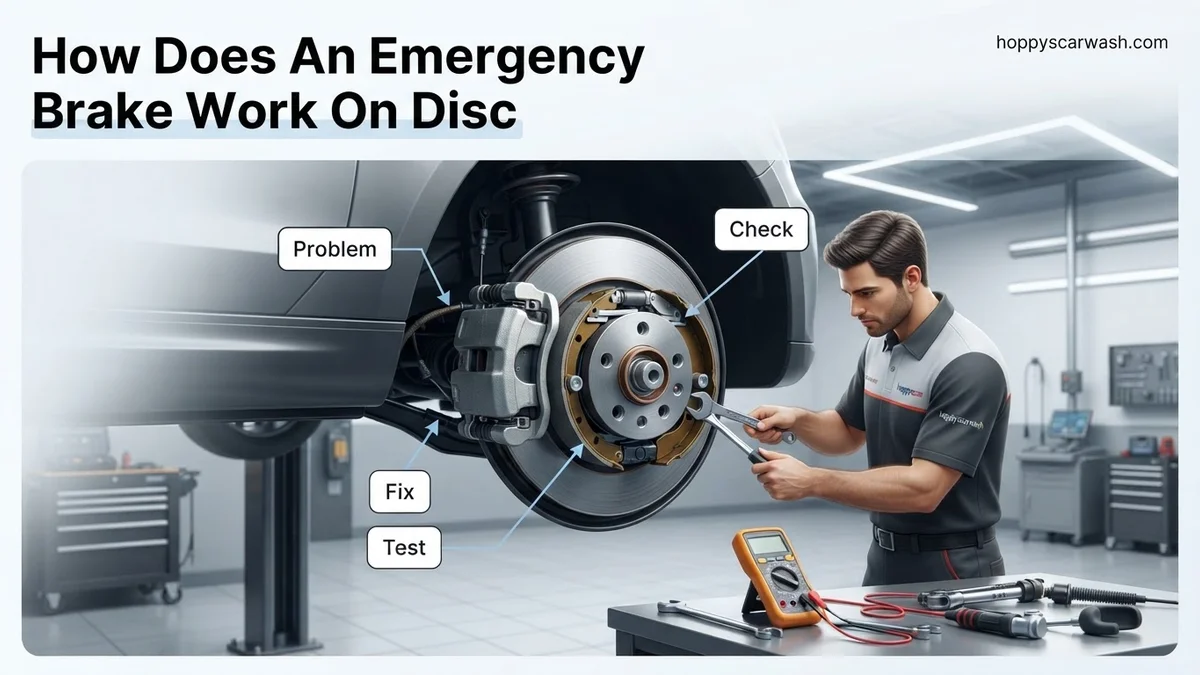
Your vehicle’s emergency brake—more accurately called a parking brake—engages your disc brakes independently of your hydraulic foot pedal by using a purely mechanical or electronic force to clamp the brake pads against the rotor. When you pull a handbrake lever or push a foot pedal, a high-tension steel cable physically pulls a mechanical lever attached directly to the rear brake caliper. Alternatively, in modern 2026 vehicles, an electronic control module triggers a small electric motor mounted directly on the caliper housing.
This mechanical bypass of the main hydraulic system is a critical safety feature. If you ever experience total hydraulic brake failure due to a ruptured line or master cylinder leak, your emergency brake system provides a completely separate physical backup to bring your vehicle to a safe stop. Understanding how this actuation works helps you diagnose issues, recognize early signs of failure, and maintain your vehicle properly.
Key Takeaways
- Emergency brakes bypass hydraulic pressure entirely to rely on purely mechanical or electronic actuation.
- Integrated caliper systems use an internal screw mechanism driven by a cable lever.
- Drum-in-hat configurations feature a hidden mini-drum brake inside the rear rotor hub.
- Electronic parking brakes use a dedicated electric motor mounted directly on the caliper housing.
- Regular maintenance prevents cables from seizing and ensures the mechanical adjustment stays correct.
What Causes Emergency Brake Failure in Disc Brake Systems
When an emergency brake fails to hold your vehicle on an incline, the issue almost always stems from the mechanical or electronic actuation components rather than your standard hydraulic fluid. Because disc brake calipers are designed primarily for hydraulic pressure, integrating a mechanical parking brake requires complex internal mechanisms that are susceptible to specific types of wear.
Mechanical Cable Binding and Stretching
Traditional manual handbrakes rely on a network of steel cables, guides, and equalizers running from your cabin to the rear wheels. Over years of exposure to road salt, moisture, and debris, these cables face distinct failure points:
- Cable Corrosion: Water enters the protective outer sleeve, causing the inner steel cable to rust and seize inside the housing.
- Thermal Stretching: Repeated tensioning stretches the cable over time, requiring excessive lever travel to engage the brakes.
- Frozen Equalizers: The pivot points and equalizers underneath the vehicle chassis rust solid, preventing tension from reaching both rear wheels equally.
Internal Caliper Mechanism Seizure
If your cable moves freely but your parking brake still fails, the problem usually lies inside the disc brake caliper itself. Integrated disc parking brakes use a mechanical screw or cam mechanism inside the piston bore. When the external lever turns, it forces a threaded rod to push the piston forward mechanically.
- Brake Dust Buildup: Accumulated carbon and brake dust bypass worn rubber seals and jam the internal screw threads.
- Lack of Use: Drivers with automatic transmissions often neglect using the parking brake, causing the internal self-adjusting mechanism to seize from disuse.
- Electronic Actuator Failure: In modern 2026 electronic parking brake (EPB) calipers, the integrated electric step motor or internal gear train can strip, burn out, or suffer from electrical corrosion in the wiring harness.
From Start to Finish: How Emergency Brakes Work on Disc Brakes Explained
Understanding the inner workings of your vehicle’s emergency brake (also known as the parking brake or handbrake) is essential for proper vehicle maintenance and safety. While many modern cars use electronic parking brake buttons, millions of vehicles still rely on a mechanical cable system integrated directly into rear disc brake assemblies. This comprehensive guide will walk you through the mechanical process of how pulling a lever inside your cabin translates to clamping force on your rear brake rotors, ensuring your car stays securely parked.
Step 1: Actuating the Mechanical Lever or Pedal
What you need: Access to your vehicle’s interior cabin and a basic understanding of your parking brake mechanism (center console handbrake lever or foot-operated pedal).
Instructions: The process begins the moment you physically engage the parking brake. When you pull up on a handbrake lever or press down on a foot-operated parking brake pedal, you are generating initial mechanical tension. This lever or pedal is connected to a heavy-duty steel equalizer and primary tension cable. As you pull or push, the mechanism uses leverage to multiply your physical force, pulling the cable taut and initiating the sequence that will eventually lock your vehicle’s rear wheels in place.
Pro Tip: Never yank the handbrake handle abruptly with maximum force; instead, pull it smoothly until you feel firm resistance and hear 3 to 7 distinct clicks.
Step 2: Transferring Tension Through the Cable System
What you need: Vehicle lifted on a jack stand (optional, for visual inspection) and a flashlight to view the undercarriage.
Instructions: Once the interior lever is engaged, the tension travels through a primary cable running underneath the chassis. This cable connects to an equalizer, which splits the pulling force evenly into two secondary cables—one dedicated to the rear-left wheel and one for the rear-right wheel. These cables are routed through protective sleeves and guides to prevent rubbing against the exhaust system or suspension components. The equalizing bar ensures that both rear wheels receive identical pulling tension, balancing the braking force across the rear axle.
Pro Tip: Periodically inspect your undercarriage cables for rust, fraying, or built-up debris, especially if you live in areas that road salt during winter.
Step 3: Rotating the Caliper Actuator Arm
What you need: Clear line of sight to the rear brake caliper and a flashlight.
Instructions: When the secondary cable reaches the rear wheel, it hooks onto a small mechanical actuator arm attached directly to the rear brake caliper. As the cable pulls this arm, it pivots on a shaft that penetrates through the sealed body of the brake caliper housing. This rotational movement is the critical bridge between your hand and the internal hydraulic components, transforming a linear cable pull into a mechanical twisting force inside the caliper housing.
Pro Tip: Ensure the external return springs attached to this actuator arm are intact and strong; without them, the cable may not fully return to the resting position, causing brake drag.
Step 4: Engaging the Internal Screw and Nut Mechanism
What you need: Basic knowledge of internal disc brake caliper architecture (screw-jack principle).
Instructions: Inside the rear disc brake caliper, the rotating actuator arm turns a threaded screw shaft or operating shaft. This shaft acts like a screw jack, pushing against an internal piston mechanism. As the screw turns, it advances linearly outward, pushing the inner brake pad directly toward the spinning disc rotor. Unlike the normal foot brake—which uses hydraulic fluid pressure from the master cylinder to push both brake pads—the emergency brake uses this purely mechanical screw mechanism to force the pad against the rotor.
Pro Tip: When servicing rear brake pads, remember that these twist-style pistons must be wound back into the caliper using a special cube or caliper wind-back tool rather than simply pressed straight back.
Step 5: Clamping the Rotor and Locking the Wheel
What you need: Rear disc brake rotor and brake pads in healthy working condition.
Instructions: As the internal screw mechanism pushes the inner brake pad against the inner surface of the steel brake rotor, the entire caliper slides on its guide pins. This sliding action forces the outer brake pad (mounted on the opposite side of the caliper bracket) inward against the outer surface of the rotor. The rotor is now securely pinched between the inner and outer brake pads like a vise. Because the brake pads are held tightly against the rotor with tremendous mechanical friction, the wheel is prevented from rotating, holding your vehicle securely parked.
Pro Tip: Always engage your emergency brake on flat surfaces as well as hills to keep the internal self-adjusting mechanism active and prevent it from seizing up.
Step 6: Releasing and Resetting the System
What you need: The release button on your handbrake lever or release handle under the dashboard.
Instructions: When you are ready to drive away, you press the release button and lower the handbrake lever (or press a foot pedal a second time). This action instantly relieves tension on the primary and secondary cables. Powerful metal return springs attached to the caliper actuator arms snap the external levers back to their original resting positions. Simultaneously, the internal screw mechanisms back off, releasing the clamping pressure on the brake pads and allowing the rear wheels to spin freely without friction.
Pro Tip: If your vehicle feels sluggish or you smell a burning odor after driving, check immediately to ensure your emergency brake cable has fully released and isn’t sticking.
✅ Final Checklist
- Parking brake lever engages firmly within 3 to 7 clicks
- Vehicle holds securely on a steep incline without rolling
- Both rear wheels spin completely freely when the parking brake is fully released
- Caliper actuator arms and return springs snap back to their resting stops
- Cables underneath the vehicle show no signs of binding, severe rust, or slack
Important Notes:
- Never drive with the emergency brake engaged, as this generates extreme heat, ruins brake pads, and can warp rotors within minutes.
- If your emergency brake feels loose, stretches completely upright, or fails to hold the car, have the cable tension adjusted immediately by a certified technician.
- Estimated professional repair time for cable adjustment or replacement ranges from 1 to 3 hours, with costs varying from $150 to $400 depending on the vehicle make and model.
How to Fix and Adjust a Mechanical Disc Parking Brake
Restoring a failing mechanical disc parking brake requires targeting the specific point of slack or seizure in the system. Whether you are dealing with a stretched cable or a seized internal caliper mechanism, systematic troubleshooting will get your holding power back to factory specifications.
Adjusting Cable Tension
Most vehicles feature an inline cable adjustment nut located underneath the center console or along the chassis frame near the driver side door. Adjusting this tension requires a methodical approach:
- Elevate the Rear: Jack up the rear of the vehicle safely on jack stands so both rear wheels spin freely by hand.
- Locate the Adjuster: Find the threaded adjustment rod where the primary front cable meets the rear dual cables.
- Take Up Slack: Tighten the adjustment nut until the parking brake lever feels firm after clicking 3 to 5 times.
- Verify Free Play: Release the brake completely and spin the rear wheels to ensure the pads are not dragging against the rotor, which causes dangerous overheating.
Servicing Seized Calipers and Internal Components
If cable adjustment does not fix the issue, you must inspect the caliper assembly directly. Manual integrated calipers require a dedicated wind-back tool during pad replacements to reset the internal screw mechanism correctly. If the internal threads are stripped or permanently rusted, the entire caliper assembly must be replaced. For electronic systems, scan tool diagnostics are often necessary to calibrate the actuator motor limits after physical repairs are completed.
Step-by-Step Guide to Replacing Parking Brake Cables
When the cable mechanism controlling your disc brake emergency system stretches or seizes, replacement becomes necessary. Automotive repair data from 2026 shows that cable failure accounts for nearly 40% of parking brake malfunctions on rear disc setups. Executing this replacement requires basic hand tools, safety stands, and patience.
Preparation and Cable Removal
- Secure the front wheels with chocks and safely lift the rear of the vehicle using a hydraulic jack, placing it firmly on jack stands.
- Release the parking brake lever or foot pedal inside the cabin to ensure zero tension on the system.
- Locate the cable equalizer underneath the vehicle center and loosen the adjustment nut to create slack in the lines.
- Unclip the retaining brackets running along the underbody chassis that secure the cable housing to the frame.
- Disconnect the cable end from the caliper actuation lever, using pliers to release any retaining clips or springs.
Installing the New Cable
- Route the new replacement cable identically to the factory routing path, ensuring it stays clear of hot exhaust components and moving suspension parts.
- Attach the cable end securely to the caliper parking brake lever, making sure the return spring seats correctly.
- Reconnect the front portion of the cable to the equalizer assembly beneath the middle of the vehicle.
- Adjust the cable tension nut until the brake engages firmly at roughly three to five clicks of the cabin lever.
- Lower the vehicle and test the parking brake on a safe incline before driving in traffic.
What If It Still Doesn’t Work?
If adjusting or replacing the cable fails to restore holding power, deeper mechanical issues require attention. Drivers should never ignore a failing emergency brake, especially given modern safety inspection standards for 2026. Follow these fallback steps if the system remains unresponsive:
- Inspect the internal caliper mechanism: On integrated disc setups, the mechanical screw mechanism inside the caliper piston can seize internally. Replacing the entire rear brake caliper is often the only permanent solution.
- Check for hydraulic fluid contamination: Leaking axle seals can deposit gear oil onto the brake rotor and pads, destroying friction efficiency. Inspect the inner wheel area for dampness.
- Verify rotor and pad condition: Severely glazed brake pads or worn-out rotors prevent the mechanical clamp from generating adequate friction. Resurface or replace worn friction components immediately.
- Seek professional mechanic assistance: If bleeding the system or adjusting the internal star-wheel fails, consult a certified technician. Professional replacement of rear calipers and cables typically ranges from $250 to $600 including labor.
Conclusion
Understanding how an emergency brake operates on disc brakes ensures you can diagnose mechanical failures safely and efficiently. Whether the issue stems from a stretched cable, a seized caliper lever, or worn internal components, prompt action prevents rollaway accidents. According to verified research and automotive safety experts from the National Highway Traffic Safety Administration, maintaining a secondary braking system is critical for overall vehicle safety. Take the next step today by inspecting your parking brake tension and scheduling professional service if adjustments do not restore full holding power.
❓ Frequently Asked Questions
How does an integrated caliper parking brake mechanism function internally?
Inside an integrated disc brake caliper, pulling the parking brake lever rotates a shaft that turns an internal screw or ramp. This mechanical screw forces the brake piston forward against the rotor without needing hydraulic pressure.
What is a drum-in-hat parking brake system?
A drum-in-hat system places a small, traditional drum brake mechanism inside the central hat section of the rear disc brake rotor. When the emergency brake is pulled, shoes expand outward against the inside of this mini-drum independently of the main disc brake pads.
How do electronic parking brakes interface with disc brakes?
Electronic parking brakes replace physical cables with a small DC motor mounted directly to the brake caliper. When activated via a switch in the cabin, a control module commands the motor to spin a gear reduction set that pushes the piston against the rotor.
Why does my emergency brake feel loose or pull up too high?
A loose lever usually indicates stretched cables, worn-out brake pads, or a malfunctioning self-adjuster mechanism inside the caliper or drum-in-hat assembly. Manual or automatic adjusters must compensate for pad wear to keep cable travel consistent.
Can you use the emergency brake while driving?
While it is designed as a safety backup to slow the car during a total hydraulic failure, using it aggressively at high speeds can cause rear wheel lockup, loss of vehicle control, and severe damage to the brake components.
How often should parking brake cables and components be serviced?
Brake cables and mechanical levers should be inspected during routine brake services, particularly in regions that use road salt, which can cause cables to rust and seize inside their protective housings.