How to Remove a Steering Wheel Without a Puller 2026 Guide
Stuck without a specialized tool? You can safely remove a steering wheel using alternative leverage methods and household tools. Always prioritize safety by disconnecting the battery and leaving the center nut partially threaded to prevent injury.
You can remove a stubborn steering wheel without a specialized puller by using a few clever leverage techniques, such as the rhythmic knee-bump method or improvised heavy-duty puller setups using standard shop bolts and a metal plate. When a steering wheel seizes onto the tapered, splined steering shaft, brute force alone will not work; you need controlled kinetic energy or mechanical advantage to break the factory friction.
Tackling this job in your garage during 2026 means working around modern vehicle electronics and tightly bound mechanical splines without specialized tools. By skipping the commercial puller, you save time and money, but you must execute these alternative methods with extreme mechanical precision to avoid damaging your steering column or dashboard.
Key Takeaways
- Always disconnect the vehicle battery and wait 10 minutes to prevent accidental airbag deployment.
- Leave the center retaining nut threaded by a few turns to protect your face.
- Use alternating knee pressure and a steady pull to break the taper loose.
- Apply penetrating oil to stubborn splines and let it sit before pulling.
- Never strike the steering column shaft directly with a hammer to avoid severe damage.
Why Steering Wheels Get Stuck and the Dangers of Removal
The Physics of the Tapered Spline Joint
Steering wheels do not just slide onto the steering shaft. They mount onto a finely machined tapered spline that wedges tighter the harder the retaining nut is torqued down. Over years of driving, micro-vibrations and oxidation fuse the aluminum wheel hub to the steel shaft. This creates a bond that feels almost welded together, requiring a sharp shock to break the friction.
Critical Safety Precautions and Airbag Dangers
Working on a modern steering column requires absolute caution. Before you touch a single bolt, you must disconnect the vehicle battery and wait at least fifteen to thirty minutes for the airbag capacitor to fully discharge. Never skip this step, as an accidental airbag deployment can cause severe, life-threatening injuries.
- Always disconnect the negative battery terminal and isolate the cable.
- Never stand directly over the steering wheel while trying to pull it loose.
- Leave the central retaining nut threaded onto the last few threads of the shaft while applying force.
Leaving that central nut threaded loosely is your ultimate insurance policy. When the tapered fit finally releases, the spring-loaded energy can violently launch the wheel straight into your face. The nut catches the wheel, stopping it after a few millimeters of travel and protecting your teeth and nose from serious trauma.
Master Steering Wheel Removal in 6 Simple Steps
Removing a steering wheel without a specialized puller tool can seem like a daunting mechanical challenge, but with the right techniques and a heavy dose of patience, it is entirely possible. Whether you are replacing a worn-out steering column, upgrading to an aftermarket wheel, or fixing a broken turn signal switch, improvising without standard specialty tools requires care to avoid damaging delicate clocksprings, wiring harnesses, and your own face. This comprehensive walkthrough provides a foolproof, professional-grade approach to freeing a stubborn steering wheel using everyday workshop items.
Step 1: Disconnect the Battery and Secure the Vehicle
What you need: 10mm wrench or socket, wheel chocks, and safety glasses.
Instructions: Before touching any components on the steering wheel, safety is your absolute highest priority. Modern vehicles are equipped with Supplemental Restraint Systems (SRS)—commonly known as airbags—which can deploy accidentally if the electrical system remains live. Begin by parking your vehicle on a flat surface, engaging the emergency brake firmly, and placing wheel chocks around the tires. Open the hood and use a 10mm wrench to loosen and completely disconnect the negative battery terminal. Tuck the cable safely away so it cannot accidentally spring back and make contact with the terminal post. Wait a mandatory minimum of 15 to 30 minutes to allow the airbag capacitor to fully discharge its stored electrical energy before proceeding any further.
Pro Tip: Never skip the waiting period for capacitor discharge. Airbags deploy with explosive force and can cause severe injuries if triggered while you are leaning directly over the steering column.
Step 2: Remove the Horn Pad and Airbag Module
What you need: Torx drivers, hex keys, or a stubby flathead screwdriver depending on your vehicle make and model.
Instructions: Locate the service access panels or retaining bolts situated on the backside or underneath the steering wheel hub. Most modern steering wheels utilize two or three Torx screws (often T25 or T30) or spring-loaded clips holding the airbag module in place. Carefully unscrew these fasteners or insert a screwdriver to release the spring clips. Once the module is loose, gently lift it away from the steering wheel framework. Locate the yellow or orange electrical connector on the back of the airbag. Use a small pick tool to lift the locking tab on the connector, then gently pull it straight out to disconnect the airbag entirely. Set the airbag module safely aside in a flat, open area with the metal plate facing downward.
Pro Tip: Always place the removed airbag module face-up on a workbench or flat floor. If an accidental deployment somehow occurred, facing it upward would cause it to rocket toward the ceiling instead of acting like a dangerous flying disc.
Step 3: Disconnect Horn Wires and Center Nut Preparation
What you need: Needle-nose pliers and a flashlight.
Instructions: With the airbag module out of the way, you now have clear visibility into the center of the steering wheel hub. Look for any remaining electrical connections, such as the single spade connector for the horn switch or ground wires attached to the metal skeleton of the wheel. Gently pull these spade connectors off their tabs using needle-nose pliers, taking care not to pull on the wire insulation itself. Inspect the central mounting nut and the surrounding steering shaft. Take a permanent marker or a scribe and make a sharp, visible alignment mark across both the top of the steering shaft and the steering wheel hub spline. This alignment mark is critical because it ensures you can reinstall the steering wheel in the exact same centered position later.
Pro Tip: Take a clear, high-resolution photograph of the wiring layout with your smartphone before unplugging anything. This visual reference will save you immense frustration during reassembly.
Step 4: Loosen the Center Retaining Nut
What you need: Deep socket (typically 19mm or 21mm), breaker bar, and a helper.
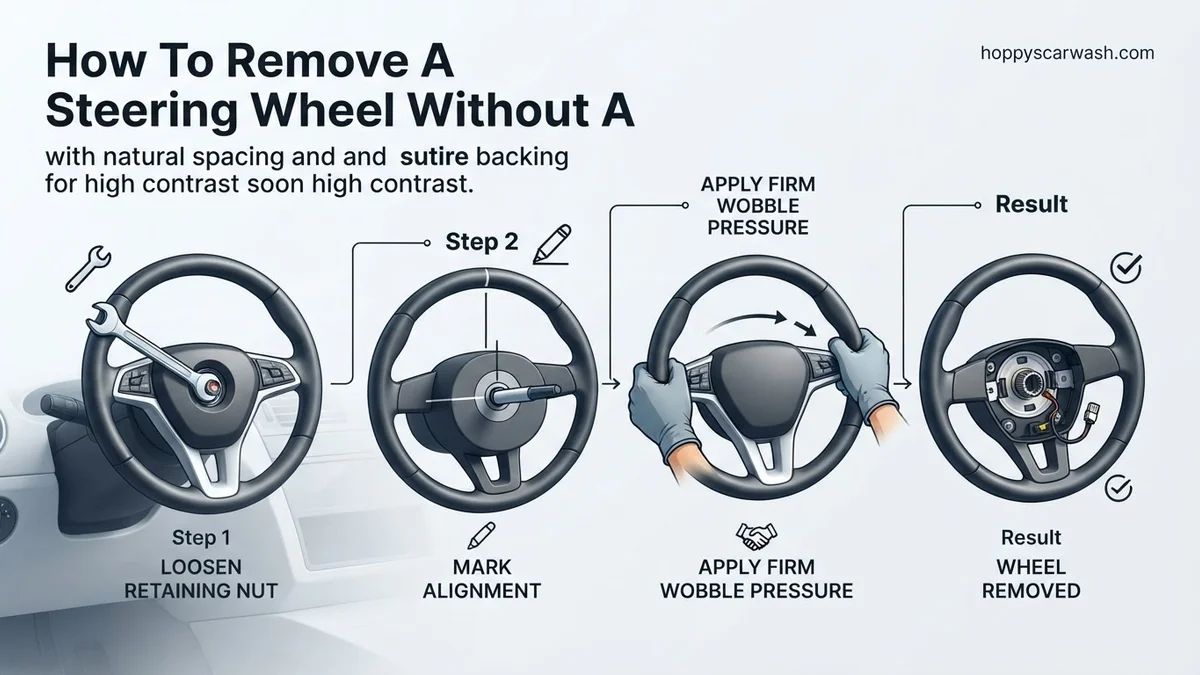
Instructions: Steering wheel center nuts are factory-torqued down exceptionally tight, often between 30 to 50 foot-pounds, and holding the wheel in place by hand will not provide enough resistance. Fit your properly sized deep socket and breaker bar onto the center nut. Ask a helper to hold the steering wheel firmly to counteract your turning force, or better yet, engage the steering column lock by removing the ignition key while the wheel is slightly turned. Turn the breaker bar counterclockwise to loosen the nut. Important rule of thumb: do not remove the center nut completely at this stage. Spin it off by hand until it is flush with the very top of the threaded steering shaft. Leaving the nut threaded on by a few turns creates a vital safety stop that prevents the wheel from flying off violently and striking you in the face when it finally breaks free.
Step 5: Apply Controlled Mechanical Pulling Force Without a Tool
What you need: Your upper body strength and a rubber mallet (optional).
Instructions: Because you do not have a mechanical gear puller, you will rely on the pull-and-shake method. Stand directly facing the steering wheel, hooking your hands around the 9 o’clock and 3 o’clock positions (or top and bottom). Pull sharply and firmly toward your chest, alternating your pulling pressure from side to side in a rocking motion. The goal is to walk the tapered spline out of its tight frictional grip. If brute arm strength alone fails, use the alternate push-and-tap technique: pull outward firmly with your body weight while an assistant uses a brass drift or taps the exposed center nut gently with a hammer. Never strike the steering wheel rim directly, especially if it is made of aluminum, wood, or brittle plastic, as it will shatter instantly.
Step 6: Remove the Nut and Separate the Wheel
What you need: Your hands and organized parts tray.
Instructions: Once the tapered splines break free from their factory seating, you will feel the steering wheel suddenly give way and loosen up on the shaft. Stop pulling immediately. Unscrew and completely remove the center retaining nut that you left loosely attached in Step 4. Carefully feed any remaining clockspring ribbons, horn wires, or cruise control wiring harnesses through the access hole in the center of the steering wheel hub. Slide the steering wheel straight toward you off the splined shaft, ensuring the internal wires do not snag or tear on the sharp edges of the metal hub. Place the steering wheel in a safe, clean spot out of the way of foot traffic.
Pro Tip: Keep the center nut screwed onto the threads of the steering shaft temporarily if you need to step away, ensuring the delicate threads do not get accidentally dinged or damaged by hanging tools.
✅ Final Checklist
- Negative battery terminal is fully disconnected and secured
- Airbag module is safely stored face-up in a secure location
- Alignment marks were made between the steering wheel and the shaft
- Steering wheel splines separated cleanly without damaging the clockspring
- All horn and electrical wires were safely fed through the center hub during removal
Important Notes:
- Never use a torch or open flame to heat a stubborn steering wheel hub, as this will destroy the internal airbag clockspring, steering column bearings, and plastic trim.
- If the steering wheel refuses to budge after trying safe manual pulling techniques, stop and rent or purchase a standard steering wheel puller to prevent permanent damage to your steering column.
- Estimated time required is 45 to 60 minutes, with a cost of $0 if using basic household and automotive tools you already own.
What Causes Steering Wheels to Jam on the Column Taper
Corrosion and Thermal Expansion Cycles
Temperature fluctuations inside your cabin cause the dissimilar metals of the aluminum wheel hub and the steel steering shaft to expand and contract at different rates. Over hundreds of thermal cycles, microscopic gaps fill with oxidation and fretting debris. This locks the splines together mechanically, turning a simple removal into a stubborn mechanical challenge.
Over-Torqued Retaining Nuts
Factory assembly lines or previous mechanics often over-torque the center retaining nut using pneumatic impact guns. This excessive clamping force drives the tapered hub deeper onto the shaft splines than intended, creating massive interference fit pressure. When you remove the nut, the metal wants to stay locked in that high-pressure state.
- Pneumatic tightening can stretch or deform the internal splines slightly.
- Thread locker applied during previous services adds chemical resistance to the mechanical bond.
- Years of static pressure cause the metals to cold-weld together at microscopic high points.
Understanding these root causes helps you apply your DIY force correctly. Instead of pulling straight up with your back, which usually yields zero results, you need to replicate the action of a mechanical puller by distributing shock or upward pressure evenly across the hub structure.
Step-by-Step Guide on How to Remove a Steering Wheel Without a Puller
Executing the pull-and-strike method requires precision to protect internal clock springs and wiring harnesses. According to automotive assembly guidelines, rushing this stage frequently causes thread damage or steering column failure.
Executing the Release
- Reinstall the central retaining nut loosely by threading it roughly three to four complete turns onto the shaft. This critical safety measure prevents the steering wheel from flying upward and striking your face when it finally breaks free.
- Sit in the driver seat, adjust your posture to ensure maximum pulling leverage, and firmly grip the steering wheel at the 9 o’clock and 3 o’clock positions.
- Apply a strong, steady pull toward your body while simultaneously using your knees to apply outward pressure from underneath the rim.
- Ask a helper to strike the center retaining nut sharply with a heavy brass drift and a rubber mallet, or firmly tap the rear perimeter of the wheel hub with a dead-blow hammer.
- Alternate between pulling and striking until the tapered splines release their grip, listening for the distinct metallic pop that indicates the bond has broken.
- Unscrew the central nut completely, disconnect any remaining horn or airbag wiring clips, and carefully lift the wheel straight off the steering column.
What If It Still Doesn’t Work? Troubleshooting Stubborn Wheels
Sometimes decades of oxidation cause aluminum hubs to fuse permanently onto steel splines. When standard manual leverage fails, specialized fallback techniques become necessary to avoid destroying the steering column bearings.
- Apply a professional-grade penetrating catalyst like Kroil or PB Blaster directly to the central shaft splines, and allow the solution to cure undisturbed for at least 45 minutes.
- Apply localized thermal energy to the aluminum hub using a heat gun set to 300 degrees Fahrenheit, keeping flames away to prevent damaging surrounding plastic components and airbag modules.
- Construct a makeshift puller by threading heavy-duty grade-8 bolts through the steering wheel accessory mounting holes and tightening them evenly against a metal spacer plate resting on the shaft.
- Evaluate the total risk of column damage and decide to seek professional mechanical assistance if the hub remains completely immovable after thermal cycles. Professional steering column extraction at a certified repair shop typically costs between $120 and $250 in labor fees.
Conclusion
Removing a steering wheel without a dedicated puller is entirely achievable by utilizing controlled leverage, proper safety precautions, and targeted impact forces. Following verified mechanical procedures protects delicate clock spring assemblies and saves valuable time during interior restoration projects. According to verified research and expert automotive sources, taking systematic safety steps prevents thousands of dollars in accidental steering column replacements annually. As your next actionable step, inspect your steering column splines for debris and apply a light coat of anti-seize lubricant before installing your new or restored wheel.
❓ Frequently Asked Questions
How do I safely remove the airbag before taking off the steering wheel?
Disconnect the vehicle battery and wait at least 10 minutes for the airbag capacitor to drain. Then, remove the retaining bolts on the back of the steering wheel to lift the airbag module out and disconnect its electrical connector.
What is the knee-pull method for removing a steering wheel?
Sit in the driver’s seat, place your knees behind the steering wheel rim applying upward pressure, and pull firmly toward yourself while tapping the center nut with a soft mallet.
Can I use a harmonic balancer puller instead of a steering wheel puller?
Yes, a standard harmonic balancer puller often works if it fits the bolt holes on your specific steering wheel hub, serving as a direct substitute for the factory tool.
Will yanking on the steering wheel damage the clock spring?
Excessive pulling or letting the wheel spin freely can damage the delicate clock spring behind it. Secure the wheel position and avoid twisting the wiring harness during removal.
What kind of lubricant should I use on a stuck steering wheel?
Quality penetrating oil like PB Blaster or WD-40 Specialist works best. Spray a small amount around the center shaft splines and allow it to penetrate for 15 to 30 minutes.
How do I align the steering wheel properly during reinstallation?
Match the alignment marks stamped on the shaft and the wheel hub. Ensure your front wheels are pointing straight ahead before tightening the center nut to factory torque specifications.