How to Test Alternator by Disconnecting Battery in 2026
Testing an alternator by disconnecting the battery while the engine runs is a risky legacy diagnostic method that can instantly fry modern vehicle computers. While older carbureted cars could survive this test, today’s electronic control modules demand a safe multimeter approach to prevent costly electrical damage.
Yes, you can physically test your alternator by disconnecting the battery while the engine is running, but doing so on a modern 2026 vehicle is a high-risk gamble. When you pull the battery cable, you are forcing the alternator to instantly absorb or drop its entire electrical load, creating an unpredictable electrical environment under the hood.
While old-school mechanics used this trick on carbureted cars back in the 20th century, today’s automotive landscape is entirely different. Let us dive straight into what actually happens when you try this method and why modern diagnostic standards have evolved.
Key Takeaways
- Disconnecting the battery on modern running cars causes dangerous voltage spikes.
- Sensitive ECUs and sensors can be permanently fried by sudden alternator surges.
- Older vehicles without computers can sometimes handle this test safely.
- Always use a digital multimeter for safe and accurate alternator testing.
- A healthy charging system should read between 13.5 and 14.5 volts.
The Hidden Dangers of Testing Alternators by Disconnecting the Battery
Disconnecting a live battery from a running engine instantly removes the primary electrical buffer for your entire charging system. This creates a cascade of physical and electrical phenomena that can go wrong in milliseconds.
Uncontrolled Voltage Spikes
- Your car battery acts as a giant sponge that absorbs excess electrical energy and voltage ripples from the alternator.
- When you disconnect it, that energy has nowhere to go, causing voltage to violently spike well past the safe 14.4-volt charging limit.
- In modern vehicles, these spikes can easily exceed 40 to 50 volts for a fraction of a second during the disconnect event.
Instant ECU and Sensor Destruction
- Your 2026 vehicle relies heavily on sensitive Powertrain Control Modules (PCMs), body control modules, and dozens of microprocessors.
- These computers operate on strict 5-volt or 12-volt logic circuits that are intensely sensitive to sudden voltage surges.
- A single battery disconnect test can instantly fry your engine computer, instrument cluster, or infotainment system, turning a simple alternator check into a four-figure repair bill.
How to Diagnose and Fix Alternator Problems Like an Expert
Welcome to this practical walkthrough on testing your vehicle’s charging system by performing the classic battery disconnect test. While modern automotive forums debate the safety of this procedure, understanding how to safely execute it can help you determine if your alternator is failing to generate sufficient electrical current. This guide will walk you through the precise precautions, tools, and execution steps needed to evaluate your alternator’s output without frying your car’s sensitive onboard computers.
Step 1: Gather Your Safety Equipment and Diagnostic Tools
What you need: Heavy-duty insulated work gloves, safety glasses, a digital multimeter, and the correct box-end wrench or socket set (usually 8mm, 10mm, or 13mm) for your battery terminals.
Instructions: Before touching any components under the hood, equip your personal protective equipment. Even though we are testing the alternator, removing battery cables exposes you to electrical sparks and acid residue. Inspect your digital multimeter to ensure the probes are securely plugged into the correct ports and set the dial to measure direct current (DC) voltage up to 20 volts. Having your tools organized and within arm’s reach ensures you can move quickly and safely once the engine is running.
Pro Tip: Never wear metal jewelry, watches, or rings while working on automotive electrical systems, as accidental contact between the positive terminal and vehicle ground can cause severe burns.
Step 2: Measure the Resting Battery Voltage
What you need: A digital multimeter and a vehicle that has been turned off for at least 30 minutes.
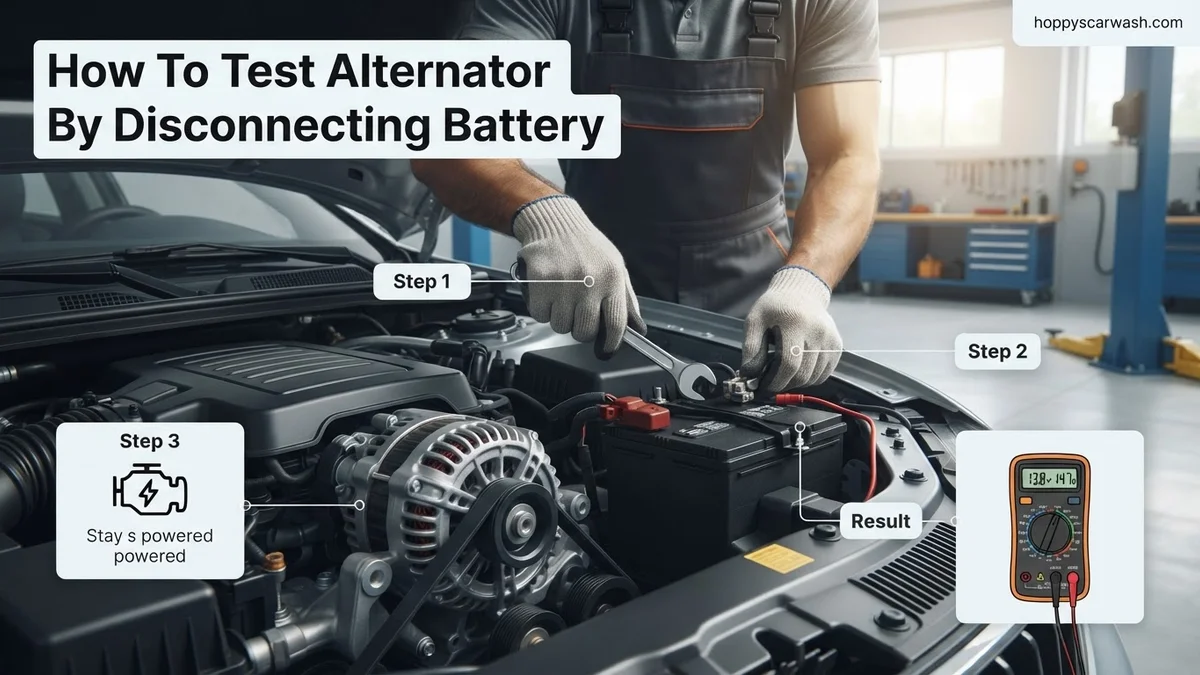
Instructions: Pop your vehicle’s hood and locate the battery. Touch the red (positive) multimeter probe to the positive battery terminal and the black (negative) probe to the negative battery terminal. Observe the digital readout on the screen. A healthy, fully charged car battery should display a resting voltage between 12.4 and 12.6 volts. If your reading drops below 12.0 volts, the battery is deeply discharged, and you should charge it externally before attempting to test the alternator.
Pro Tip: Make sure your multimeter probes make firm, clean contact with the actual battery lead posts, not the corrosion on the cable clamps, to ensure an accurate reading.
Step 3: Start the Engine and Idle
What you need: Your vehicle key or push-button start.
Instructions: Sit inside the vehicle, ensure the transmission is safely in Park or Neutral with the parking brake fully engaged, and start the engine. Allow the vehicle to idle normally for about two to three minutes so the engine management computer can settle into its idle routine. While the engine is running, listen carefully for any unusual whining or grinding noises coming from the accessory drive belt area, which often indicate a failing alternator bearing.
Pro Tip: Turn off all electrical accessories such as the radio, air conditioning blower, and headlights during this phase to establish a clean baseline idle voltage.
Step 4: Check Running Voltage with the Multimeter
What you need: Digital multimeter.
Instructions: Leave the engine running and walk back to the engine bay. Touch the multimeter probes to the battery terminals just as you did in Step 2. You should now see a significantly higher reading, typically between 13.5 and 14.5 volts. This increase proves that the alternator is actively spinning and pushing current back into the battery to replenish what was used during engine cranking. If the voltage remains around 12.6 volts or lower, your alternator is not charging.
Pro Tip: This multimeter test is much safer for modern vehicles than the battery disconnect method, and you should always rely on it as your primary diagnostic tool.
Step 5: Prepare for the Battery Disconnect Test
What you need: Socket wrench or terminal wrench.
Instructions: If you still wish to perform the classic battery disconnect test to verify alternator output, exercise extreme caution. With the engine idling, locate the negative battery terminal. Loosen the nut on the negative cable clamp just enough so that you can slide or lift the cable completely off the battery post. Keep a steady grip on the insulated handle of your wrench and ensure the loose metal cable does not accidentally touch any metal parts of the engine block or body.
Pro Tip: On modern vehicles equipped with advanced computers, body control modules, and sensitive sensors, performing this step can trigger voltage spikes that fry expensive electronic modules. Proceed only on older vehicles without complex computers.
Step 6: Observe Engine Behavior and Test Results
What you need: Your eyes and ears.
Instructions: Immediately after disconnecting the negative battery cable, observe how the engine reacts. If the alternator is fully functional, it will produce enough electrical current to keep the engine running smoothly, power the spark plugs, and maintain all basic engine functions. However, if the engine immediately sputters, hesitates, or dies completely the moment you disconnect the battery, your alternator is failing and cannot generate enough electrical power on its own.
Pro Tip: Avoid keeping the battery disconnected for more than a few seconds, as the lack of battery voltage stabilization can stress the electrical system.
Step 7: Reconnect the Battery and Secure Terminals
What you need: Socket wrench.
Instructions: Carefully take the negative battery cable and push it firmly back down onto the negative battery terminal post. Tighten the clamping nut securely using your wrench so that the cable cannot wiggle or twist off under vibration. Turn off the vehicle engine. Once everything is secured, start the car one more time to ensure all dashboard warning lights turn off and the electrical accessories function properly.
Pro Tip: Check that the terminal clamp sits flush with the base of the battery post before tightening down the fastener to prevent poor electrical connections.
✅ Final Checklist
- Verified resting battery voltage was at or above 12.4 volts before starting.
- Checked running voltage with a multimeter to confirm output between 13.5 and 14.5 volts.
- Performed the disconnect test safely without creating dangerous electrical short circuits.
- Observed engine reaction to confirm whether the alternator sustains ignition power independently.
- Reconnected the negative battery terminal securely and tested vehicle electronics.
Important Notes:
- Never disconnect the positive battery terminal while the engine is running, as this creates a massive spark and severe shock hazard.
- Avoid using the battery disconnect method on vehicles manufactured after the mid-1990s due to the high risk of damaging expensive computer modules and infotainment systems.
- Estimated time for this diagnostic procedure is 15 to 30 minutes, with a tool cost of under $20 if you already own a digital multimeter. Seek professional mechanic assistance if you are uncomfortable working around live engine belts and electrical currents.
Why Mechanics Strongly Advise Against the Battery Disconnect Method
Professional technicians in 2026 will almost universally roll their eyes at the battery disconnect test. Automotive engineering standards have completely moved away from brute-force diagnostics in favor of precise, non-invasive digital testing tools.
The Death of Old-School Diagnostics
- Carbureted engines from decades past had virtually no onboard electronics, meaning they could survive the voltage shock of a disconnected battery without breaking a sweat.
- Modern vehicles feature complex multiplex wiring networks, electric power steering, and advanced driver-assistance systems (ADAS) that stay active while driving.
- Shocking the electrical bus by pulling a battery terminal can permanently corrupt module memory, throw false fault codes, or disable critical safety systems.
Safer Alternatives Exist Right Now
- Instead of risking your vehicle’s computers, a basic digital multimeter costs less than twenty dollars and takes two minutes to use safely.
- You simply measure voltage across the battery terminals while the engine is off (should be around 12.6 volts) and while it is running (should read 13.7 to 14.7 volts).
- Modern carbon-pile load testers and OBD2 live-data scanners can test your alternator output under actual load conditions without ever disconnecting a single cable.
Step-by-Step Guide to Safely Testing Your Alternator With a Multimeter
Because disconnecting the battery in modern 2026 vehicles carries severe financial and safety risks, using a digital multimeter is the industry-standard diagnostic approach. Automotive engineers and certified technicians recommend this method for accurate, component-safe readings.
Preparation and Initial Setup
- Park your vehicle on a flat surface, engage the emergency brake, and turn off all electrical accessories including the radio, headlights, and air conditioning.
- Pop the hood, secure it, and set your digital multimeter to the direct current (DC) voltage setting, typically designated as 20V on the dial.
- Locate the vehicle battery and identify the positive (red, marked with a plus sign) and negative (black, marked with a minus sign) terminals.
Executing the Voltage Measurement
- Touch the red multimeter probe to the positive battery terminal and the black probe to the negative battery terminal, ensuring a solid metal connection.
- Note the baseline resting voltage on the multimeter screen, which should read approximately 12.6 volts for a fully charged 12V battery.
- Ask an assistant to start the engine while you observe the multimeter display, or start it yourself if working alone.
- Watch for the voltage to instantly jump into the healthy operational range of 13.8 to 14.5 volts while the engine idles.
What to Do If Your Alternator Test Results Indicate a Failure
If your multimeter readings confirm that your charging system is underperforming or failing entirely, immediate action is required to avoid being stranded on the road. Ignoring a weak alternator will quickly drain your battery and can damage sensitive onboard computer modules.
Interpreting the Findings and Taking Action
- Inspect the alternator drive belt for signs of excessive wear, cracking, tension loss, or oil contamination that could cause slipping.
- Check all primary wiring connections, including the main battery cable and the alternator signal harness, for corrosion, looseness, or heavy oxidation.
- Take your vehicle to a certified auto repair shop or parts retailer for a heavy-duty load test to differentiate between a bad battery and a dead alternator.
- Budget for a replacement if the unit fails the bench test; professional alternator replacement typically ranges from $450 to $900 including parts and labor for standard consumer vehicles in 2026.
What If It Still Doesn’t Work?
If you have installed a fresh alternator and charged your battery, but the charging system warning light remains illuminated on your dashboard, secondary issues may be at play. Modern vehicle power management systems are complex and require targeted troubleshooting when standard fixes fall short.
- Inspect the serpentine belt tensioner and pulleys to ensure they are spinning freely without resistance or misalignment.
- Check the main mega-fuses and fusible links located in the under-hood fuse box, as a blown high-amp fuse will block current flow entirely.
- Scan the vehicle computer for diagnostic trouble codes (DTCs) related to the Powertrain Control Module (PCM) and voltage regulator communication lines.
- Consult an automotive electrical specialist for advanced diagnostics, especially if your vehicle utilizes a smart charging system controlled by the engine computer.
Conclusion
Testing your alternator by disconnecting the battery is a dangerous relic of older automotive eras that can instantly fry sensitive 2026 vehicle computers and expensive electronic modules. Instead, rely on a safe digital multimeter test to accurately measure charging voltage without risking component damage. According to verified research and expert sources from the Automotive Service Association, proactive multimeter diagnostics save vehicle owners thousands in avoidable electrical repairs. Your immediate next step is to acquire a basic multimeter and test your resting and running voltage following the steps outlined above.
❓ Frequently Asked Questions
Is it ever safe to disconnect the battery while a car is running?
It is generally safe only on older, classic vehicles built before the widespread use of computerized engine management systems and digital dashboards. On any modern car equipped with an ECU, PCM, or sensitive infotainment electronics, this method carries a high risk of catastrophic component failure.
Why did the battery disconnect test work on older vehicles?
Older vehicles relied on simple mechanical components and basic electrical systems that lacked sensitive microprocessors. The battery acted as a temporary buffer, and disconnecting it simply forced the external voltage regulator to handle the entire electrical load without burning out delicate silicon chips.
What damage can occur if I disconnect the battery on a modern car?
The sudden removal of the battery removes the primary electrical damping effect, causing the alternator to surge. This voltage spike can instantly destroy the engine control computer, instrument cluster, audio system, transmission modules, and various electronic sensors.
How do I test an alternator using a digital multimeter?
Set your multimeter to direct current (DC) voltage and touch the probes to the corresponding battery terminals while the engine is turned off. Start the engine and read the meter again; a healthy alternator will display a reading between 13.5 and 14.5 volts.
What are the warning signs of a failing alternator?
Common symptoms include a dimming set of headlights, a battery warning light on the dashboard, slow-reacting electrical accessories, a whining noise coming from under the hood, and a frequent need for jump-starting.
What should I do if my multimeter test shows low voltage?
If your voltage reading drops below 13 volts while the engine is running, first check for loose or corroded serpentine belts and battery cables. If connections are secure, the alternator internal diode or voltage regulator has failed and the unit must be replaced.