How Do I Reset the Check Engine Light on Toyota 2026 Guide
To reset the check engine light on a Toyota, you must first resolve the underlying mechanical or electrical issue. Once fixed, you can clear the dashboard warning using an OBD-II scanner or by disconnecting the negative battery terminal for several minutes.
You can reset the check engine light on your Toyota in two main ways: by clearing the fault codes with an inexpensive OBD-II scanner or by disconnecting the negative battery terminal for about 15 minutes. Both methods wipe the computer memory and turn off the dashboard warning.
Clearing that amber light brings immediate peace of mind as you head into 2026. However, simply erasing the code without fixing the root mechanical or electrical issue means the light will almost certainly return within a few drive cycles.
Key Takeaways
- Always diagnose the trouble code before attempting to clear the dashboard light.
- An OBD-II scanner is the safest and most accurate tool for clearing codes.
- Disconnecting the negative battery terminal for 15 minutes can manually reset the ECU.
- Clearing the light without fixing the problem causes it to return quickly.
- Some older Toyota models required manual button sequences near the steering column.
What Causes the Check Engine Light to Turn On in Toyotas
Common Mechanical and Sensor Triggers
Modern Toyotas feature sophisticated engine management computers that monitor dozens of emission and performance sensors. When a reading falls outside factory parameters, the computer stores a diagnostic trouble code and illuminates the dashboard indicator. Knowing what triggered the light helps you decide if a simple reset will suffice or if a repair is required.
- Loose gas cap: This is the single most frequent culprit on modern Toyota models, allowing fuel vapors to escape and tripping the evaporative emissions monitor.
- Oxygen sensor failure: Sensors in your exhaust stream track unburned oxygen, and a failing sensor sends erratic data to the ECU.
- Mass Air Flow (MAF) sensor contamination: Dust or oil on the MAF sensor wire alters air-fuel ratio calculations, often triggering a lean or rich code.
- Ignition system wear: Worn spark plugs or failing ignition coils cause cylinder misfires that immediately register on your dash.
The Danger of Ignoring the Underlying Problem
Resetting your Toyota’s computer only wipes the error code from the temporary memory. It does not fix a failing catalytic converter, a vacuum leak, or a faulty thermostat. If you clear the code without addressing the mechanical fault, you risk burning excess fuel, damaging expensive emission components, or getting stranded. Always diagnose the code before you clear it to ensure your vehicle remains safe and efficient on the road.
How to Diagnose and Fix Toyota Check Engine Light Like an Expert
Dealing with an illuminated check engine light on your Toyota can be stressful, but resetting it is a straightforward process once you understand the underlying issues. Whether you drive a dependable Camry, a rugged Tacoma, or a spacious RAV4, this comprehensive manual will walk you through reading the diagnostic codes, addressing the root mechanical or electrical problems, and safely clearing the dashboard indicator. Follow these expert procedures to ensure your vehicle runs smoothly and stays emissions-compliant without unnecessary trips to the repair shop.
Step 1: Inspect the Fuel Cap
What you need: Just your hands and a moment to examine your vehicle’s exterior.
Instructions: Before reaching for any advanced diagnostic tools, walk to the rear of your Toyota and check the gas cap. A loose, damaged, or improperly sealed fuel cap is the single most common cause of a Toyota check engine light because it disrupts the pressure in the Evaporative Emission Control (EVAP) system. Unscrew the gas cap completely, inspect the rubber gasket for dry rot or cracks, and then screw it back on tightly until you hear it click at least one distinct time. Sometimes, simply securing a loose cap will cause the computer to self-clear the light after a few driving cycles.
Pro Tip: Never force a cross-threaded cap. If the plastic clicking mechanism is broken, replace the cap immediately with an OEM Toyota part to maintain proper tank sealing.
Step 2: Connect an OBD-II Scanner
What you need: An OBD-II diagnostic scanner, which you can purchase online or borrow from an auto parts store.
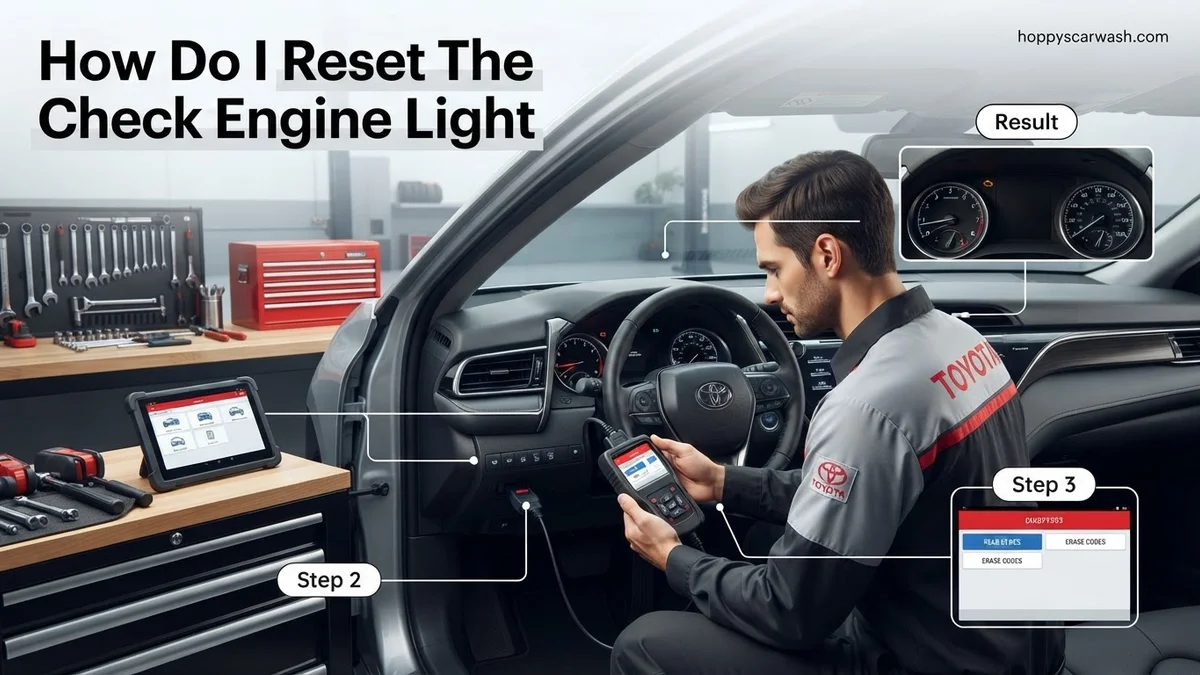
Instructions: Locate the OBD-II diagnostic port inside your Toyota cabin. On almost all modern Toyota models, this 16-pin connector is situated underneath the driver’s side dashboard, directly above the gas and brake pedals near the steering column. Situate yourself comfortably, plug the scanner’s cable connector firmly into the port, and turn your ignition key to the “ON” position without starting the engine (or press the push-start button twice without holding the brake pedal). Power on the scanner, and it will automatically interface with your Toyota’s Engine Control Module (ECM) to establish communication.
Pro Tip: Ensure your ignition is fully in the ON position, not just accessory mode, otherwise the scanner will fail to link with your vehicle’s computer system.
Step 3: Read and Document Diagnostic Trouble Codes (DTCs)
What you need: Your OBD-II scanner, plus a notepad and pen or your smartphone to take a photo.
Instructions: Once the scanner successfully links with your Toyota’s computer, select the “Read Codes” or “Diagnostic Trouble Codes” option on the device menu. The screen will display one or more alpha-numeric codes, typically starting with the letter “P” followed by four numbers (for example, P0420 for catalyst efficiency or P0128 for thermostat issues). Write down every single code that appears on the screen. It is vital to record these codes rather than just clearing them, because erasing the memory without fixing the underlying problem guarantees the check engine light will return within a few miles of driving.
Pro Tip: Many advanced scanners will also show “Pending” codes. Pay attention to these, as they indicate intermittent faults that haven’t triggered a permanent light yet.
Step 4: Research and Address the Underlying Mechanical Issue
What you need: Access to the internet, basic automotive repair tools, or replacement parts specific to your Toyota model.
Instructions: Look up your recorded Diagnostic Trouble Codes online or consult a Toyota repair manual to determine what specific malfunction triggered the alert. For instance, if you have a code related to an oxygen sensor, you will need to inspect the wiring harness or replace the faulty sensor using an oxygen sensor socket. Perform the necessary repairs or replace any broken components. Ignoring the root cause and simply resetting the light will leave your vehicle vulnerable to poor fuel economy, rough idling, or potential catalytic converter damage over time.
Pro Tip: If your code points to a complex internal engine issue or transmission fault, do not attempt a DIY fix unless you have advanced mechanical training.
Step 5: Clear the Codes Using the OBD-II Scanner
What you need: Your plugged-in OBD-II scanner with the ignition in the ON position.
Instructions: Navigate through the main menu of your OBD-II scanner to locate the function labeled “Clear Codes,” “Erase Trouble Codes,” or “Reset.” Select this option and confirm your choice when the device prompts you with a warning asking if you are sure you want to erase diagnostic data. The scanner will send a command to your Toyota’s ECM, wiping the trouble codes and instantly turning off the check engine light on your dashboard instrument cluster. You will also notice that readiness monitors are temporarily reset.
Pro Tip: Clearing codes with a scanner also erases your car’s computer learning memory. Your Toyota might idle slightly rough for the first few miles as it recalibrates.
Step 6: Perform a Drive Cycle to Verify Readiness
What you need: A stretch of open road or highway where you can safely drive your Toyota for 15 to 20 minutes.
Instructions: After resetting the light, take your Toyota out for a test drive to ensure the system passes self-diagnostics. Execute a complete drive cycle: start the car from a cold state, let it idle for two minutes, drive on city streets reaching speeds up to 45 mph, and then drive on a highway maintaining a steady 55 to 65 mph for at least five continuous miles without using cruise control. This specific sequence allows internal sensors like the EVAP system, oxygen sensors, and catalytic converter to run their automated self-tests and confirm everything is operating correctly.
Pro Tip: Do not disconnect your car battery as an alternative reset method unless absolutely necessary, as it wipes out radio presets and forces you to redo the entire drive cycle.
✅ Final Checklist
- Gas cap is securely tightened and rubber seal is completely undamaged
- All diagnostic trouble codes (DTCs) were successfully read and recorded
- Mechanical repairs or part replacements were properly completed
- OBD-II scanner successfully cleared the codes and extinguished the dashboard light
- Vehicle passed a complete driving cycle without the check engine light returning
Important Notes:
- Never attempt to clear a check engine light right before a state emissions inspection, as the computer will show “Not Ready” status and fail the test automatically.
- If the check engine light begins flashing instead of glowing steadily, pull over safely immediately—a flashing light indicates severe engine misfire that can destroy your catalytic converter.
- Estimated time for diagnostic scanning and clearing is 15 minutes, with costs ranging from $0 if borrowing a tool to $50–$150 for a basic consumer scanner purchase. Seek professional mechanic assistance if complex electrical or internal engine issues persist.
How to Fix and Reset the Check Engine Light Using an OBD-II Scanner
Connecting the Scanner and Reading Codes
Using a handheld OBD-II code reader is the cleanest, most precise method to clear a check engine light on any Toyota built from 1996 to the current 2026 models. This tool plugs directly into your vehicle’s data link connector and communicates with the engine computer to reveal the exact reason for the warning.
- Locate the OBD-II port under the driver-side dashboard, usually near your knees or close to the hood release lever.
- Plug your code reader into the port while your Toyota’s ignition is turned to the ON position without starting the engine.
- Follow the device prompts to read the stored diagnostic trouble codes and write them down for your reference.
- Inspect the reported systems to ensure you have repaired or tightened any obvious faults, such as replacing a cracked vacuum line or securing a loose gas cap.
Clearing the Code from the ECU Memory
Once you have diagnosed and resolved the issue, you can use the scanner interface to wipe the fault code and turn off the dashboard light permanently.
- Navigate the scanner menu to the Clear Codes, Erase, or Reset function.
- Confirm the command when the device asks if you want to erase diagnostic data and turn off the malfunction indicator lamp.
- Turn the ignition off, unplug the scanner, and start your Toyota to verify the check engine light is gone.
- Drive the vehicle for 10 to 15 miles to complete the internal monitor readiness cycle and ensure the light does not return.
Step-by-Step Guide to Resetting the Light Without a Scanner
For Toyota owners who do not own an OBD-II scanner, the manual battery disconnect method often works to clear minor diagnostic trouble codes. This procedure temporarily cuts power to the engine control module, clearing the computer’s volatile memory. Automotive repair standards recommend following strict safety protocols before touching vehicle electrical components in 2026.
Preparation and Safety
Park the vehicle on a flat surface, engage the parking brake, and turn off the ignition. Wear safety glasses and insulated gloves to prevent accidental shocks or acid exposure. Locate the vehicle battery, typically found under the hood on the driver or passenger side depending on the Toyota model.
The Manual Reset Procedure
- Use a 10mm wrench to loosen the nut on the negative (-) battery terminal clamp.
- Carefully pull the negative cable away from the battery post, ensuring it does not touch any metal surfaces or the positive terminal.
- Wait a minimum of 15 to 20 minutes to allow all electronic control units to fully discharge their internal capacitors.
- Press the vehicle’s horn or turn on the headlights for 30 seconds to drain any residual electrical current remaining in the system.
- Firmly reattach the negative battery cable back onto the negative post and tighten the 10mm nut securely.
- Start the Toyota and check the instrument cluster to verify whether the check engine light has cleared.
What If It Still Doesn’t Work?
If the check engine light remains illuminated or immediately returns after using a scanner or disconnecting the battery, an active fault code persists within the system. According to automotive service data, persistent warning lights indicate that the root mechanical or electrical issue has not been resolved. Consider the following troubleshooting fallback steps:
- Recheck the fault code using a reliable OBD-II scanner to identify if a new or recurring diagnostic trouble code has registered.
- Inspect the gas cap for wear, cracks, or loose fitting, as a faulty evaporative emissions seal frequently triggers persistent Toyota dashboard warnings.
- Drive the vehicle through a standardized drive cycle lasting 15 to 20 minutes to allow the computer to re-evaluate emission sensors.
- Consult a certified technician or dealership service center if the light continues to defy clearing procedures, ensuring proper component testing.
Professional diagnostic fees at certified service centers generally range from $100 to $150, though this fee is often applied toward the total cost of any necessary repairs.
Conclusion
Resetting the check engine light on a Toyota is a straightforward process when approached with the correct tools, such as an OBD-II scanner or a proper battery disconnect procedure. Clearing the dashboard indicator removes temporary faults, but addressing the underlying mechanical or electrical trigger remains essential for long-term vehicle health. According to verified research and automotive service standards, ignoring an underlying sensor or emission failure will cause the warning light to return within a few driving cycles. An actionable next step is to scan your Toyota for active diagnostic codes today to ensure safe and compliant operation on the road.
❓ Frequently Asked Questions
How do I use an OBD-II scanner to reset the check engine light on a Toyota?
Plug the scanner into the diagnostic link connector beneath the driver-side dashboard, turn the ignition key to the ON position, select the read/erase codes function on the menu, and confirm the deletion of the stored trouble codes.
Is it safe to disconnect the car battery to clear dashboard warning lights?
Disconnecting the negative battery terminal is generally safe, but it will also reset your radio presets, clock, and powertrain control module learning parameters, requiring a brief drive cycle to relearn idle settings.
What should I do if the check engine light is flashing?
A flashing check engine light indicates a severe engine misfire that can damage the catalytic converter. You should pull over safely, turn off the engine, and avoid driving the vehicle until it is towed or inspected.
Do Toyota vehicles have a manual odometer reset button method for clearing codes?
Older Toyota models from the late 1990s and early 2000s sometimes allowed maintenance required lights to be reset via the odometer button, but actual engine trouble codes always require an OBD-II scan tool or battery reset.
How many drive cycles does it take for emission monitors to reset?
Complete OBD-II monitor readiness typically requires driving for 20 to 30 miles over several days, including mixed city and highway driving conditions.
Can I pass inspection immediately after resetting my check engine light?
No, plugging into an emissions testing machine immediately after clearing codes will result in a ‘not ready’ status failure, forcing you to drive until internal system monitors run successfully.