How to Bleed Brakes by Yourself No Special Tools 2026 Guide
Bleeding your vehicle’s brakes alone without expensive equipment is entirely possible using common household items like clear plastic tubing and a plastic bottle. This guide details a reliable DIY method to remove trapped air and restore firm brake pedal pressure safely.
Bleeding your vehicle’s brakes by yourself without any special tools is entirely possible using a simple DIY catch bottle and a piece of clear tubing. You do not need an expensive one-man vacuum bleeder or a pressurized tank system to get a firm pedal feel.
By utilizing the classic gravity method or a homemade check-valve tube assembly, you can successfully flush old fluid and purge trapped air right in your driveway in 2026. This approach saves you shop labor costs while giving you total control over your hydraulic system’s maintenance.
Key Takeaways
- Use a DIY clear tube and bottle to prevent air from re-entering brake lines.
- Always start with the brake bleeder valve furthest from the master cylinder.
- Keep the master cylinder reservoir topped off constantly to avoid drawing in new air.
- A gravity bleed method requires zero pedal pumping and works great for light air removal.
- Safely jack and support the vehicle with jack stands before beginning any work.
What Causes Spongy Brakes and Why Air Gets Trapped
The Danger of Compressible Air Pockets
Hydraulic brake fluid is non-compressible, which is why pressing your pedal instantly forces the brake pads against the rotors. When air enters the lines, that physics changes completely. Air compresses easily under pressure, meaning your foot travels further toward the floor before you actually feel stopping power.
Common Entry Points for Air in 2026 Vehicles
Air typically enters your braking system during component replacements like calipers or flex hoses, or simply when fluid levels drop too low in the master cylinder reservoir. Modern ABS modules can also trap micro-bubbles if a line runs dry. Identifying these entry points helps you understand why keeping the reservoir full during your solo bleed is non-negotiable.
- Low fluid levels allowing the master cylinder to draw in air from the reservoir.
- Loose bleeder valves or degraded rubber sealing caps letting air seep past the threads.
- Permeable or cracked flexible brake lines that admit air under vacuum or pressure cycles.
From Start to Finish: Solo Brake Bleeding Explained
Bleeding your car brakes by yourself without any fancy vacuum pumps, pressure bleeders, or a helpful assistant can seem intimidating, but it is entirely possible with the right technique. Over time, air bubbles find their way into your hydraulic brake lines, resulting in a spongy, unresponsive brake pedal that compromises your safety. This practical walkthrough will teach you how to flush out that trapped air and restore firm, reliable stopping power using only basic household items and common garage tools. By utilizing the clever DIY methods detailed below, you will save money, gain mechanical confidence, and master a vital maintenance skill right in your own driveway.
Step 1: Gather Your Supplies and Prepare the Vehicle
What you need: A clear piece of flexible vinyl tubing (about 2 feet long, fitting snugly over your bleeder valves), an empty glass or plastic bottle, a box-end wrench matching your bleeder valves (usually 8mm, 10mm, or 3/8-inch), fresh brake fluid of the correct DOT rating specified in your owner’s manual, rags, and a jack with jack stands.
Instructions: Park your car on a completely flat, level surface and engage the parking brake firmly. Loosen the lug nuts slightly on all four wheels, jack up the vehicle securely, and place heavy-duty jack stands underneath the frame rails for safety. Remove all four wheels to gain unobstructed access to the brake calipers or wheel cylinders. Locate the bleeder valve on the back of each brake assembly and wipe away any accumulated dirt, grease, or road grime using a clean rag and a bit of brake cleaner.
Pro Tip: Never use old or previously opened brake fluid sitting on your shelf; brake fluid aggressively absorbs moisture from the air, which ruins its boiling point. Always crack open a fresh, sealed bottle for this job.
Step 2: Create a DIY One-Man Bleeder Kit
What you need: The clear vinyl tubing and empty bottle gathered in the previous step, plus a utility knife or pair of scissors and some heavy tape or zip ties.
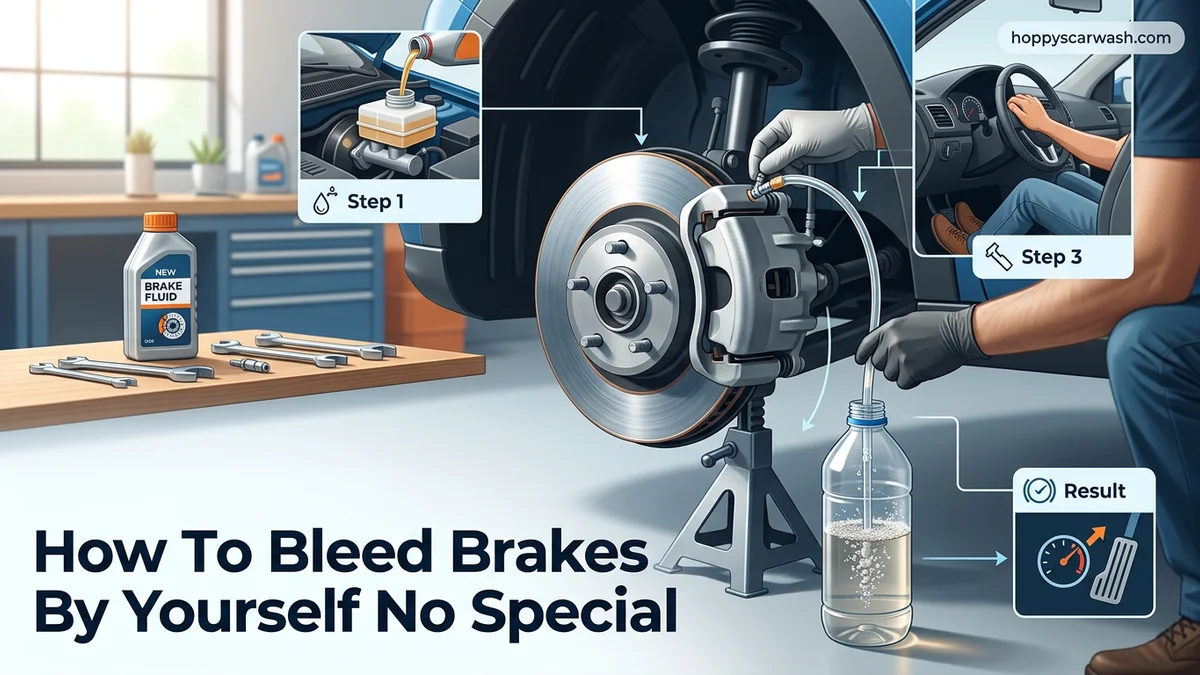
Instructions: Take your empty bottle and poke a small hole in the cap just wide enough to push your clear vinyl tubing through it. Insert one end of the tubing through the cap so it reaches nearly to the bottom of the bottle. Leave the other end free to connect to your brake bleeder valve. Next, drill a tiny second hole in the bottle cap to act as a pressure vent so air can escape as fluid fills the container. Pour about an inch of fresh brake fluid into the bottom of the bottle so that the submerged end of the tube stays completely covered in liquid during the entire bleeding process.
Pro Tip: Submerging the end of the tube in fluid creates a one-way check valve system. When you release the brake pedal, the system will suck back fluid from the bottle rather than pulling air back into your brake caliper.
Step 3: Master the “Modified Gravity” and Pedal Pump Technique
What you need: Your homemade bleeder bottle setup, your box-end wrench, and a brick, heavy block of wood, or a sturdy stick to hold the brake pedal down.
Instructions: Start at the wheel furthest from the master cylinder (typically the passenger-side rear wheel, followed by driver-side rear, passenger-side front, and finally driver-side front). Slip your box-end wrench over the bleeder valve, and then firmly attach your clear vinyl tube to the valve nipple. Go inside the car and slowly pump the brake pedal three to four times, and then hold constant pressure down on the pedal using your brick or heavy object. Walk back to the wheel, loosen the bleeder valve about a quarter to a half-turn with your wrench. You will see old fluid and air bubbles rush through the clear tube into your bottle. Quickly tighten the valve back up before you go back inside the car to release the pedal.
Pro Tip: Communication is key, even when working alone! Do not let the brake pedal lift up while the bleeder valve is open, otherwise, air will immediately rush back into the hydraulic system.
Step 4: Monitor and Replenish the Master Cylinder Reservoir
What you need: A flashlight, fresh brake fluid, and a clean turkey baster or lint-free rags.
Instructions: Open your engine bay and locate the brake master cylinder fluid reservoir. Throughout the bleeding process, you must check the fluid level after every two to three pedal pump cycles. If the fluid level drops below the minimum line, the master cylinder will suck air into the internal lines, forcing you to restart the entire bleeding process from the beginning. Carefully top off the reservoir with fresh brake fluid up to the “MAX” line using a funnel to prevent spills. If your old fluid looks dark, murky, or contaminated, use a clean turkey baster to extract the old fluid from the reservoir and refill it with fresh fluid before you begin pumping.
Pro Tip: Brake fluid acts like an industrial paint stripper. If you accidentally spill any fluid on your car’s painted body panels, immediately rinse the area thoroughly with copious amounts of water—do not wipe it, as wiping will scratch the paint.
Step 5: Repeat the Cycle Until Fluid Runs Clean
What you need: Your bleeder kit, wrench, fresh brake fluid, and plenty of patience.
Instructions: Continue the cycle of pumping the pedal, securing it down, opening the bleeder valve to let fluid and air out, tightening the valve, and returning to the driver’s seat to release the pedal. Closely watch the clear vinyl tubing. You will know this wheel is successfully bled when the fluid running through the tube is completely crystal clear and entirely free of tiny air bubbles. Once you achieve this, securely tighten the bleeder valve to manufacturer torque specifications (do not over-tighten, or you may snap the fragile brass fitting). Remove your tubing and push a clean rubber dust cap over the bleeder nipple to protect it from corrosion.
Pro Tip: Keep a running mental tally or write down how many times you bleed each corner. Rear brakes typically take more cycles because the lines are longer and hold more fluid volume than the front brakes.
Step 6: Progress to the Remaining Wheels in Sequence
What you need: Wrench, bleeder bottle, and fresh fluid.
Instructions: Move systematically to the next wheel in the correct bleeding sequence: Passenger Rear, Driver Rear, Passenger Front, and finally Driver Front. Repeat the exact same process for each wheel: attach the DIY bottle system, pump and hold the pedal, crack the valve, tighten the valve, release the pedal, and continuously monitor the master cylinder fluid level under the hood. Empty your collection bottle into a sealed container whenever it gets too full, making sure to keep the tube submerged in fluid for the next wheel. Take your time to ensure zero air bubbles escape into the clear tubing at every single corner of the vehicle.
Pro Tip: Never mix different DOT types of brake fluid unless specified. Most standard street cars use DOT 3 or DOT 4 fluid, which are glycol-based and compatible, but never mix them with silicone-based DOT 5 fluid.
Step 7: Final Pedal Check and Cleanup
What you need: Brake parts cleaner, clean rags, and your car keys.
Instructions: Before putting your wheels back on, top off the master cylinder reservoir one final time to the “MAX” line and firmly secure the cap. Sit in the driver’s seat and press the brake pedal with your foot. The pedal should feel firm, solid, and high up, stopping firmly before it sinks halfway to the floorboards. If the pedal still feels spongy, spongy feedback indicates that air is still trapped somewhere in the system, requiring you to re-bleed the wheels. Once you are satisfied with the pedal firmness, spray any spilled brake fluid around the bleeder valves with brake cleaner and wipe everything down. Reinstall your wheels, lower the car off the jack stands, and torque your lug nuts to factory specifications.
Pro Tip: Perform a slow-speed test drive in an empty, safe parking lot before hitting public roads, testing your brakes gently at 5 MPH to ensure everything is operating properly.
✅ Final Checklist
- Brake fluid master cylinder reservoir is filled exactly to the MAX line and cap is secure
- All four bleeder valves are fully tightened and fitted with their protective rubber dust caps
- Brake pedal feels firm and resolute, with no spongy or sinking feeling when depressed
- Wheels are securely reinstalled and lug nuts are torqued to manufacturer specifications
- Old brake fluid has been safely stored for proper recycling at an auto parts store
Important Notes:
- Brake fluid is toxic and highly corrosive; always wear safety glasses and nitrile gloves, and keep it away from painted surfaces.
- If you perform a full bleed and the pedal remains spongy despite multiple attempts, you may have a failing master cylinder or internal leak requiring professional mechanic intervention.
- Estimated time: 1.5 to 2.5 hours. Estimated cost: $15 to $30 for a couple of bottles of fresh brake fluid and basic tubing.
Essential Preparation and Household Items Needed for Solo Bleeding
Gathering Your DIY Bleeding Gear
Since you are working completely alone, you need a setup that prevents air from sucking back into the bleeder valve when you release the brake pedal. Skip the commercial vacuum pumps and gather items you likely already have around your garage or kitchen.
- A short length of clear vinyl tubing (usually 1/4-inch inner diameter) that snugly fits over your bleeder nipple.
- A clean, empty plastic water bottle or glass jar to act as your fluid catch container.
- A box-end wrench that matches your vehicle’s specific bleeder valve size (typically 8mm, 10mm, or 3/8-inch).
- Fresh, unopened DOT 3 or DOT 4 brake fluid matching your vehicle manufacturer specifications for 2026.
- A brick, heavy block of wood, or a specialized pedal depressor stick if you choose the modified pedal-push method.
Vehicle Setup and Safety Precautions
Proper preparation ensures you do not damage your vehicle or introduce contaminants into your brake system. Park your car on a completely flat, stable surface and chock your wheels securely. Clean any dirt away from the master cylinder cap before opening it to prevent debris from falling into the reservoir.
Locate the correct bleeding sequence for your specific vehicle configuration. Most modern front-wheel-drive and rear-wheel-drive cars require you to start at the wheel furthest from the master cylinder and work your way to the closest:
- Passenger side rear wheel
- Driver side rear wheel
- Passenger side front wheel
- Driver side front wheel
Step-by-Step Guide on How to Bleed Brakes by Yourself With No Special Tools
Bleeding your brakes solo requires patience and a reliable method to prevent air from re-entering the system. The DIY gravity method or the modified push-method using a piece of clear tubing and a catch bottle works exceptionally well for modern 2026 vehicles.
Preparation and Setup
- Park your vehicle on a flat surface, engage the emergency brake, and loosen the wheel lug nuts.
- Safely elevate the vehicle using a hydraulic jack and secure it with heavy-duty jack stands.
- Remove the wheels to gain unobstructed access to the brake bleed valves on each brake caliper.
- Clean around the master cylinder reservoir and the bleed screws to prevent dirt contamination.
- Fill the master cylinder completely with fresh DOT 3 or DOT 4 brake fluid, keeping the cap loosely resting on top.
Executing the One-Man Bleed
- Start at the wheel furthest from the master cylinder, typically the passenger-side rear.
- Attach a clear vinyl tube to the bleeder valve and submerge the other end into a clean bottle containing a small amount of brake fluid.
- Gently press the brake pedal down slowly and hold it firmly in place.
- Open the bleeder valve a quarter-turn using a box-end wrench to let old fluid and air bubbles escape.
- Tighten the bleeder valve immediately before releasing the brake pedal to prevent back-siphoning air.
- Repeat this pump-and-hold cycle until the fluid running through the clear tube is entirely free of air bubbles.
- Move systematically to the driver-side rear, passenger-side front, and finally the driver-side front caliper.
What If It Still Doesn’t Work and Troubleshooting Stubborn Air Pockets
If your brake pedal still feels spongy after a complete bleed, trapped air or hardware failure is likely the culprit. According to automotive service data from the Automotive Maintenance and Repair Association (AMRA), stubborn micro-bubbles often cling to internal ABS module walls.
- Activate the ABS Module: Drive safely to a dirt road or empty parking lot and firmly trigger the anti-lock braking system to force trapped air into the main lines, then re-bleed the brakes.
- Check for Gravity Flow Issues: If a bleeder screw fails to drip fluid naturally during a gravity bleed, use a straightened paperclip to clear minor corrosion clogs out of the nozzle tip.
- Inspect Master Cylinder Seals: An internal master cylinder bypass will continuously mimic a spongy pedal even after multiple successful bleeds.
- Know When to Seek Professional Help: If DIY bleeding fails twice or if your brake lines show heavy rust, take the vehicle to a certified technician. Professional brake bleeding service typically ranges from $100 to $250 depending on regional labor rates and fluid disposal fees.
Conclusion
Mastering how to bleed brakes by yourself with no special tools saves both time and money while restoring crucial vehicle safety. By maintaining constant reservoir levels and following a systematic wheel sequence, you eliminate dangerous air bubbles completely. According to verified research and expert automotive safety sources, routine hydraulic fluid replacement every two years prevents costly caliper and master cylinder failures. Your immediate next step is to inspect your brake fluid clarity and test-drive your vehicle at low speeds in a safe area.
❓ Frequently Asked Questions
How does the DIY bottle-and-tube method work for one-person brake bleeding?
You attach a clear vinyl hose to the bleeder valve and place the other end into a small bottle containing a small amount of brake fluid. As you pump the brake pedal from inside the car, fluid and air push out through the tube, while the submerged end prevents air from being sucked back in when you release the pedal.
What is the gravity bleed method and when should I use it?
Gravity bleeding involves simply opening the bleeder valve and letting brake fluid slowly drip out of the caliper on its own due to gravity. This requires zero pedal pumping and is great for flushing old fluid, though you must carefully monitor the master cylinder reservoir so it never runs dry.
How do I know what size wrench to use on my bleeder valves?
Most bleeder valves require a standard metric open-end wrench, commonly 8mm, 10mm, or 11mm. Always use a proper wrench rather than pliers to avoid rounding off the soft metal hex head of the bleeder valve.
What type of brake fluid should I use to top off my system?
Check the cap of your master cylinder to find the exact specification required, usually DOT 3, DOT 4, or DOT 5.1. Never mix silicone-based DOT 5 with glycol-based fluids, and always use brand-new fluid from a freshly opened container.
What should I do if my brake pedal still feels spongy after bleeding?
A spongy pedal usually indicates that air remains trapped in the lines, or possibly inside the ABS module. Repeat the bleeding process, tap lightly on calipers with a rubber mallet to dislodge stubborn bubbles, or perform a preliminary automated automated bleed procedure if your vehicle requires it.
Is it safe to drive immediately after bleeding brakes by yourself?
No. Before moving the vehicle out of the garage, pump the brake pedal several times while parked until it feels firm and holds pressure. Then, perform a low-speed test drive in a safe, empty area like a driveway or empty lot to verify complete stopping power.