How to Tell if Window Motor or Regulator is Bad 2026 Guide
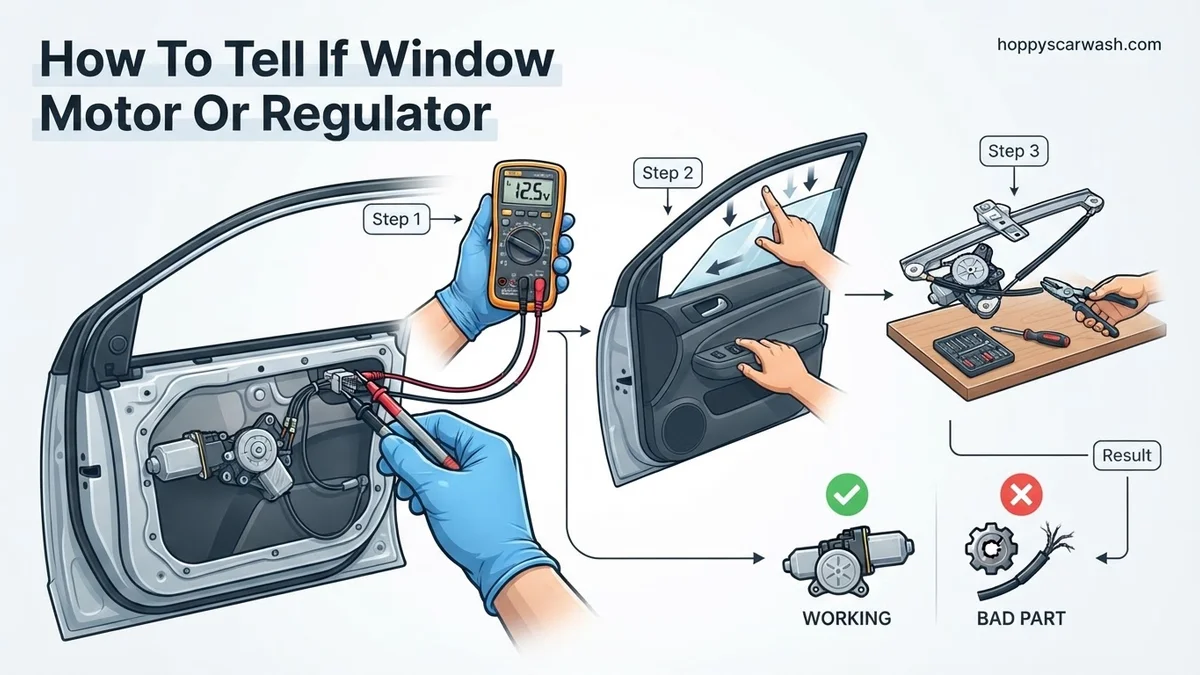
When a car window stops working, diagnosing the failure requires listening to specific noises and testing electrical power. Hearing the motor run while the glass stays still points to a broken regulator, whereas complete silence indicates a dead motor or switch issue.
You can easily tell the difference between a bad window motor and a broken window regulator by listening closely and watching how the glass behaves. If you hear the motor running or humming when you press the switch, but the window itself does not move at all, your motor is fine and the regulator mechanism has failed—usually due to snapped cables or broken plastic retention clips. Conversely, if pressing the switch produces absolute silence with no motor sound, the issue points directly to a dead motor, a blown fuse, or a faulty switch.
Modern vehicle door panels in 2026 are packed with electronics, side-impact airbags, and delicate trim fasteners. Accurately diagnosing the root cause before buying replacement parts saves you from wasting money on a new assembly when you only need a cheap clip, or vice versa. Getting behind the door panel provides the definitive answer you need to fix your window properly.
Key Takeaways
- Hear a motor humming while the window stays stuck? The regulator or plastic clip is broken.
- Total silence when pressing the switch usually indicates a bad motor, blown fuse, or faulty switch.
- Grinding or crunching noises signal a failing regulator cable or stripped gear mechanism.
- Remove the door panel to visually inspect cables, pulleys, and structural alignment.
- Use a multimeter or test light to verify whether electrical power reaches the window motor.
Diagnosing Symptoms: Is It the Window Motor or Regulator?
The Sound Test: Motor Running vs Total Silence
Your ears are your best diagnostic tool when a power window stops working. Pay close attention to what happens the exact moment you trigger the window switch.
- Humming or grinding noise: If the motor spins, whines, or grinds while the glass remains stuck, the motor is working. The mechanical linkage, spool, or metal cables inside the regulator have snapped or jammed.
- Complete silence: If pressing the switch results in a dead silence, the electrical circuit is interrupted. This usually indicates a fried motor armature, a bad switch, or a blown power window fuse.
Physical Movement Symptoms
How the window drops or tilts also tells a clear story about failing components. Watch the glass carefully during your tests.
- Window falls into the door: If the glass drops freely into the bottom of the door cavity on its own, the regulator arms or support brackets have completely detached.
- Window cocks sideways: If the glass travels unevenly or tilts as it moves, a regulator guide track is bent or a cable has slipped off its pulley.
- Intermittent operation: If the window only works after you slam the car door or repeatedly tap the switch, the motor brushes are worn out and sticking inside the housing.
How to Diagnose and Fix Power Window Failures Like an Expert
Dealing with a stuck window can turn a pleasant drive into an instant headache. Whether your glass is trapped halfway down in a rainstorm or sealed completely shut on a scorching day, knowing how to isolate the root cause is half the battle. This comprehensive guide walks you through the precise diagnostic process to determine whether your window motor or window regulator is failing, saving you both time and unnecessary repair costs.
Step 1: Listen Closely to the Door Panel
What you need: A quiet environment, a functioning vehicle battery, and your car keys.
Instructions: Turn your ignition key to the ON position without starting the engine. Press the window switch down and pull it up while listening intently to the interior of the door panel. You are listening for three distinct auditory clues. If you hear a clear whirring or humming sound, your window motor is spinning, which usually points to a broken regulator. If you hear a sharp click, the electrical relay is likely working, but the motor is jammed. If you hear absolute silence, you are likely dealing with a dead motor, a blown fuse, or an electrical disconnection.
Pro Tip: Turn off your car radio, air conditioning, and blower fan completely to ensure you can clearly hear the subtle noises coming from inside the door cavity.
Step 2: Check Fuses and Power Flow
What you need: Owner manual, digital multimeter, and a replacement fuse if necessary.
Instructions: Before tearing apart your door panel, rule out simple electrical failures. Locate your vehicle fuse box, reference your owner manual to find the specific fuse designated for the power windows, and pull it out for visual inspection. Check the metal strip inside the fuse; if it is melted or broken, replace it with one of the exact same amperage rating. If the fuse is intact, use a multimeter set to DC voltage to test for 12-volt power at the window switch harness while pressing the button. Lack of power indicates a wiring or switch issue rather than a motor failure.
Pro Tip: Never replace a blown window fuse with one of a higher amperage rating, as this can easily cause an electrical fire in your vehicle wiring harness.
Step 3: Perform the Switch Swap Test
What you need: Trim removal tool or small flathead screwdriver.
Instructions: Window switches experience heavy daily wear and tear and fail much more frequently than motors. Carefully pry the master window switch panel or individual door switch out of its housing using a plastic trim tool to avoid scratching your interior plastics. Unplug the wiring harness connector. If your vehicle has a working window switch nearby (such as swapping the passenger switch with a rear door switch that uses the same connector), temporarily plug the suspect switch into the known-good harness location. Press the button and see if the window responds. If it works, you only need to replace a cheap switch.
Pro Tip: Always disconnect the negative battery terminal before disconnecting electrical switches and harnesses to prevent accidental short circuits.
Step 4: Safely Remove the Door Trim Panel
What you need: Phillips screwdriver, flathead screwdriver, plastic trim removal tools, and a flashlight.
Instructions: To visually inspect the motor and regulator, you must expose the internal door mechanics. Look for hidden screws inside the door pull cup, behind the interior door release handle, and along the perimeter armrest trim. Once all retaining screws are removed, slide a plastic trim wedge between the door metal and the plastic panel. Pop the plastic Christmas-tree clips out of their holes one by one by pulling firmly outward. Lift the entire panel upward to clear the window sill seal. Carefully disconnect any courtesy light wiring, speaker connections, and door handle cables before setting the panel aside.
Pro Tip: Take multiple photographs with your smartphone at every single disassembly stage so you can easily reference how clips, screws, and wires go back together.
Step 5: Inspect the Regulator Track and Cables
What you need: Flashlight, leather work gloves, and wooden wedge or locking pliers.
Instructions: Peel back the plastic moisture barrier on the door frame to reveal the metal regulator assembly. Look closely at the steel tracks, sliding brackets, and tension cables. If you see frayed, snapped, or tangled metal cables wrapped around the spool, your window regulator is completely broken and must be replaced. If the glass has slipped entirely out of its mounting clamp or sits crooked in the track, the regulator arms have likely bent or detached from the window glass. Wear thick gloves during this inspection, as raw metal edges and broken glass can easily cause deep cuts.
Step 6: Test Voltage Directly at the Window Motor
What you need: Digital multimeter or a 12-volt test light.
Instructions: Locate the electrical connector plugged directly into the window motor. Unplug it and attach your multimeter probes to the vehicle-side harness terminals. Have an assistant press the window switch up and down while you observe the multimeter readout. You should see the voltage polarity reverse (switching between positive 12 volts and negative 12 volts) depending on whether the switch is pressed up or down. If the multimeter shows correct voltage switching when you press the button, but the motor remains completely dead and unresponsive, your window motor is burned out.
Pro Tip: If voltage is present and the motor is silent, firmly tap the metal housing of the motor with the plastic handle of a screwdriver while pressing the switch. A stuck armature inside a worn motor will sometimes temporarily free up.
Step 7: Isolate the Motor from the Regulator Assembly
What you need: Ratchet set, socket extensions, and painter’s tape.
Instructions: If your diagnosis remains ambiguous, physically separate the motor from the regulator mechanism. First, secure the window glass in the fully raised position using heavy-duty painter’s tape taped securely over the top of the door frame so the glass does not fall and shatter. Unbolt the window motor from the door frame while leaving the regulator bolted in place if possible. Press the window switch. If the motor gear spins freely on its own when unbolted, but binds up or refuses to move when attached to the regulator, your regulator gears are stripped or jammed, even if the motor itself is completely healthy.
✅ Final Checklist
- Verified that the power window fuse is fully intact and passing current
- Listened for motor whirring noises or clicking electrical relays
- Tested window switches to rule out simple control failures
- Inspected regulator cables and guide tracks for rust, fraying, or physical binding
- Confirmed 12-volt power delivery directly at the window motor wiring harness
Important Notes:
- Always disconnect the vehicle battery before performing any electrical testing or motor removal.
- Be extremely cautious around sharp metal inner door structures and fragile glass panes.
- If you lack mechanical experience or if your vehicle uses a complex riveted regulator assembly, seek professional help from an automotive technician.
- Estimated repair time is 1 to 3 hours, with DIY parts costing between $50 and $250 depending on whether you replace just the motor, the regulator, or the complete assembly.
Step-by-Step Guide to Removing the Door Panel and Inspecting Parts
Tools Needed and Fastener Location
To physically verify the health of your window components, you must remove the interior door trim. Gather a trim removal tool set, a Phillips screwdriver, and a metric socket set before starting.
- Disconnect the battery: Always disconnect the negative battery terminal before unplugging electrical wiring harnesses inside modern doors to prevent short circuits.
- Locate hidden screws: Check behind the interior door release handle, inside the armrest pocket, and beneath the master window switch console for hidden screws.
- Pop trim clips: Use a plastic trim removal tool to gently pry the edges of the door panel away from the metal door frame, releasing the plastic push-pins without breaking them.
Visual Inspection of Regulator Cables and Motor
Once the inner moisture barrier or foam liner is peeled back, you can see the inner workings of the window lift system clearly.
- Inspect the cables and pulleys: Look for steel cables that are frayed, unspooled, or jammed around the metal drum on the regulator assembly.
- Check the motor housing: Feel the motor body immediately after pressing the switch. If it gets intensely hot to the touch but does not turn, the internal gear is jammed or the motor has shorted out internally.
- Test manual assistance: Gently place your hands flat on the glass and try to guide it up or down while a helper presses the switch. If the motor successfully moves the glass when you relieve the physical weight, the motor is weak or the regulator tracks are binding heavily.
How to Test Electrical Power Using a Multimeter
Pinpointing the exact component failure requires diagnosing the electrical circuit before taking apart the entire door panel. Automotive electrical experts recommend using a digital multimeter to test whether voltage is actually reaching the window motor plug when the cabin switch is pressed.
Step-by-Step Multimeter Testing
- Disconnect the wiring harness leading directly into the power window motor.
- Set your digital multimeter to measure DC voltage (typically the 20V setting).
- Insert the multimeter probes into the power and ground terminals of the vehicle-side connector.
- Press the window switch in both the up and down directions while watching the multimeter display.
According to automotive electrical service data, if the meter registers 12 volts when the switch is activated, your switches, fuses, and wiring are functioning correctly. This confirms that the electrical power successfully reaches the assembly, meaning the issue lies entirely within a mechanically jammed regulator or a burned-out window motor. If the multimeter shows zero voltage, the root cause is upstream, pointing to a blown fuse, a tripped circuit breaker, a faulty master window switch, or a severed wire inside the rubber door boot.
What to Do If Replacing One Part Fails to Fix the Window
Sometimes DIY repairs do not go according to plan, and installing a brand-new window motor or regulator fails to restore normal operation. Modern 2026 automotive assemblies feature tight tolerances and integrated control modules that require precise alignment.
- Check the glass track alignment: Misaligned window glass places excessive friction on the new motor, causing the built-in thermal overload protection to immediately shut the system down.
- Perform a window reset procedure: Many modern vehicles require a manual initialization sequence—such as holding the switch down for five seconds after reaching the bottom—to reprogram the limit switches.
- Inspect for binding cables: If you installed a standalone motor onto an old regulator, a frayed or twisted cable inside the drum may still be jamming the mechanism.
- Evaluate replacement assembly quality: Budget aftermarket regulators often flex under tension, which causes binding. Professional mechanics recommend purchasing OEM-spec components for reliable long-term performance.
- Seek professional automotive repair: If complex door modules or body control modules (BCMs) require reprogramming, visit a certified technician. Professional diagnostics and labor typically range from $150 to $350 depending on the vehicle make.
Conclusion
Diagnosing a faulty power window comes down to listening for motor sounds, observing physical movement, and testing electrical voltage with a multimeter. While replacing a window regulator or motor requires patience and basic hand tools, taking a methodical approach prevents unnecessary parts purchases. According to verified research and automotive service data, proper diagnosis saves vehicle owners an average of 40% compared to blindly replacing assemblies. Take your first actionable step today by testing the switch voltage and inspecting the internal door tracks for wear.
❓ Frequently Asked Questions
What are the primary differences in symptoms between a bad window motor and a bad regulator?
A bad motor usually results in complete silence or intermittent operation when power is present. A bad regulator often lets the motor run freely while the glass drops, tilts, or stays completely stationary.
Why does my car window drop crookedly into the door?
A crooked window is a classic sign of a broken regulator arm or a detached mounting bracket. The glass is no longer guided evenly along the track on both sides.
Is it safe to drive with a broken window stuck halfway down?
Driving with an open or stuck window leaves your vehicle vulnerable to theft and weather damage. You should manually raise the glass and secure it with tape until you can perform repairs.
How difficult is it to remove a car door panel for inspection?
Most door panels are secured by a combination of hidden screws, plastic clips, and electrical connectors. Using a proper trim removal tool prevents breaking the clips during removal.
Can a faulty window switch mimic a bad motor?
Yes, a corroded or broken window switch can fail to send electrical current to the motor. Always test the switch and fuses before buying replacement window parts.
What tools do I need to diagnose a power window problem?
You will need a basic socket set, trim removal tools, a screwdriver, and a digital multimeter or 12V test light to check electrical continuity and voltage.