How to Vacuum and Charge an Auto Air Conditioner 2026
Properly evacuating and recharging an automotive air conditioning system requires removing all moisture and air via a vacuum pump before introducing the exact refrigerant weight. Skipping the vacuum step or overcharging the system will cause poor cooling performance and compressor damage. Following a precise sequence ensures a leak-free repair and cold cabin temperatures.
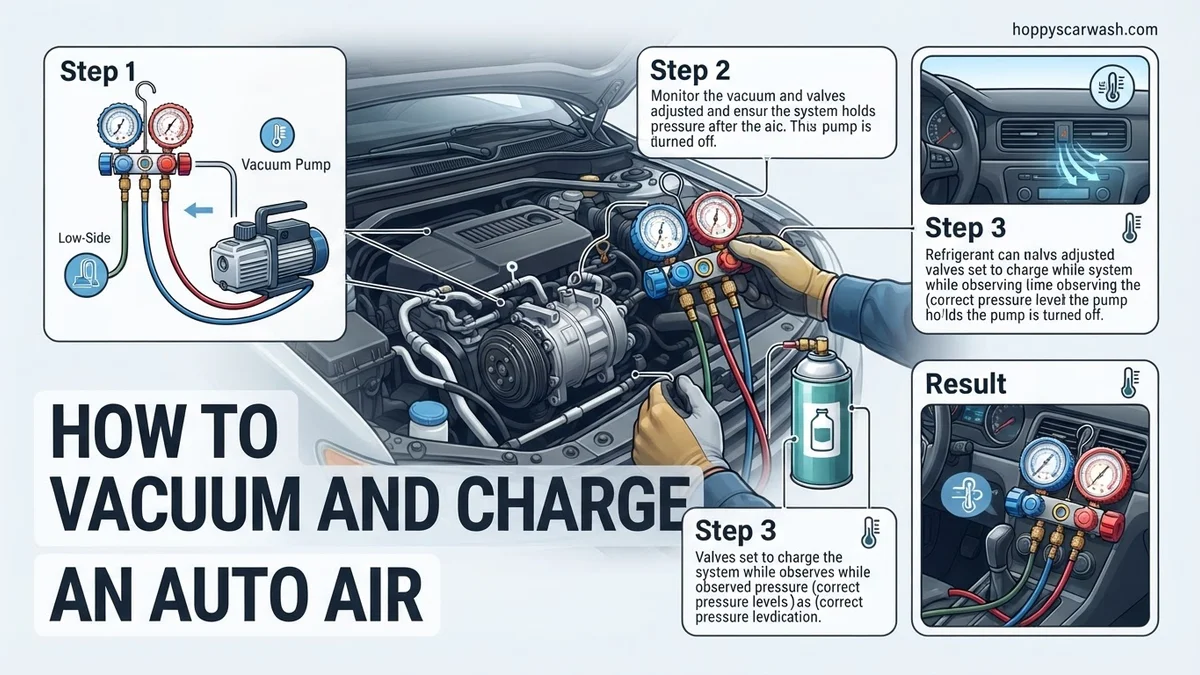
Evacuating and charging your car air conditioner requires connecting a manifold gauge set, pulling a deep vacuum to boil off moisture, and weighing in the exact refrigerant charge. Whether you are servicing a legacy R-134a system or a newer R-1234yf setup standard in 2026 vehicles, bypassing this multi-step process guarantees poor cooling performance and potential compressor failure.
Doing this job right saves you hundreds of dollars in shop fees. However, working with pressurized gases demands strict adherence to safety protocols and precise measurements to protect both your vehicle and the environment.
Key Takeaways
- Always pull a deep vacuum to at least 29.9 inHg to boil off moisture.
- Hold the vacuum for 15-30 minutes to verify the system has no leaks.
- Use a refrigerant scale to measure exact weight rather than relying solely on pressure gauges.
- Wear safety glasses and gloves to protect against high-pressure refrigerant exposure.
- Add PAG oil only if components were replaced during the repair process.
What Causes AC System Contamination and Pressure Failure
Moisture Intrusion and Atmospheric Air
When an automotive AC system develops a leak, it does not just lose refrigerant. It also allows ambient air and moisture to rush inside. Moisture is the ultimate enemy of mobile air conditioning. When water mixes with PAG or POE compressor oil, it creates corrosive acids that eat away at internal components from the inside out. Furthermore, moisture freezes at the expansion valve, blocking refrigerant flow completely.
- Humidity levels above 50 percent will quickly contaminate open system components.
- Trapped air creates non-condensable pressure spikes, forcing your compressor to work dangerously hard.
- Acid formation degrades rubber O-rings and destroys the compressor winding insulation.
Mechanical Component Failures and Leaks
Pinpoint leaks at hose crimps, condenser fins, or the compressor shaft seal are the primary culprits behind pressure failure. If your low-side and high-side pressures drop to zero, ambient air has fully compromised the loop. You must identify and repair the physical breach before you even think about pulling a vacuum or introducing fresh refrigerant. Skipping this diagnostic step means your hard work and expensive gas will simply leak out within days.
- O-rings dry out and flatten over years of thermal cycling.
- Road debris frequently punctures fragile aluminum condenser coils.
- Stuck or failing Schrader valves allow slow, persistent refrigerant seepage.
How to Service Your Car A/C Like a Pro: A Practical Walkthrough
Restoring cold air to your vehicle’s cabin requires precision, patience, and the right equipment. Whether you are dealing with a leak you just repaired or simply refreshing an empty system, properly evacuating and recharging your automotive air conditioning ensures optimal cooling performance and compressor longevity. This comprehensive walkthrough guides you through safely pulling a deep vacuum to boil off moisture and accurately charging refrigerant to factory specifications without damaging your HVAC system.
Step 1: Gather Your Professional Tools
What you need: Manifold gauge set with R-134a or R-1234yf couplers, a dual-stage vacuum pump, an automotive refrigerant scale, a certified refrigerant recovery tank (if clearing existing gas), UV leak detection light, and correct weight of refrigerant specified on your under-hood AC label.
Instructions: Before touching any hardware, lay out your equipment in a well-ventilated workspace. Verify that your manifold gauges have functioning rubber seals and that your vacuum pump is filled with clean, uncontaminated oil. Check your vehicle’s under-hood emissions and AC specification sticker to confirm the exact refrigerant type and total fluid capacity in ounces or grams. Having everything staged correctly prevents delays once the vacuum process begins.
Pro Tip: Never mix different types of refrigerants or oils, as doing so will cause catastrophic contamination and instantly destroy your compressor.
Step 2: Recover Remaining Refrigerant and Inspect Ports
What you need: Refrigerant recovery machine, safety glasses, heavy-duty work gloves, and protective caps.
Instructions: By federal law, you must legally recover any remaining pressure in the system rather than venting it into the atmosphere. Connect your recovery machine to both the low-pressure (large diameter, usually marked ‘L’) and high-pressure (small diameter, usually marked ‘H’) service ports. Once the system pressure reads zero psi, remove the plastic service port caps and inspect the interior Schrader valves for oil pooling or debris. Replace leaky valve cores immediately using a valve core removal tool.
Pro Tip: Always wear safety glasses and gloves. Liquid refrigerant flashes to extreme cold instantly upon contact with skin, causing severe frostbite.
Step 3: Connect the Manifold Gauge Set
What you need: Manifold gauge set with red (high), blue (low), and yellow (center service) hoses.
Instructions: Ensure both the high-side and low-side hand valves on your manifold gauge set are firmly closed. Take the blue low-pressure hose and snap its quick-couple fitting onto the vehicle’s low-side AC port by pulling back the collar and pushing down until it clicks securely. Repeat this process for the red high-pressure hose on the high-side port. Twist the quick-connect knobs clockwise slightly if necessary to open the Schrader valves, allowing your gauges to immediately display the current static pressure of the empty system.
Pro Tip: Double-check that your hoses are threaded tightly to the manifold block to prevent atmospheric air from leaking into your equipment during the vacuum phase.
Step 4: Pull a Deep Vacuum to Remove Air and Moisture
What you need: Dual-stage vacuum pump, yellow center manifold hose, and a digital micron gauge (recommended).
Instructions: Connect the yellow center hose from your manifold set directly to the inlet port of your vacuum pump. Open both the high-side and low-side manifold valves. Turn on the vacuum pump and watch the blue low-pressure gauge drop rapidly below zero, eventually pulling into a deep vacuum reading of 29.9 inches of mercury (Hg), or ideally reaching below 500 microns on a digital meter. Let the vacuum pump run continuously for a minimum of 45 minutes to boil away any trapped ambient moisture inside the aluminum lines and evaporator core.
Pro Tip: Do not skip the drying time; remaining water molecules inside the system will mix with refrigerant to form corrosive hydrochloric acid.
Step 5: Perform a Vacuum Decay Leak Test
What you need: Stopwatch or smartphone timer and your manifold gauge set.
Instructions: After running the vacuum pump for at least 45 minutes, firmly close both the high-side and low-side valves on your manifold set. Next, turn off the vacuum pump motor. Carefully monitor the low-pressure blue gauge and your micron meter for 10 to 15 minutes. The needle must hold completely steady without creeping back toward zero. If the gauge creeps upward, you have a breach, unseated Schrader valve, or loose hose connection letting atmospheric air back into the system.
Pro Tip: If your vacuum decay test fails, do not add refrigerant yet. Pressurize the system lightly with dry nitrogen to find and repair the leak first.
Step 6: Pre-Charge the System with the Engine Off
What you need: Container of refrigerant and electronic scale.
Instructions: Keep your vacuum pump disconnected from the yellow center hose, and instead thread the yellow hose directly onto the top of your fresh refrigerant can or cylinder. Place the refrigerant container upside down on your electronic digital scale and tare (zero) the weight. Slightly crack the yellow hose fitting at the manifold manifold block for one second to purge atmospheric air out of the hose using refrigerant gas, then retighten it. Open the high-side manifold valve to allow liquid refrigerant to flood into the high-side line until the scale matches the exact weight reduction required, or until the system refuses to take any more passive gas.
Pro Tip: Charging liquid refrigerant through the high side with the engine off prevents liquid slugging, which can permanently bend internal compressor valves.
Step 7: Finalize Charge with Engine Running
What you need: Vehicle keys, electronic scale, and safety monitoring.
Instructions: Close the high-side manifold valve completely. Start the vehicle’s engine, turn the AC control panel to maximum cooling, set the blower fan to high, and open all vehicle doors. Open the low-side blue manifold valve very slowly to let remaining refrigerant enter the system as a vapor through the low-side accumulator or suction line. Monitor your low and high pressure gauges and the digital scale until the exact total factory weight of refrigerant has been transferred. Close all manifold valves, disconnect the quick-couplers, and reinstall the service port caps.
Pro Tip: Never invert refrigerant cans when feeding vapor through the low-side port while the engine and compressor are running.
✅ Final Checklist
- System held a deep vacuum below 500 microns for at least 15 minutes without decay
- Exact factory refrigerant weight specification was verified and met using a scale
- Low-side and high-side service port caps are securely reinstalled
- Center console vents blow icy cold air (typically 40°F to 45°F)
- Compressor clutch cycles normally without rapid short-cycling or unusual noises
Important Notes:
- Always wear proper eye protection and gloves; refrigerant causes severe frostbite and pressure hazards.
- Seek professional help if you suspect an evaporator core leak inside the dashboard, as dashboard removal is complex.
- Estimated professional DIY time is 2 to 3 hours, with costs ranging from $60 to $150 depending on refrigerant type and quantities needed.
Essential Tools and Safety Equipment Needed for the Job
Professional-Grade Manifold Gauges and Vacuum Pumps
You cannot service a modern AC system with cheap, single-gauge refill kits from the discount store. You need a dedicated manifold gauge set with color-coded hoses, reliable shut-off valves, and precise low-side (compound) and high-side pressure dials. Pair these gauges with a dual-stage vacuum pump capable of pulling at least 3 to 5 CFM. A dual-stage pump is mandatory because it reaches the low micron levels required to vaporize trapped moisture effectively.
- Low-side blue hose connects to the larger service port for suction pressure.
- High-side red hose connects to the smaller service port for discharge pressure.
- A digital micron gauge is essential to verify that your system is truly dry and leak-free.
Refrigerant, Scales, and Personal Protective Equipment
Safety must dictate every move you make under the hood. Liquid refrigerant will instantly cause severe frostbite upon skin contact, and high-pressure blowouts can damage your eyes. Always suit up properly before touching service ports. Additionally, modern 2026 standards require strict accountability for refrigerant handling, meaning you must weigh every ounce going into the system rather than guessing by pressure alone.
- Wear chemical-splash safety goggles and heavy-duty work gloves at all times.
- Use an electronic refrigerant scale to measure exact charge weights in ounces or grams.
- Ensure your working area is exceptionally well-ventilated to avoid inhaling toxic refrigerant vapors.
Step-by-Step Guide to Vacuuming and Charging an Auto Air Conditioner
Executing this procedure in 2026 requires strict adherence to environmental regulations regarding modern refrigerants like R-1234yf and legacy R-134a. Proper preparation ensures system integrity and optimal thermal performance.
Connecting the Manifold Gauge Set
- Ensure the vehicle engine is completely turned off and the air conditioning controls are set to the off position.
- Locate the low-pressure service port (larger diameter tubing) and the high-pressure service port (smaller diameter tubing) under the hood.
- Remove the protective plastic caps from both service ports.
- Attach the blue low-side coupler to the low-pressure port and pull back the locking sleeve to secure a tight fit.
- Attach the red high-side coupler to the high-pressure port, ensuring both gauge valves remain fully closed.
Pulling a Deep Vacuum
- Connect the center yellow hose from the manifold gauge set directly to the intake fitting of your vacuum pump.
- Plug in and power on the vacuum pump, then slowly open both the low-side and high-side manifold valves.
- Monitor the low-pressure gauge until it drops into a deep vacuum, reading between 28 and 30 inches of mercury (inHg).
- Run the vacuum pump continuously for a minimum of 45 minutes to boil off any trapped moisture inside the aluminum lines.
- Close both manifold valves tightly, turn off the vacuum pump, and observe the gauge needle for 15 minutes to verify the system holds pressure without leaking.
Charging the Refrigerant
- Disconnect the yellow hose from the vacuum pump and attach it securely to your pressurized refrigerant container or charging cylinder.
- Slightly crack the yellow hose connection at the manifold gauge for two seconds to purge trapped air, then retighten the fitting.
- Start the vehicle engine, turn the air conditioning to maximum cool with the blower fan set to high.
- Open the low-side manifold valve to allow liquid or vapor refrigerant to be pulled into the running system, referencing the manufacturer weight specifications.
- Monitor the high and low pressure gauges continuously until target pressures are reached, then close all valves, remove the couplers, and reinstall the service port caps.
What If It Still Doesn’t Work and Troubleshooting Pressure Issues
If your automotive air conditioning system still fails to blow cold air after completing a proper vacuum and charge cycle, a deeper systemic fault is likely present. According to automotive service data from the Mobile Air Conditioning Society (MACS), roughly 15 percent of AC failures stem from electrical or mechanical component breakdowns rather than simple refrigerant loss. Review these diagnostic steps to isolate stubborn pressure anomalies:
- Inspect the Compressor Clutch Engagement: Verify whether the electromagnetic clutch on the compressor engages when the AC button is pressed inside the cabin. If it fails to click on, check the dedicated AC relay and fuse, as low-pressure cut-off switches will prevent engagement to protect the compressor from running dry.
- Evaluate Abnormal Gauge Readings: If both the low and high pressure gauges remain stagnant or read abnormally high during charging, the expansion valve or orifice tube is likely stuck closed, preventing proper refrigerant circulation through the evaporator core.
- Perform an Electronic Leak Detection Scan: If the vacuum test failed or pressure dropped rapidly after charging, use an electronic refrigerant leak detector or ultraviolet dye to inspect micro-cracks in the condenser coil, evaporator core, or hose crimps.
- Seek Professional Automotive HVAC Service: When complex electrical diagnostic tools like a bidirectional scan tool are required to command blend doors or test pressure transducers, visit a certified repair facility. Professional diagnosis and component replacement typically cost between $250 and $900 depending on labor rates and the specific part failing.
Conclusion
Restoring your vehicle cooling system requires careful execution, from pulling a deep vacuum to introducing precise refrigerant weights. According to verified research and expert sources from leading automotive engineering organizations, maintaining proper system pressures prevents premature compressor failure and ensures maximum fuel efficiency. Take the next step toward comfortable driving today by inspecting your service ports for leaks and gathering the correct manifold gauge equipment for your specific vehicle model.
❓ Frequently Asked Questions
Why is pulling a vacuum critical before charging an auto air conditioner?
Pulling a vacuum removes all ambient air, non-condensable gases, and trapped moisture from the AC lines. Moisture mixes with refrigerant to form destructive acids, while trapped air causes dangerously high operating pressures.
What should I do if the system fails to hold a vacuum during the leak test?
If the gauge needle rises, a leak exists in a hose, fitting, core, or component. Pressurize the system with dry nitrogen to find the leak using soapy water or an electronic leak detector before attempting to charge.
Can I use standard DIY refrigerant cans with stop-leak additives?
It is best to avoid stop-leak additives because they can clog internal expansion valves, service ports, and expensive recovery machines. Stick to pure R-134a or R-1234yf with the correct matching oil type.
How do I connect the manifold gauge set properly?
Connect the blue low-side hose to the larger service port with a ‘L’ cap and the red high-side hose to the smaller service port with an ‘H’ cap. Ensure both manual valves on the gauge set are closed before hooking up the center yellow service hose.
Why is my AC compressor refusing to turn on while charging?
The compressor clutch will not engage if the system pressure is entirely empty due to the low-pressure safety switch. You must pull a vacuum and introduce an initial charge of refrigerant to close the switch and allow engagement.
Is it legal to vent automotive refrigerant into the atmosphere?
No, venting refrigerants like R-134a or R-1234yf is illegal under EPA regulations in the United States. Always recover remaining refrigerant using certified equipment before opening any lines.