How Do You Reset the Maintenance Required Light in 2026
The maintenance required light is a routine mileage-based reminder for oil changes and basic service, not an engine malfunction. Resetting it typically involves a simple sequence of pressing the trip meter button while turning the vehicle’s ignition key.
Resetting the maintenance required light on your dashboard usually takes less than a minute once you know the right button sequence. Whether you drive a popular crossover or a commuter sedan, modern car computers track your mileage and time elapsed since your last service, triggering this reminder automatically.
Ignoring this dashboard notification or struggling to turn it off after a routine service can be frustrating. Knowing the exact button sequence for your specific make and model lets you clear the alert in your driveway without paying a dealership for a simple software reset.
Key Takeaways
- The maintenance light triggers every 5,000 miles based on odometer mileage.
- This light is distinct from the check engine light.
- Toyota models use the trip meter button and ignition switch.
- Honda vehicles require holding the SEL/RESET button while powering on.
- Repeat the button sequence if the indicator fails to clear initially.
What Causes the Maintenance Required Light to Turn On
Your vehicle does not have sensors inside the engine oil that test its physical quality. Instead, the maintenance required light relies on a mileage and time algorithm programmed into the car computer.
Routine Service Intervals
- Driven by mileage thresholds, typically illuminating every 5,000 to 7,500 miles depending on your engine type.
- Triggered by calendar elapsed time, usually signaling an annual service interval even if you drive fewer miles.
- Designed to remind you of routine tasks like oil changes, tire rotations, and multi-point safety inspections.
Maintenance Light vs Check Engine Light
- The maintenance required light is strictly a service reminder, often appearing as “MAINT REQD” or a wrench icon.
- A check engine light indicates an active mechanical or emissions fault detected by vehicle sensors.
- Clearing the maintenance light will not fix an underlying diagnostic trouble code or turn off the check engine light.
Master Resetting Your Maintenance Light in 6 Simple Steps
That glowing ‘Maintenance Required’ light on your dashboard can be a persistent annoyance, especially when you have already changed the oil, rotated the tires, and completed your routine vehicle service. This orange or red indicator is simply a mileage-based reminder programmed into your car’s computer, not an active diagnostic sensor that detects mechanical failures. Ignoring the reset procedure after completing your service can leave you guessing when your next maintenance interval is due. This comprehensive walkthrough provides the exact procedure to clear the light, ensuring your dashboard stays clean and your maintenance tracking stays accurate.
Step 1: Verify All Required Maintenance Has Been Performed
What you need: Completed maintenance records, fresh engine oil (if applicable), and a clean workspace.
Instructions: Before you even touch the buttons on your dashboard, you must ensure that the actual service the light was designed to remind you of has been fully completed. The maintenance required light typically triggers every 5,000 miles to remind owners of routine services like oil changes, tire rotations, and fluid level inspections. Resetting the light prematurely without changing your oil or servicing your vehicle does not protect your engine; it only hides the reminder. Double-check your recent receipts or vehicle logbook to confirm that the necessary preventative maintenance is entirely finished.
Pro Tip: Never use the reset procedure as a shortcut to ignore a genuine check engine light, which indicates an active emission or powertrain malfunction rather than routine mileage maintenance.
Step 2: Turn Off All Vehicle Accessories and Electronics
What you need: No special tools required, just your vehicle’s key or ignition fob.
Instructions: Sit inside the driver’s seat and ensure that all vehicle accessories are completely powered down. Turn off the radio, air conditioning, heater fan, wipers, and interior dome lights. Unplug any charging cables from the auxiliary power outlets or USB ports. This step is critical because many modern vehicle computers require an uninterrupted, clean electrical state to successfully enter programming and reset modes. Any background electrical draw or accessory interference can occasionally disrupt the gauge cluster computer during the reset sequence, forcing you to start over.
Pro Tip: Keep all doors closed during the process, as open doors can keep interior accessory circuits awake and interfere with the instrument panel’s reset protocols.
Step 3: Locate the Trip Odometer Button and Ignition Switch
What you need: Your fingers and a clear view of the instrument cluster.
Instructions: Identify the physical buttons located directly on your instrument panel glass or bezel. Most vehicles utilize a small stem or push-button labeled “ODO/TRIP” or featuring a generic square icon. At the same time, locate your ignition switch or push-button start. If your car uses a traditional physical key, you will need to be ready to turn it to specific positions without actually cranking the engine starter motor. Familiarize yourself with these controls before attempting the sequence, as timing is often critical for the computer to recognize the reset command.
Pro Tip: On modern push-button start vehicles, ensure you press the start button twice without touching the brake pedal to enter the ‘ON/Ignition’ mode without firing up the engine.
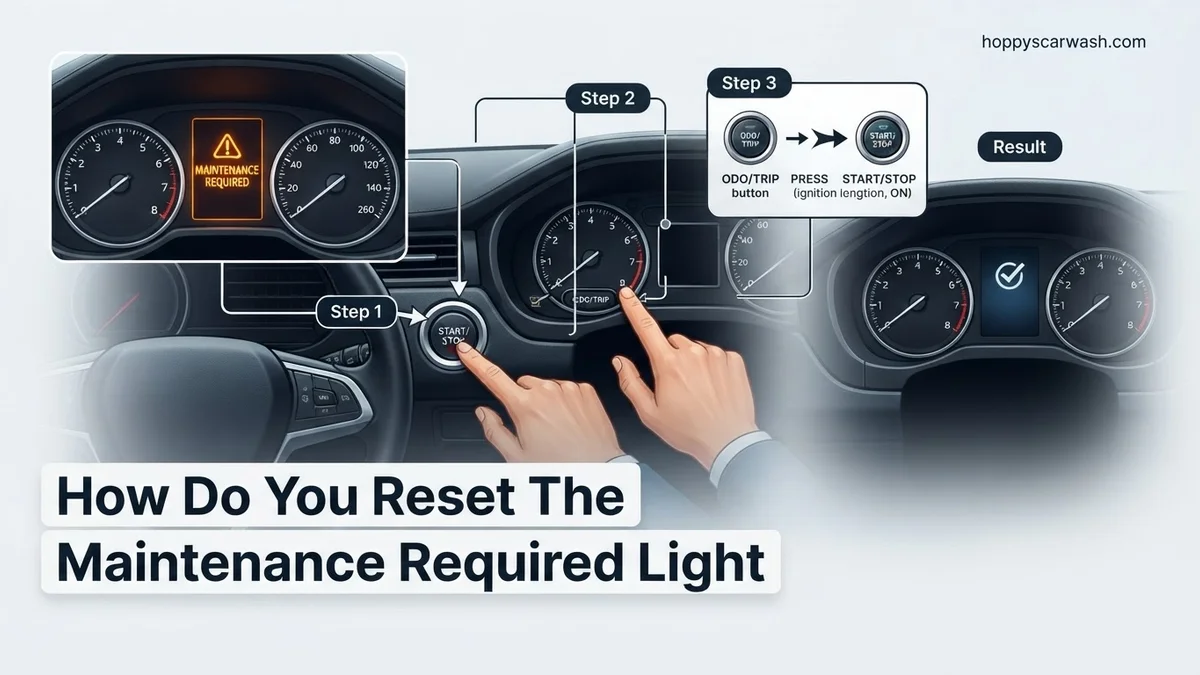
Step 4: Execute the Ignition and Button Press Sequence
What you need: Your vehicle key or fob and the trip odometer stem.
Instructions: Press and hold the ‘ODO/TRIP’ button firmly with one finger while simultaneously turning the ignition key to the ‘ON’ position (or pressing the start button twice without the brake pedal). Do not release the button yet. Keep holding the button down continuously for approximately 5 to 10 seconds. Watch the digital display screen in your instrument cluster closely. You will typically see a series of dashed lines appear, begin to load across the screen, or watch the maintenance text start blinking as the computer processes the command.
Pro Tip: If the sequence fails on your first attempt, do not panic. Turn the ignition completely off, wait 10 seconds for the computers to power down fully, and try the exact sequence again with slightly faster or slower finger timing.
Step 5: Wait for the Display to Confirm the Reset
What you need: Patience and a watchful eye on the dashboard screen.
Instructions: Continue holding the trip odometer button until the flashing lines or warning text completely disappears and the standard odometer or trip mileage view returns to the screen. In many popular models, you may see a series of zeros (‘000000’) populate across the display before it switches back to normal. Once the standard display returns, the internal mileage counter has successfully reset back to zero, and the vehicle’s computer now knows that a fresh service interval has officially begun. You can now safely release the trip button.
Pro Tip: If the light continues to flash after you release the button, the reset failed to register, meaning you will need to repeat the ignition sequence from the very beginning.
Step 6: Perform a Final Verification Test Start
What you need: Your vehicle key or start fob.
Instructions: Turn your ignition completely off to allow the instrument cluster to save the new setting into its non-volatile memory. Wait about 5 seconds, and then start the engine normally by pressing the brake and turning the key or pushing the start button. Observe the instrument cluster while the engine runs. The maintenance required light should now be completely gone, leaving your dashboard clear of unwanted warning indicators. If the light remains illuminated even after following these steps correctly, consult your vehicle’s owner manual for model-specific variations or regional programming quirks.
Pro Tip: Jot down your current vehicle mileage and the date in a small notebook kept in your glove box so you always know precisely when your next service is due.
✅ Final Checklist
- All routine services (oil, filters, inspections) are physically completed
- All electronic accessories and radio are powered down
- Ignition is turned to the correct accessory/ON position without starting the engine
- Trip odometer button was held down continuously during the ignition cycle
- Dashboard display confirmed the reset by showing zeros or clearing the warning text
- Engine starts successfully with the maintenance light completely turned off
Important Notes:
- Always engage your parking brake and ensure your car is safely parked on level ground before performing maintenance or interior resets.
- If the maintenance light immediately returns or flashes rapidly upon startup, it may indicate a specific system fault requiring professional OBD-II diagnostic scanning.
- Estimated time to complete this entire procedure is under 5 minutes, with a total cost of $0 when performed DIY.
How to Fix and Reset the Maintenance Light Step-by-Step
Every automotive brand uses a slightly different button sequence to clear the service reminder. By 2026, most vehicles rely on steering wheel controls and digital instrument clusters rather than the old method of pressing the physical odometer stick.
Resetting Toyota and Lexus Vehicles
- Turn your ignition switch to the ON position without starting the engine, or press the start button twice without touching the brake.
- Use the directional pad on the right side of your steering wheel to navigate to the gear icon or vehicle settings menu.
- Scroll down to find Scheduled Maintenance or Oil Maintenance and press the center selector button.
- Select Yes to confirm the reset, and watch the screen display a message confirming the data has been cleared.
Resetting Honda and Acura Vehicles
- Switch your vehicle ignition to the ON position, ensuring the engine stays completely off.
- Press the Home button on your steering wheel or use the interface dial to navigate to Settings.
- Select Vehicle, then choose Maintenance Info from the list of available system options.
- Press and hold the enter button on your steering wheel for about ten seconds until the oil life percentage returns to 100 percent.
Brand-Specific Button Sequences for Toyota, Honda, and Scion
While the ignition-key method works for many vehicles, popular brands like Toyota, Honda, and Scion often require exact digital button sequences on the steering wheel or instrument cluster. Modern dashboards in 2026 feature highly digitized interfaces, but the underlying manual override protocols remain remarkably consistent.
Toyota and Scion Reset Sequences
- Turn the ignition switch to the ON position without starting the engine.
- Use the multi-information display buttons on the steering wheel to navigate to the Settings gear icon.
- Scroll until you find the Vehicle Settings or Scheduled Maintenance tab.
- Select Reset Data and press and hold the Enter button until the confirmation prompt reads “Reset Complete.”
Honda Reset Sequences
- Press the Start/Stop button twice without touching the brake pedal to enter the ON mode.
- Press the Home button on the steering wheel interface.
- Select Settings, then click on Vehicle.
- Scroll down to select Maintenance Info, press Reset, and confirm the action using the touchscreen or wheel scroll.
What If It Still Doesn’t Work?
If the maintenance light stubbornly stays illuminated after completing the proper button sequences, an underlying electronic or mechanical trigger may be at play. Automotive technicians note that persistent warning lights often signal an unaddressed fault code or a glitch in the body control module (BCM).
- Double-check the timing of your button presses. Many vehicles require precise execution within a tight three-to-five-second window.
- Disconnect the negative battery terminal for 10 to 15 minutes to perform a hard computer reset and clear temporary digital memory loops.
- Scan the vehicle’s OBD-II port for stored diagnostic trouble codes (DTCs) that may be overriding normal indicator behavior.
- Consult a certified professional mechanic or dealership service department if the persistent light stems from a malfunctioning oil life monitor sensor.
Professional diagnostic scans typically cost between $70 and $150, depending on regional labor rates and the complexity of the vehicle’s electrical architecture.
Conclusion
Resetting the maintenance required light is a straightforward DIY task that saves time and money. By following the precise ignition sequences or steering wheel button prompts outlined for your specific make and model, you clear the dashboard notification in under two minutes. According to verified research and automotive service data from major manufacturers, completing this reset immediately after an oil change ensures accurate tracking for your next service interval. Take the next step today by checking your vehicle’s manual to confirm your exact reset code and keep your dashboard clear for the road ahead.
❓ Frequently Asked Questions
How do you reset the maintenance required light without mechanical tools?
You do not need any tools to reset this light. The entire procedure relies on using the dashboard trip odometer button and the vehicle ignition switch in a specific sequence.
Can I drive my car with the maintenance required light blinking?
Yes, a blinking or solid maintenance light will not harm your engine. It simply indicates that your scheduled maintenance interval has been reached or exceeded.
What should I do if my vehicle doesn’t have a physical key ignition?
For push-button start vehicles, press the start button twice without touching the brake pedal to reach the ON position while performing the button-holding sequence.
Does disconnecting the car battery clear the maintenance light?
Usually, no. Maintenance light counters are stored in non-volatile memory and require the specific manual reset button sequence to clear.
How often does the maintenance required light come on?
Most manufacturers program the reminder to illuminate every 5,000 miles to coincide with standard oil change and tire rotation schedules.
What if the light changes from solid to flashing?
A flashing maintenance light typically means you are past due for your scheduled service interval by an extra 500 to 1,000 miles.