How to Test Spark Plug Wires Without Multimeter 2026
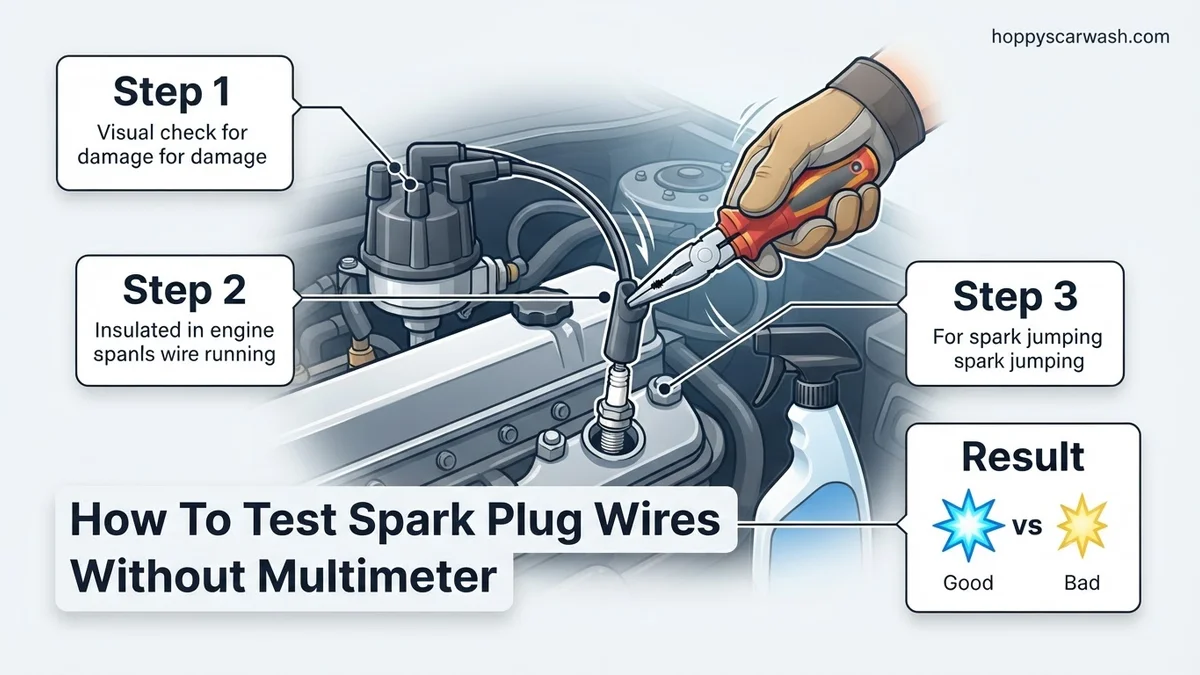
Troubleshooting faulty ignition wires requires practical diagnostic techniques when no electrical tools are available. Visual inspections, the water spray test, and checking for physical wear can instantly reveal dangerous electrical leaks. Following these manual methods ensures you can safely identify bad spark plug wires in any environment.
You can effectively test your spark plug wires without a multimeter by using visual inspections, night-time mist tests, and listening for audible signs of electrical arcing. When your engine misfires or stumbles in 2026, you do not need expensive electrical diagnostic tools to track down a failing ignition wire.
Spark plug wires carry high-voltage electrical current from your ignition coil to the spark plugs. Over time, heat, vibration, and age degrade the insulation, causing the electricity to escape before it reaches the cylinder. Spotting these failures early saves you from replacing expensive catalytic converters damaged by unburned fuel.
Key Takeaways
- Inspect wires closely in total darkness to spot escaping electrical arcs.
- Always work on a completely cold engine to prevent severe burns.
- Use insulated pliers when handling plug boots to avoid high-voltage shocks.
- Look for physical cracks, dry rot, and burn marks along the insulation.
- Mist water onto running wires to trigger visible sparking on damaged sections.
What Causes Spark Plug Wire Failure and Arcing
Understanding how wires fail helps you know where to look during your inspection. Spark plug wires operate in a brutal under-hood environment where extreme temperatures and mechanical stress break down modern silicone and rubber materials.
Thermal Breakdown and Abrasion
Constant heating and cooling cycles make the outer insulation brittle and prone to microscopic cracking. If a wire rubs against a metal bracket or hot exhaust manifold, the protective jacket wears away rapidly. Once the insulation is compromised, high-voltage electricity naturally seeks the path of least resistance to ground itself against the engine block instead of firing the spark plug.
- Exhaust Proximity: Wires resting against manifolds bake and harden within months.
- Vibration Wear: Loose routing allows constant rubbing against sharp metal edges.
- Oil Contamination: Leaking valve cover gaskets swell and degrade standard rubber boots.
Internal Conductor Damage
Inside the wire, the carbon-impregnated core or spiral-wound metal conductor can break internally without showing external damage. Pulling directly on the wire insulation instead of the rubber boot during past tune-ups often stretches and snaps the internal conductor. Even though the exterior looks fine, electrical current cannot flow smoothly, resulting in weak spark delivery and rough engine idle.
How to Diagnose and Fix Spark Plug Wires Like an Expert
Faulty spark plug wires can rob your engine of power, cause frustrating misfires, and tank your fuel economy. While a digital multimeter is the standard workshop tool for checking resistance, you can accurately assess your ignition system’s health using simple visual, tactile, and observational methods. This comprehensive walkthrough guides you through multiple hands-on diagnostic techniques requiring zero electrical testing equipment, helping you pinpoint whether your spark plug wires are truly to blame for your engine troubles.
Step 1: Preparing Your Workspace and Ensuring Safety
What you need: A well-lit workspace, leather work gloves, safety glasses, and a cold engine.
Instructions: Park your vehicle on a flat, level surface, engage the parking brake, and ensure the ignition is completely turned off. Open the hood and allow the engine to cool down fully if it has been running recently; exhaust manifolds and engine blocks reach extreme temperatures capable of causing severe burns. Disconnect the negative battery terminal using an appropriate wrench to eliminate any accidental electrical discharge while handling ignition components. Gather your basic hand tools and ensure you have plenty of natural or artificial light shining directly onto the valve covers and distributor cap or ignition coil packs.
Pro Tip: Never work on a hot engine. Aluminum cylinder heads and steel exhaust components retain heat for hours, making close-quarters inspection painful and dangerous.
Step 2: Performing a Thorough Visual Inspection
What you need: A bright flashlight and an optional magnifying glass for close-up cracks.
Instructions: Carefully trace each spark plug wire from the distributor cap or ignition pack all the way down to the spark plug boot. Shine your flashlight along the entire length of the silicone or rubber insulation jacket. Look closely for any signs of physical damage, including deep abrasions, cuts, bulges, melting spots from touching hot exhaust headers, or rodent chew marks. Examine the plastic and rubber boots at both ends for tears, severe cracking, or white powdery residue which indicates voltage tracking. If you spot any physical compromise, that specific wire is compromised and must be replaced immediately.
Pro Tip: Flex the wires gently in a U-shape as you inspect them. Hidden hairline cracks often reveal themselves only when the flexible insulation is slightly bent.
Step 3: Conducting the Total Darkness Night Test
What you need: A completely dark garage or nighttime conditions, and a spray bottle filled with ordinary tap water.
Instructions: Start your engine and let it idle smoothly. Turn off all garage lights or perform this test well after sunset so your eyes can adjust to total darkness. Mist a fine spray of water over the spark plug wires, taking care not to soak electronic sensors or the alternator. Watch closely along the entire route of every wire. If you see tiny blue sparks jumping, arcing between wires, or flashing against the metal engine block, you have found a short circuit caused by degraded insulation. This glowing electrical leakage instantly proves the wire is failing and leaking high voltage.
Step 4: Checking the Connection Terminals and Boots
What you need: A clean shop rag and dielectric grease (optional).
Instructions: Grab each spark plug boot firmly—never pull on the wire itself—and twist it slightly to break the seal before pulling straight up to disconnect it. Inspect the metal terminal clip hidden inside the rubber boot. Look for heavy corrosion, rust, green or white crusty buildup, or oil contamination from a leaking valve cover gasket. A loose-fitting terminal will fail to snap securely onto the spark plug top or distributor terminal. Wipe the interior clean with a dry rag. Verify that the metal clip makes a distinct, secure snapping sensation when you press it back onto the spark plug.
Step 5: The Insulated Pliers Resistance and Continuity Check
What you need: A pair of heavy-duty insulated spark plug boot pullers or heavy rubber-handled pliers.
Instructions: While the engine is running at a normal idle, use your insulated pliers to gently lift and hover each spark plug wire approximately one-quarter inch away from its spark plug or coil connection one at a time. Listen carefully to the engine’s behavior. If lifting a specific wire causes the engine idle to drop significantly or stumble worse, that cylinder was actively firing, meaning the wire is transferring current. If lifting a wire produces zero change in engine speed or sound, that cylinder was already dead, pointing directly to a failed wire or spark plug.
Step 6: Performing the Tactile Engine Warmth Test
What you need: Infrared thermometer gun or bare hands (with extreme caution).
Instructions: Run your engine for approximately two to three minutes from a cold start, then shut it off immediately. Carefully touch the exhaust runner on the exhaust manifold corresponding to each individual cylinder—or use an infrared thermometer pointed at each exhaust port. A cylinder with a dead spark plug wire will fail to ignite fuel, resulting in a significantly cooler exhaust runner compared to the working cylinders. If one specific exhaust pipe runner is noticeably colder than the rest, trace that cylinder back to its spark plug wire to confirm a misfire source.
Step 7: The Substitution Swap Test
What you need: A known working spare wire or permission to swap adjacent wires temporarily.
Instructions: If you suspect a particular wire is faulty based on your visual inspection or idle test, perform a substitution cross-check. Remove the suspected bad wire and swap its position with a longer, easily accessible wire from a neighboring cylinder that you know is functioning properly. Restart the engine. If the engine misfire symptom physically moves to the new cylinder where you placed the suspect wire, you have definitively confirmed that the original wire is defective and needs replacement.
✅ Final Checklist
- Engine is turned off and the negative battery cable is safely disconnected during initial inspection
- All wire insulation jackets checked from end to end for cracks, burns, and abrasions
- No electrical arcing or blue sparks observed during the dark water-mist test
- Interior terminal clips inside every boot are free of heavy corrosion and oil buildup
- Every spark plug boot makes a firm, secure mechanical snap when reattached
Important Notes:
- Ignition systems generate high voltages exceeding 40,000 volts; never touch exposed wire conductors while the engine is running to avoid severe shock.
- If replacing wires does not resolve your engine misfire, consult a professional mechanic to check fuel injectors, compression, and ignition coil packs.
- Estimated time for visual and physical testing is 30 to 45 minutes, with replacement wire sets costing between $30 and $90 depending on vehicle make and model.
How to Perform a Visual and Tactile Inspection
Your first line of defense requires no tools at all, just your eyes, hands, and a safe working environment. Always ensure your engine is completely cold before you touch any part of the ignition system to prevent severe burns.
Checking for Cracks, Burns, and Corrosion
Start by carefully twisting and pulling each rubber boot off its spark plug and ignition coil or distributor cap. Look deep inside the boots for white, green, or powdery gray corrosion, which indicates moisture intrusion and arcing. Trace the entire length of each wire while looking closely for:
- White or grayish tracks: These ash-like trails show where high voltage has been leaking outward to a nearby metal ground.
- Bulges or blistering: Heat damage weakens specific spots along the silicone jacket.
- Pinholes or cuts: Sharp under-hood components easily puncture aging wire insulation.
The Tactile Check for Soft Spots
With the engine off and cool to the touch, run your fingers gently along the entire length of every spark plug wire. Squeeze the wire lightly as you move from one end to the other. You should feel a consistent thickness and firmness. If you notice a sudden mushy spot, a hard brittle section, or a lump inside the insulation, the internal core has failed or melted, and that wire must be replaced immediately.
How to Fix Faulty Wires Using the Water Spray Test
The water spray test is a classic diagnostic technique used by roadside mechanics to pinpoint insulation breakdowns. As ignition systems age, microscopic cracks develop in the silicone or rubber jacketing. High-voltage electricity escapes through these fissures instead of reaching the spark plugs, causing engine misfires. By introducing moisture, you create a conductive path that amplifies the electrical leakage.
Step-by-Step Water Spray Procedure
- Park the vehicle in a completely dark garage or wait until dusk to perform the test.
- Start the engine and let it idle so the ignition system is actively firing under load.
- Fill a clean spray bottle with ordinary tap water and adjust the nozzle to a fine mist setting.
- Stand clear of moving serpentine belts and cooling fans for safety.
- Spray a light mist of water directly over the spark plug wires, keeping the bottle at least 12 inches away.
- Observe the wires closely in the dark while misting each line individually.
Interpreting Visual Feedback
According to automotive diagnostic standards from the Society of Automotive Engineers (SAE), a healthy wire will show no reaction to moisture. However, if a wire has degraded insulation, you will immediately see a distinct blue spark jumping from the cable to the nearest engine ground. You may also hear a sharp snapping sound or notice the engine stumble and nearly stall. Industry data shows that a single arcing wire requires immediate replacement to prevent permanent catalytic converter damage from unburned fuel.
What If It Still Doesn’t Work?
If your spark plug wires pass the visual inspections, resistance checks, and water spray tests, but your engine still misfires, the issue lies elsewhere in the ignition system. Modern vehicle diagnostics require a systematic approach when primary fixes fail. Consider these advanced troubleshooting steps:
- Inspect the spark plugs for heavy carbon fouling, oil contamination, or excessive electrode gap. Industry benchmarks suggest replacing spark plugs every 30,000 to 100,000 miles depending on the material.
- Test the ignition coils or coil-on-plug (COP) units, as internal coil windings frequently break down under thermal stress.
- Check the fuel injectors for clogs or weak spray patterns using a mechanic’s stethoscope or a dedicated pressure gauge.
- Scan the engine computer for pending diagnostic trouble codes (DTCs) using an OBD2 scanner to isolate misfires to specific cylinders.
- Consult a certified professional technician if the powertrain control module (PCM) fails to send proper trigger signals to the ignition system. Diagnostic labor typically ranges from $100 to $250 depending on regional shop rates.
Conclusion
Testing spark plug wires without a multimeter relies on careful visual inspections, physical checks, and the targeted water spray method to identify dangerous insulation breakdown. Catching these electrical leaks early prevents sudden engine stalls and protects expensive downstream emission components. According to verified research and automotive service data, replacing damaged ignition wires restores peak fuel efficiency and smooths out rough idles instantly. Your next actionable step is to inspect your vehicle’s wire routing and replace any compromised sets with OEM-grade components before your next long drive in 2026.
❓ Frequently Asked Questions
How do I spot a spark plug wire leak in the dark?
Park your vehicle in a completely dark garage or at night, pop the hood while the engine is running, and look closely along the length of each wire. If you see tiny blue flashes or sparks jumping to metal surfaces, the insulation is compromised.
What safety precautions are necessary when checking ignition wires?
Always ensure the engine is completely off and cool before touching physical components. When testing a running engine, never grip bare wire and rely strictly on insulated spark plug pliers to prevent dangerous electrical shocks.
How does the water spray test work for testing spark plug wires?
Fill a spray bottle with clean water and mist a light layer over the spark plug wires while the engine idles in the dark. Water amplifies conductivity, causing current to instantly arc through microscopic cracks, making damaged wires immediately visible.
Can physical damage alone indicate a bad spark plug wire?
Yes, visible signs such as deep cuts, melting from contact with hot exhaust manifolds, heavy oil contamination, or bulging rubber boots mean the wire should be replaced immediately regardless of test results.
What happens if a spark plug wire is completely disconnected?
A disconnected wire stops delivering current to that specific cylinder, causing an immediate and severe engine misfire, heavy vibration, a drastic drop in power, and unburnt fuel entering the exhaust system.
How often should spark plug wires be replaced as preventative maintenance?
Standard copper-core ignition wires generally need replacement every 30,000 to 50,000 miles, while higher-quality silicone or suppression wires can often last up to 60,000 miles under normal driving conditions.