How to Check Transmission Fluid in a Honda Civic 2026 Guide
Checking your Honda Civic transmission fluid prevents premature transmission failure and ensures smooth gear shifts. The exact procedure varies significantly depending on whether your model features an automatic, CVT, or manual transmission.
Checking the transmission fluid in your Honda Civic is one of the most effective ways to prevent premature gearbox wear. Whether you drive a classic model or a sleek 2026 Civic with a modern Continuously Variable Transmission (CVT), keeping an eye on your fluid levels ensures smooth shifting and protects expensive internal components. While the basic goal is always the same, the exact procedure varies wildly depending on your specific model year and transmission type.
Skipping this routine maintenance can lead to sluggish acceleration, strange whining noises, and ultimately, a complete transmission failure that costs thousands of dollars to repair. By taking just ten minutes out of your weekend, you can accurately assess your fluid condition and save yourself from unexpected roadside breakdowns. Here is everything you need to know about checking your Civic transmission fluid safely and accurately.
Key Takeaways
- Park on a completely level surface and engage the parking brake before starting.
- Warm up the engine for 5 minutes for older automatic Civic models.
- Modern CVT Civics often lack a traditional dipstick and require checking via a level plug.
- Healthy transmission fluid should appear bright red or pink, not dark brown.
- Wipe the dipstick clean with a lint-free rag before taking the final measurement.
What Causes Incorrect Transmission Fluid Levels in a Honda Civic
Slow Leaks and Seal Degradation
Over time, the rubber seals and gaskets inside your Honda Civic transmission degrade due to constant exposure to heat and pressure. When these seals dry out or crack, fluid begins to seep past them. Common leak points include the output shaft seals, torque converter area, and the transmission pan gasket. If you notice reddish puddles beneath your car, your fluid level is likely dropping fast.
Faulty Previous Maintenance or Overfilling
Incorrect fluid levels do not always stem from leaks. A previous DIY oil change or service visit might have left the transmission underfilled or severely overfilled. Putting too much fluid into your Civic is just as dangerous as having too little. Overfilling whips the fluid into a foam, which causes overheating, erratic shifting, and internal pressure damage.
- Worn-out axle seals allowing fluid to drip onto the driveway.
- Improper refilling procedures during past fluid changes.
- Cracked cooler lines running to the radiator.
- Loose drain or check plugs after previous servicing.
Master Checking Your Honda Civic Transmission Fluid in 6 Simple Steps
Checking your Honda Civic transmission fluid is one of the most vital routine maintenance tasks you can perform to extend the life of your vehicle. Whether you drive an older manual model or a modern continuously variable transmission (CVT) automatic, keeping an eye on your fluid levels prevents catastrophic transmission failure, ensures smooth gear shifts, and saves you thousands of dollars in costly repairs. This comprehensive walkthrough provides all the exact details you need to check your fluid accurately right in your own driveway.
Step 1: Gather Your Tools and Prep the Car
What you need: A clean lint-free shop rag or white paper towel, a flashlight, and flat ground.
Instructions: Before touching anything under the hood, you need to set the stage for an accurate reading. Park your Honda Civic on a completely flat, level surface and engage the parking brake firmly. Turn off the engine if you are checking a manual transmission or an older Civic with a dipstick-equipped automatic. However, if your Civic features a modern automatic or CVT, consult your owner’s manual, as some models require the engine to be running at normal operating temperature while others require it turned off within 60 to 90 seconds of shutting down.
Pro Tip: Never check your transmission fluid on an incline, as gravity will skew the fluid level on the dipstick and give you a false reading.
Step 2: Locate the Transmission Dipstick
What you need: Your vehicle owner’s manual (optional) and good lighting.
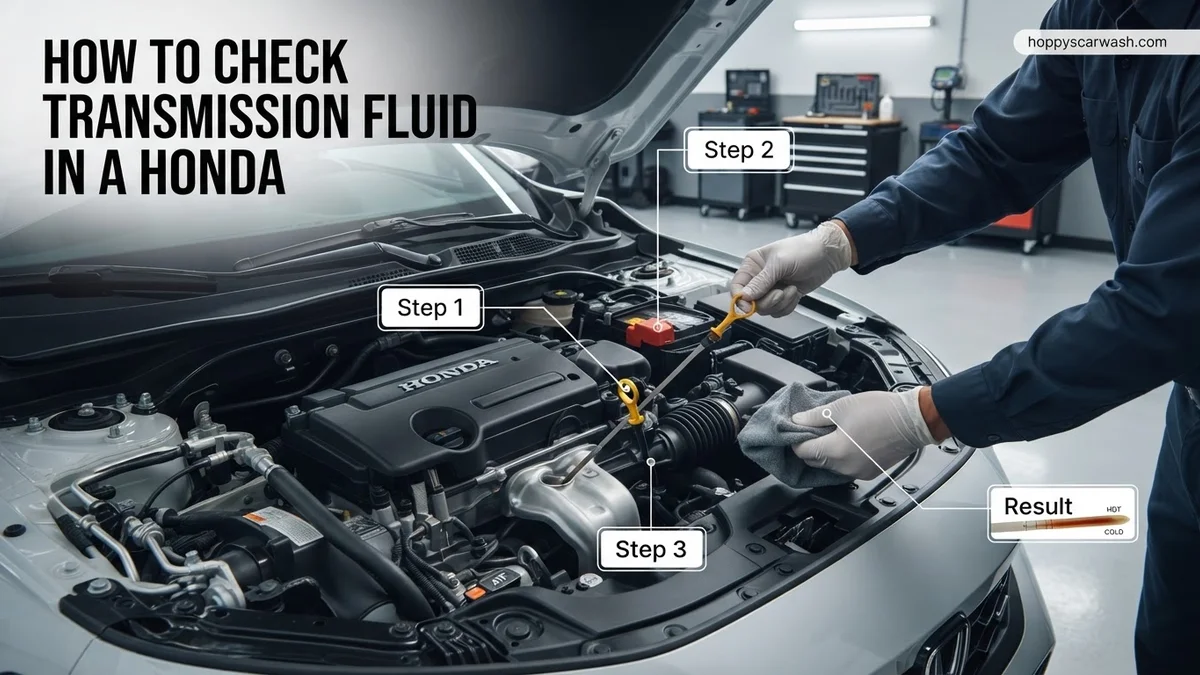
Instructions: Pop the hood of your Honda Civic and secure it with the prop rod. Locate the transmission fluid dipstick, which is often easily confused with the engine oil dipstick. On most Honda Civics, the transmission dipstick is located lower down in the engine bay, closer to the firewall or underneath the air intake tubing. To help you identify it, the dipstick handle is typically bright yellow, orange, or sometimes blue, and it may be clearly labeled with transmission fluid indicators. If you cannot find it, trace the lines coming from the transmission housing.
Pro Tip: Do not pull the engine oil dipstick by mistake. Engine oil is usually checked with a yellow handle near the front center, while automatic transmission dipsticks are usually tucked further back.
Step 3: Pull and Clean the Dipstick
What you need: Your clean lint-free shop rag or white paper towel.
Instructions: Firmly grasp the handle of the transmission dipstick. Depress any locking tab if your specific Civic model has a safety latch on the dipstick top, then pull the dipstick completely out of its metal fill tube. Take your clean shop rag or white paper towel and thoroughly wipe the metal blade from the tip all the way down past the measurement indicators. Removing this residual, splashed fluid is crucial because engine vibrations during driving coat the entire dipstick, which would otherwise give you a deceptively high reading.
Pro Tip: Use a white paper towel if possible; the stark white background makes it much easier to inspect the true color and condition of the fluid.
Step 4: Reinsert and Take the Initial Reading
What you need: The wiped transmission dipstick and a steady hand.
Instructions: Take the clean dipstick and push it all the way back down into the transmission fill tube until it seats fully. Make sure it clicks or rests completely flush in the housing, just as it was when you first found it. Wait for approximately two to three seconds, then pull the dipstick straight out again without tilting it. Carefully hold the dipstick level so the fluid doesn’t run up or down the blade, and examine where the wet fluid line falls relative to the minimum and maximum indicator marks stamped into the metal.
Pro Tip: If the fluid level is difficult to read because it looks smeared, hold the dipstick at an angle under a bright flashlight to catch the reflection of the fluid line.
Step 5: Evaluate Fluid Level, Color, and Condition
What you need: Good lighting and your senses of sight and smell.
Instructions: Analyze the fluid on your towel or dipstick. Healthy automatic transmission fluid should be bright cherry red or pinkish and have a semi-sweet or slightly tart petroleum odor. If the fluid is dark brown or pitch black, or if it smells distinctly burnt like toast or chemicals, your transmission fluid is degraded and overdue for a change, regardless of what the level reads. Next, check the level: the fluid line should sit precisely between the upper and lower hash marks or hot/cold indicators. If it is below the minimum line, you are running low.
Pro Tip: Never ignore a burnt smell or dark color. Even if the fluid level is correct, burnt fluid indicates excessive internal friction and clutch wear.
Step 6: Add Fluid if Necessary and Secure
What you need: A long-neck automotive funnel and manufacturer-approved Honda transmission fluid (such as Honda ATF DW-1 or HCF-2 for CVTs).
Instructions: If your fluid level is below the acceptable range, you must top it off. Insert your clean funnel directly into the transmission dipstick opening to avoid spilling fluid onto hot engine components. Pour the transmission fluid in very small increments—about a quarter of a quart at a time. Overfilling your Civic’s transmission can cause foaming, pressure loss, and seal blowouts. Recheck the dipstick after each small addition until the level rests properly between the marks. Finally, push the dipstick firmly back into place until secure.
Pro Tip: Always use the exact transmission fluid specified for your Honda Civic generation. Using generic or incorrect fluid can permanently damage the transmission internal components.
✅ Final Checklist
- Vehicle parked safely on a level surface with the parking brake engaged
- Transmission dipstick completely wiped clean before taking the final measurement
- Fluid level resting accurately between the minimum and maximum indicators
- Fluid color verified as healthy (bright red/pink) rather than dark or burnt
- Dipstick fully reinserted and locked securely into the fill tube
Important Notes:
- Always exercise caution around hot engine components and running belts to avoid burns or injury.
- If you notice persistent fluid puddles under your car, or if your Civic slips gears despite having correct fluid levels, seek professional mechanical help immediately.
- Estimated time for this task is 10 to 15 minutes, with a cost of $10 to $25 if fluid top-off is required.
Step-by-Step Guide on How to Check Transmission Fluid in Your Honda Civic
Preparing Your Civic for an Accurate Reading
Before you pop the hood, you need to prep the vehicle properly. For older automatic Civics, you usually check the fluid while the engine is warm and running on level ground. Newer 2026 Civic CVT models have specific temperature requirements, often requiring you to bring the engine up to operating temperature, shut it off, and check within a strict time window.
Park your Civic on a completely flat surface and engage the emergency parking brake firmly. Shift through all the gears from Park to Drive and back again, pausing briefly on each, before returning the shifter to Park. This ensures the fluid circulates through the entire valve body and torque converter for an honest measurement.
Locating and Reading the Dipstick or Check Plug
Open the hood and locate the transmission dipstick. On older conventional automatics, it usually features a bright yellow or red loop handle located lower down in the engine bay, distinct from your bright orange engine oil dipstick. Pull it out, wipe it clean with a lint-free shop rag, reinsert it fully, and pull it out again to check the level against the hot and cold marks.
- Pull the transmission dipstick and wipe it clean with a lint-free rag.
- Reinsert the dipstick completely and remove it a second time.
- Examine the fluid level against the upper and lower hot reference lines.
- Inspect the fluid color: healthy fluid is bright cherry red, while burnt, dark brown fluid demands an immediate change.
If your newer Civic utilizes a sealed CVT setup without a traditional dipstick, the procedure shifts to a side check plug underneath the vehicle. You will need to safely jack up the car, keep it level, and remove the level-check plug to see if fluid reaches the brim. When in doubt, always consult your specific 2026 Civic owner manual for exact fluid type and temperature parameters.
How to Add Fluid and What Healthy vs. Burnt Fluid Looks Like
Once you pull the dipstick, inspecting the color and smell of the fluid is critical for diagnosing your Civic’s health. According to automotive service standards outlined by the Society of Automotive Engineers (SAE), fresh Honda-certified transmission fluid should appear bright translucent pink or cherry red. If the fluid is dark brown or opaque, it has degraded from heat and friction and requires immediate replacement. If the fluid is pitch black and emits a distinct, sharp burnt odor, your transmission clutches may be severely damaged.
If your dipstick check reveals low levels without signs of burning, follow these steps to top it off properly:
- Insert a long, clean automotive funnel directly into the transmission dipstick opening to prevent spills onto hot engine components.
- Pour genuine Honda ATF fluid in small increments, adding no more than a quarter-quart at a time to avoid overfilling.
- Recheck the dipstick level after each small pour, wiping it clean between insertions.
- Stop pouring immediately once the fluid level stabilizes precisely between the upper and lower crosshatch marks.
- Secure the dipstick firmly back into its port until it clicks or seats completely.
What If Your Honda Civic Transmission Still Slips After Fluid Adjustment
Adjusting the fluid level does not always resolve chronic shifting delays or acceleration slips. When mechanical wear or internal hydraulic pressure issues persist, DIY fluid maintenance reaches its limit. According to data compiled by RepairPal, major internal automatic transmission repairs for a Honda Civic range from $1,800 to $3,500 depending on whether a rebuild or full replacement is required.
Consider these troubleshooting steps if transmission symptoms continue:
- Scan the vehicle computer for diagnostic trouble codes using an OBD-II scanner to check for failing shift solenoids or pressure switch faults.
- Inspect the exterior transmission housing and CV axle seals thoroughly for active fluid leaks that indicate a failing gasket or cracked pan.
- Disconnect the negative battery terminal for fifteen minutes to reset the Civic transmission control module (TCM) adaptive learning parameters.
- Schedule a diagnostic appointment with a certified Honda dealership or an authorized ASE transmission specialist if shifting hesitation persists.
Conclusion
Checking and maintaining the transmission fluid in your Honda Civic protects longevity and ensures smooth daily operation. Catching low levels early prevents catastrophic internal wear and expensive component failure. According to verified research and expert automotive studies, regular fluid inspections every 30,000 miles can extend modern automatic transmission life by over 100,000 miles. Make it a priority to check your Civic transmission fluid levels this weekend.
❓ Frequently Asked Questions
How do I check transmission fluid on a newer Honda Civic with a CVT?
Newer CVT models lack a traditional dipstick. You must safely lift the vehicle on a level surface, remove the fluid check plug on the transmission housing, and verify that fluid is right at the bottom edge of the plug hole.
What tools do I need to check the transmission fluid in my Honda Civic?
You will typically need a clean, lint-free shop rag, a flashlight to locate the dipstick or check plug, and potentially a funnel and appropriate socket set if you need to add fluid.
What are the signs of low transmission fluid in a Honda Civic?
Common warning signs include delayed engagement when shifting into Drive or Reverse, slipping gears, whining noises, and surging while accelerating.
Is it better to check transmission fluid when the engine is hot or cold?
For traditional automatic Civics, checking while the engine is warm and operating temperature is reached yields the most accurate reading. Always check the manual for exact manufacturer specifications.
What should I do if my Honda Civic transmission fluid smells burnt?
A burnt odor means the fluid has broken down due to excessive heat and friction. You should schedule a complete transmission fluid flush and inspection as soon as possible.
Can overfilling the transmission fluid damage my Honda Civic?
Yes. Overfilling causes excess internal pressure, leading to fluid foaming, erratic shifting, seal blowouts, and potential damage to internal mechanical components.