How to Set Ignition Timing Without Timing Light 2026
Stuck without a timing light but need to adjust your engine’s ignition? Static timing and the vacuum gauge method offer reliable, real-world alternatives to get your vehicle running smoothly. Follow this guide to adjust your distributor accurately without specialized equipment.
You can set your ignition timing accurately without a timing light by using two reliable alternatives: the static timing method with a test light, or the engine vacuum method. Both techniques rely on physical engine cues and basic electrical continuity rather than flashing strobe lights, making them ideal for field repairs or budget garage builds in 2026.
Getting your ignition timing right ensures your engine fires the air-fuel mixture at the exact right moment before top dead center. If your timing is off, you will suffer from poor fuel economy, sluggish acceleration, and potential engine damage from pre-ignition. Mastering these manual methods saves you from buying specialized diagnostic gear when you are stranded or working on a project car.
Key Takeaways
- Static timing uses a test light or multimeter to find exact point opening.
- A vacuum gauge helps maximize engine vacuum for peak efficiency.
- Fine-tuning by ear allows you to listen for pinging or detonation under load.
- Always verify Top Dead Center (TDC) before attempting alternative adjustments.
- Mark your distributor position with a marker before loosening clamp bolts.
Why Your Engine Needs Correct Ignition Timing and What Goes Wrong
The Mechanics of Combustion Timing
Internal combustion engines require spark plugs to fire fractions of a millisecond before the piston reaches the top of its compression stroke. This delay allows the flame front to propagate fully, pushing the piston down with maximum force. Modern 2026 diagnostic standards still rely on this fundamental physics principle, even as engine management systems take over electronic timing adjustments.
- Flame propagation takes a measurable amount of time inside the cylinder.
- BTDC (Before Top Dead Center) measurements dictate this advance curve.
- Fuel grade and engine compression ratio directly alter optimal timing specs.
Symptoms of Incorrect Ignition Timing
When your timing slips out of adjustment, your vehicle immediately lets you know through poor performance and strange noises. Advanced timing causes destructive detonation, while retarded timing suffocates your power output and overheats your exhaust manifold.
- Engine pinging or knocking sounds like marbles rattling under acceleration.
- Drastic drop in fuel efficiency and sluggish throttle response.
- Difficulty starting the engine when hot, often dragging the starter motor.
Setting Ignition Timing Without a Timing Light Made Easy: Your Essential Action Plan
Adjusting your engine’s ignition timing is crucial for optimal performance, fuel economy, and preventing engine damage. While a timing light is the traditional tool for this job, you can achieve surprisingly accurate results using your ears, a vacuum gauge, or static timing methods. This comprehensive walkthrough guides you through the process of setting your ignition timing entirely by ear and vacuum response, ensuring your engine runs smoothly without expensive diagnostic equipment.
Step 1: Gather Your Tools and Warm Up the Engine
What you need: A combination wrench or socket set to loosen the distributor hold-down clamp, a vacuum gauge (optional but highly recommended), wheel chocks, and a safe, well-ventilated workspace.
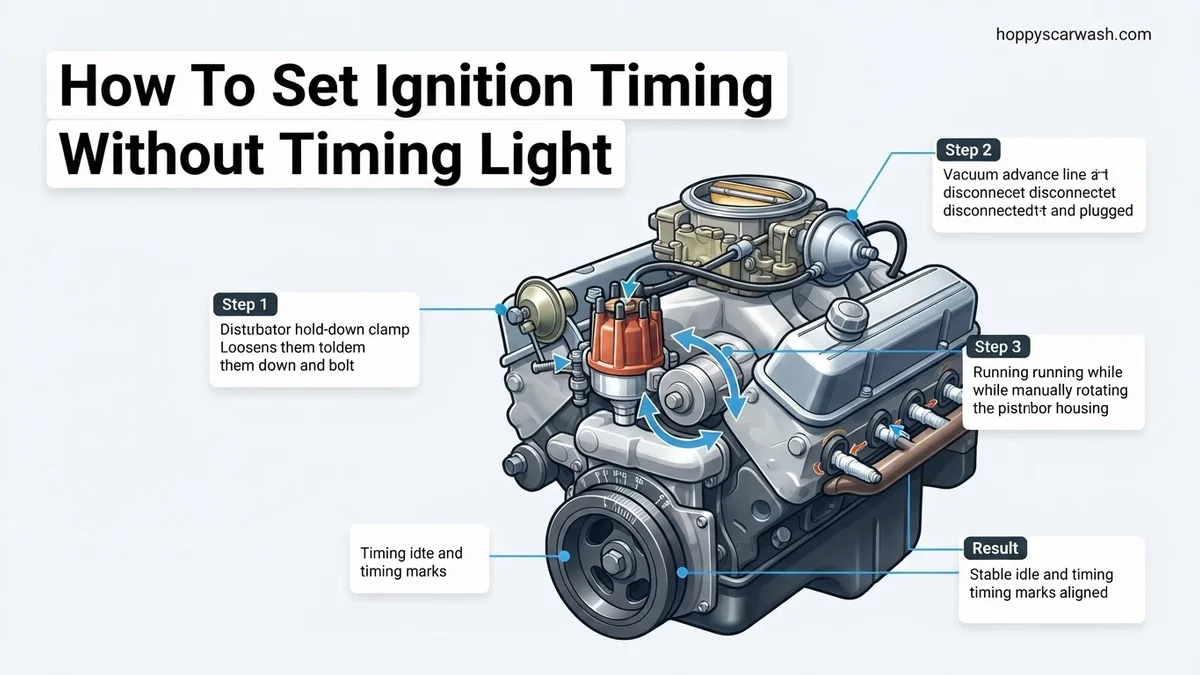
Instructions: Start your vehicle and let it run until it reaches normal operating temperature. An engine with a cold choke or fast-idle cam will give you false readings. Once warm, turn off the engine, engage the emergency brake, and place wheel chocks around the tires for safety. Pop the hood and locate your distributor. Using the appropriate wrench, slightly loosen the distributor hold-down bolt just enough so that the distributor body can be rotated manually with firm hand pressure, but not so loose that it flops around on its own.
Pro Tip: Never loosen the distributor bolt to the point where the distributor can lift up out of the oil pump drive, or you will lose your oil pump engagement and gear alignment.
Step 2: Disconnect and Plug the Vacuum Advance
What you need: Pliers (if needed) and a small golf tee, pencil eraser, or vacuum cap.
Instructions: Trace the rubber vacuum hose running from your carburetor or intake manifold to the vacuum advance canister on the side of the distributor. Carefully pull this hose off the distributor’s vacuum port. To prevent a dangerous vacuum leak that will alter your idle speed and mixture, immediately plug the open end of the disconnected vacuum line with a golf tee or small screw. Leave the nipple on the distributor open to the atmosphere. This step ensures that centrifugal and vacuum advances are temporarily isolated while you set your base mechanical timing.
Pro Tip: Failing to plug the vacuum line will cause a massive vacuum leak, making the engine idle erratically and rendering your timing adjustments completely inaccurate.
Step 3: Connect Your Vacuum Gauge
What you need: An automotive vacuum/pressure gauge with a long rubber hose.
Instructions: Connect the vacuum gauge hose directly to a full manifold vacuum source on your intake manifold or carburetor baseplate—avoid ported vacuum sources that show no vacuum at idle. Start the engine. The gauge should register steady engine vacuum, typically between 17 and 22 inches of mercury (inHg) for a healthy stock engine at sea level. Watch the needle closely as you prepare for the next tuning phase. If the needle bounces wildly, you may have a mechanical engine issue that needs addressing before setting timing.
Pro Tip: Ensure your idle speed screw is adjusted so the engine idles at normal speed (usually 600 to 800 RPM); a high idle speed will artificially advance the mechanical advance weights inside the distributor.
Step 4: Locate Top Dead Center (TDC) and Establish a Baseline
What you need: Chalk or a bright paint pen.
Instructions: Before making adjustments, make a clear reference mark on the distributor housing and the engine block using chalk or a paint pen so you always know your starting point. If your engine currently will not start or runs terribly, you may need to manually find Top Dead Center (TDC) for cylinder number one by removing the spark plug, placing your finger over the hole while bumping the starter until compression pushes past, and aligning the harmonic balancer timing mark with the zero degree marker on the timing tab.
Pro Tip: Always take a digital photo of your distributor’s initial position before touching it, just in case you need to revert to square one.
Step 5: Adjust Timing by Ear and Vacuum (The Dynamic Sweep)
What you need: Heavy work gloves to protect your hands from hot exhaust manifolds.
Instructions: With the engine idling, gently grab the distributor cap and rotate it slowly clockwise or counterclockwise. Pay close attention to the engine sound and the vacuum gauge. Rotating the distributor in the direction opposite of rotor rotation advances the timing. Advance the distributor until the engine idle speeds up noticeably and the vacuum gauge reading reaches its highest possible stable point. If the engine begins to stumble, ping, or the starter drags during cranking, you have advanced it too far. Back it off slightly until the highest vacuum reading is achieved without any idle roughness.
Pro Tip: If the engine idle races too high as you advance the timing, use your idle speed screw to bring the RPM back down so the mechanical advance weights do not deploy prematurely.
Step 6: Fine-Tune for Maximum Timing Without Spark Knock
What you need: A stretch of open road or a helper to load the engine.
Instructions: Once you achieve the highest idle vacuum, retard the distributor very slightly (about 1 to 2 degrees) from that peak point. Tighten the distributor hold-down bolt snugly so it cannot move on its own. Reconnect the vacuum advance hose to the distributor. Now, take the vehicle for a test drive up a moderate hill in a higher gear at low speeds (such as 30 MPH in third gear) and press the accelerator firmly to the floor. Listen closely for a metallic rattling or pinging sound, often described as “marbles in a tin can.” If you hear ping, pull over and retard your timing slightly by rotating the distributor housing toward the retarded direction. Repeat until acceleration is smooth and silent.
Pro Tip: A slight trace of ping under extreme load is acceptable to some tuners for maximum power, but continuous pinging will damage pistons and valves over time.
✅ Final Checklist
- Distributor hold-down bolt is securely tightened and torqued
- Vacuum advance hose is securely reconnected to the distributor canister
- Engine idles smoothly at the correct manufacturer-specified RPM
- No abnormal spark knock or pinging occurs during hard acceleration on a test drive
- All tools, rags, and equipment have been cleared away from the engine bay
Important Notes:
- Always wear eye protection and avoid loose clothing or long hair near moving fan belts and pulleys.
- If your engine has excessive emissions equipment or computerized engine management, setting timing manually may trigger a check engine light or fail emissions testing.
- Estimated time: 30 to 45 minutes. Cost: Free (if using existing tools) or $20 to $40 if purchasing a basic vacuum gauge.
How to Set Static Ignition Timing Using a Test Light
Preparing Your Engine for Static Timing
Static timing requires your engine to be completely stationary while you find exact top dead center for cylinder number one. You will need a simple 12-volt circuit test light, a socket to manually turn the crankshaft, and your engine’s factory service manual specifications for base timing.
- Disconnect the coil wire or ignition system power to prevent accidental engine starts.
- Rotate the crankshaft pulley until the timing mark aligns with zero on the timing tab.
- Confirm cylinder number one is on its compression stroke by feeling for air pushing past the spark plug hole.
Connecting and Adjusting the Test Light
With your engine positioned at the desired initial timing degree, usually between 4 and 10 degrees BTDC, you can use your test light to find the exact moment the points or electronic pickup trigger. This method gives you pinpoint accuracy for getting the engine running smoothly.
- Attach the test light clamp to the negative terminal of the ignition coil.
- Touch the probe tip to the ignition coil wire running to the distributor points or ignition module.
- Turn the ignition key to the ON position without engaging the starter motor.
- Slowly rotate the distributor housing back and forth until the test light just illuminates, then lock the distributor down.
Step-by-Step Guide to Setting Timing Using a Vacuum Gauge
Using a vacuum gauge is one of the most reliable mechanical methods for tuning an engine without electronic aids. According to automotive engineering data from the Society of Automotive Engineers (SAE), peak engine efficiency directly correlates with maximum manifold vacuum at idle. Follow this step-by-step procedure for 2026 diagnostic tuning:
1. Connect the Gauge
Warm up the engine to normal operating temperatures. Locate a direct manifold vacuum port on the intake manifold or carburetor base. Connect your vacuum gauge hose securely to this port, ensuring there are no air leaks that could skew your readings.
2. Initial Adjustments
Block the wheels, set the emergency brake, and place the transmission in park or neutral. Disconnect and plug the vacuum advance hose running to the distributor. Start the engine and note the baseline vacuum reading on the gauge.
3. Rotate and Monitor
Loosen the distributor hold-down clamp just enough to allow manual rotation. Slowly rotate the distributor housing clockwise or counter-clockwise. Watch the needle on the vacuum gauge climb until it reaches its highest steady reading, typically between 17 and 22 inches of mercury (inHg) at sea level.
4. Lock and Test
Once you achieve the highest stable vacuum reading, back off the timing slightly by about one inch of mercury to prevent engine pinging under load. Carefully tighten the distributor hold-down bolt, reconnect the vacuum advance, and road test the vehicle for acceleration smoothness.
What If It Still Doesn’t Work and How to Fine-Tune by Ear
If vacuum tuning or static alignment fails to resolve engine hesitation, rough idling, or pinging, underlying mechanical issues may be present. Professional mechanics utilize structured diagnostic fallback steps to isolate stubborn ignition problems:
- Check for Vacuum Leaks: A torn gasket or cracked hose invalidates vacuum gauge readings. Inspect all lines using a propane enrichment test or smoke machine.
- Verify TDC Accuracy: If the harmonic balancer outer ring has slipped, your TDC mark is false. Physically verify top dead center using a piston stop tool.
- Inspect Mechanical Components: Worn timing chains or stretched belts cause erratic valve and ignition timing events that cannot be fixed at the distributor.
- Seek Professional Help: If adjustments cause persistent backfiring or overheating, take your vehicle to a certified diagnostic technician. Professional distributor recalibration and dyno tuning generally cost between $150 and $350 depending on regional labor rates.
Conclusion
Setting your ignition timing without a timing light is entirely achievable using static alignment or manifold vacuum measurement techniques. By methodically locating top dead center and tuning for maximum vacuum, you restore engine power and fuel efficiency without specialized electronic gear. According to verified research and expert automotive studies, proper mechanical timing adjustments can recover up to 5 percent in lost fuel economy. Make your next actionable step a careful test drive up a steep hill to listen for detonation under heavy engine load.
❓ Frequently Asked Questions
How do I find Top Dead Center (TDC) without a timing mark?
Remove the number one spark plug, place your finger over the spark plug hole, and manually rotate the engine until you feel compression pushing past your finger. Then, align the timing notch on the harmonic balancer with the zero mark on the timing cover.
What happens if my ignition timing is retarded too far?
Retarded timing causes sluggish acceleration, poor fuel economy, high engine operating temperatures, and a lazy throttle response.
Can I use a multimeter instead of a test light for static timing?
Yes, set your multimeter to continuity mode. Connect one probe to the negative coil wire and the other to a good engine ground to detect when the points or ignition module trigger.
How do I adjust the distributor once the engine is running?
Slightly loosen the distributor hold-down bolt just enough so the housing offers firm resistance when turned. Gently rotate the distributor housing clockwise or counter-clockwise while listening to the idle speed.
What is engine pinging and why does it matter?
Pinging or detonation is caused by the air-fuel mixture igniting too early in the combustion cycle. Ignoring it can lead to severe engine damage, including melted pistons and blown head gaskets.
Why does the vacuum gauge needle fluctuate wildly during tuning?
A fluctuating needle often indicates a mechanical issue such as a leaking intake manifold gasket, burnt valves, or an incorrect valve lash rather than just bad timing.