How to Remove Scratches on Plastic Car Interior 2026 Guide
Scratches on your vehicle’s interior can ruin its clean look, but fixing them is simple with the right approach. Whether using a specialized plastic polish, a careful heat gun technique, or household remedies, you can restore your dashboard and consoles effectively.
Restoring a scratched car interior in 2026 comes down to matching the right repair technique to your specific type of cabin plastic. Whether you are dealing with a fingernail scuff on your glossy center console or a deep scrape on a textured dashboard panel, you can effectively remove or minimize the damage using targeted automotive polishes, careful heat application, or common household items.
Ignoring interior blemishes can degrade your vehicle’s resale value and create an eyesore that catches the sunlight every time you drive. Fortunately, you do not need to replace expensive trim pieces or pay for professional detailing. By prepping the surface correctly and applying the right DIY fix step-by-step, you can make those unsightly marks practically disappear.
Key Takeaways
- Always thoroughly clean plastic surfaces before applying any scratch removal products.
- Use dedicated plastic polishes for smooth, glossy, or piano-black interior trim.
- Exercise extreme caution with heat guns on textured plastic to avoid melting.
- Test any DIY household remedy on a hidden spot first.
- Avoid harsh abrasive pads that can permanently dull matte interior finishes.
Identifying Interior Plastic Types and Scratches
Before you grab a bottle of polish or a heat gun, you must identify what kind of plastic you are working with. Modern 2026 vehicle cabins use vastly different materials for switchgear, touchscreens, center consoles, and lower door panels. Treating the wrong surface with an aggressive method will permanently ruin the finish.
Smooth and Piano Black Plastics
Piano black trim and transparent instrument cluster covers scratch easily and show dust immediately. These surfaces require non-abrasive or micro-abrasive plastic polishes designed specifically for clear plastics. Never use heavy grit compounds or heat on smooth glossy trim because you will haze the clear coat and create a permanent milky patch.
Textured Dashboard and Door Panels
Most modern dashboards feature a pebbled, leather-grain texture molded directly into the polymer. Standard rubbing compounds will flatten out these peaks and valleys, leaving a shiny, smooth bald spot that stands out worse than the original scratch. Textured surfaces respond best to careful heat gun techniques or specialized textured plastic fillers rather than heavy sanding.
Plastic Car Interior Scratches Made Easy: Your Essential Action Plan
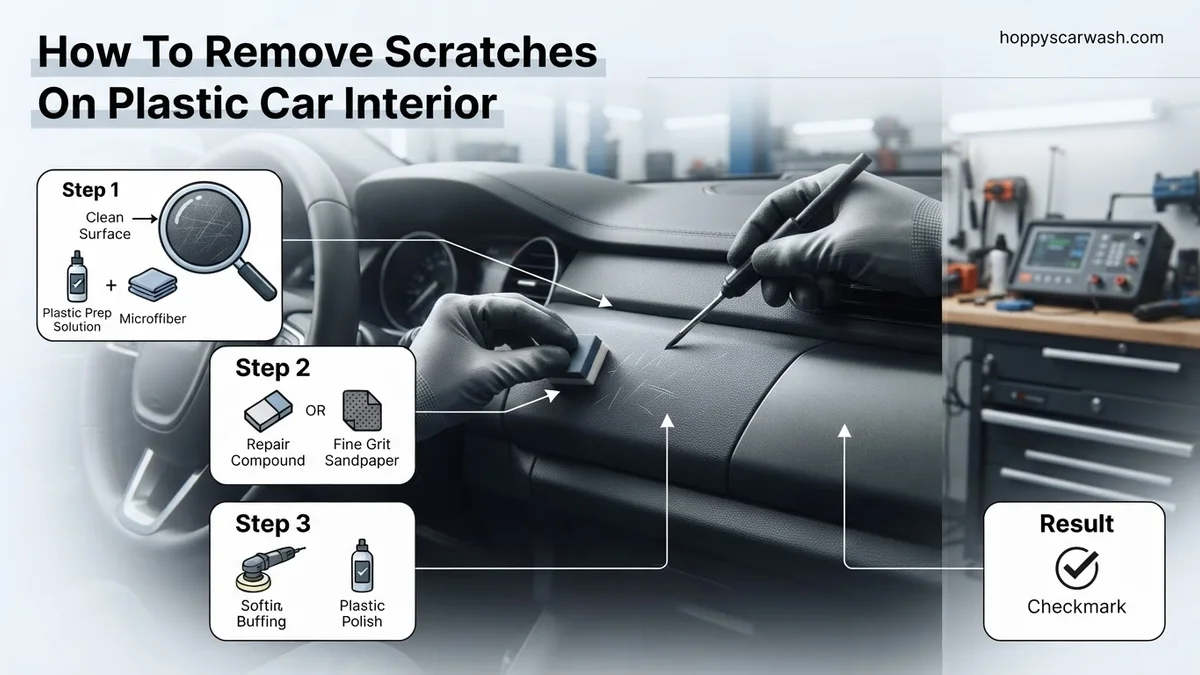
Scratches on your car’s interior plastic trim can quickly make a well-maintained vehicle look tired and neglected. Whether caused by fingernails, pet claws, or clumsy cargo loading, these blemishes are frustrating. This comprehensive guide walks you through the exact professional-grade techniques required to safely buff out and restore your vehicle’s plastic surfaces, helping you avoid costly dealership replacement fees while achieving a factory-fresh finish.
Step 1: Thorough Interior Surface Cleaning
What you need: Mild automotive interior cleaner, clean microfiber towels, and a soft-bristled detailing brush.
Instructions: Before attempting any scratch removal, you must remove all embedded dust, oils, and grit from the damaged area. If dirt remains on the plastic, the abrasive removal process will drag those particles across the surface, creating even more scratches. Spray a small amount of mild interior cleaner directly onto your microfiber towel or the plastic surface. Gently agitate the area using your detailing brush to lift dirt from textured grains. Wipe the area completely dry with a fresh microfiber towel before proceeding to the assessment phase.
Pro Tip: Never use harsh household glass cleaners containing ammonia, as they can permanently dry out, discolor, or weaken automotive plastics.
Step 2: Assess the Severity of the Damage
What you need: Good lighting (such as a penlight or smartphone flashlight) and your fingernail.
Instructions: Turn on your light source and carefully inspect the scratches. Lightly run your fingernail across the damaged plastic surface. If your fingernail glides smoothly over the scratch without catching, it is a surface-level blemish that can be easily buffed out using mild abrasives or heat. If your fingernail catches significantly in the groove, the scratch is deep and will require specialized filling techniques or wet sanding. Determining the depth now prevents you from using an ineffective method or accidentally damaging the surrounding trim.
Pro Tip: Take a high-resolution photo of the scratch under bright light so you can track your progress accurately as you move through the restoration steps.
Step 3: Apply Heat for Minor Surface Scratches
What you need: A household heat gun or a high-powered hair dryer.
Instructions: For light scuffs and minor scratches on textured dashboard plastics, controlled heat is often the fastest solution. Turn your heat gun to a low setting and hold it approximately 6 to 8 inches away from the damaged area. Keep the heat source moving constantly in a side-to-side sweeping motion—never hold it in one spot, or you will melt the plastic. The gentle heat draws the natural oils back to the surface of the plastic, causing minor scratches to magically shrink and blend seamlessly into the surrounding texture.
Pro Tip: Always test this method on a hidden area underneath a seat or inside a door jamb first to understand how your specific vehicle’s plastic reacts to heat.
Step 4: Choose and Apply Plastic Restorer or Polish
What you need: Dedicated plastic polish or trim restorer compound, and foam applicator pads.
Instructions: If heat treatment is insufficient, physical polishing is your next line of defense. Squeeze a nickel-sized amount of specialized plastic polish onto a clean foam applicator pad. Work the product into the scratch using firm, circular motions for about 60 to 90 seconds. The micro-abrasives in the polish will gently level out the sharp edges of the scratch, smoothing the transition between the damaged groove and the healthy plastic. Add a small drop more of the product if the pad becomes dry during the process.
Pro Tip: Work in small sections at a time and avoid pressing down with excessive force, especially on thin plastic bezels surrounding infotainment screens.
Step 5: Buff Away Residue and Inspect
What you need: Plush, edgeless microfiber buffing towels and rubbing alcohol (IPA 50% dilution).
Instructions: Once you have thoroughly worked the plastic polish into the scratched area, let it haze for about 30 seconds. Take your plush microfiber towel and buff the area firmly to remove all spent product and residue. To truly evaluate your work, lightly wipe the area with your 50% isopropyl alcohol solution on a clean towel to strip away any temporary fillers in the polish. Inspect the plastic under your flashlight. If the scratch is still visible, repeat Step 4 for another cycle until the surface looks uniform.
Pro Tip: Always use edgeless microfiber towels to prevent accidental secondary scratching caused by rough stitched borders during the final buffing stage.
Step 6: Protect and Seal the Restored Plastic
What you need: UV-blocking interior plastic ceramic coating or a matte-finish interior protectant.
Instructions: The scratch removal process strips away the factory protective layer on the plastic, leaving it vulnerable to fading and future damage. Apply a few drops of a quality UV-blocking interior protectant or ceramic trim coat onto a clean applicator pad. Spread an ultra-thin, even layer across the entire plastic component—not just the repaired spot—to ensure an even sheen. Allow the protectant to sit for 3 to 5 minutes, then use a dry microfiber towel to gently buff away any excess product, leaving a clean, factory-matte finish.
Pro Tip: Avoid greasy, high-gloss dressings that attract dust and create dangerous glare on your windshield when reflected in direct sunlight.
✅ Final Checklist
- Plastic surface is completely free of dust, oils, and microscopic grit before treatment
- Scratch depth was accurately diagnosed using the fingernail test
- Heat gun (if used) was kept moving constantly to prevent melting the dashboard
- All polish residue has been completely buffed away and inspected under direct light
- Protective UV dressing or ceramic coating has been evenly applied to seal the finish
Important Notes:
- Always work in a well-ventilated area and avoid breathing in fumes from heated plastics or chemical polishes.
- If a scratch penetrates deep into painted or glossy piano-black trim, seek professional interior restoration services to avoid ruining the panel.
- Estimated time for this project is 30 to 60 minutes, with a total cost ranging from $15 to $40 for basic materials and products.
What Causes Scratches on Plastic Car Interiors
Interior scratches happen unexpectedly during daily commutes and weekend road trips. Recognizing how the damage occurred helps you choose the correct repair product and prevents future blemishes.
Common Culprits Inside the Cabin
- Fingernails and Rings: Repeatedly grabbing door handles, window switches, and climate controls leaves fine, hairline scuffs.
- Cargo and Pets: Loading groceries, luggage, or traveling with pets frequently gouges lower door cards and rear hatch trim.
- Improper Cleaning: Using dirty microfiber towels, rough paper towels, or household glass cleaners with ammonia can micro-scratch soft-touch plastics.
- Keys and Devices: Dropping smartphones, house keys, or metal belt buckles onto the center console creates deep, jagged gouges in soft trim.
Assessing Scratch Depth
Run your fingernail gently across the damaged area. If your nail catches in the groove, you are dealing with a deep gouge that will require filling or heavy polishing. If your nail glides smoothly over the mark without snagging, it is a surface-level scuff that can be buffed out in minutes using basic household remedies or a light plastic polish.
Step-by-Step Guide to Fix Scratches Using Professional Products and DIY Methods
Restoring a damaged cabin requires matching the technique to the severity of the blemish. According to automotive restoration guidelines from the Society of Automotive Engineers (SAE), proper preparation prevents further texturing damage on modern polyurethane surfaces.
Method 1: The Heat Gun Technique for Light Scuffing
- Clean the scratched dashboard or door panel thoroughly using a microfiber towel and isopropyl alcohol to remove all oils.
- Set a professional heat gun to its lowest setting, approximately 250 degrees Fahrenheit.
- Hold the nozzle at least six inches away from the plastic surface, keeping it in constant motion to prevent melting.
- Sweep slowly across the scratch for three to five seconds until the natural oils rise to the surface and blend the mark.
- Allow the area to cool completely for 10 minutes before touching or applying interior dressing.
Method 2: Plastic Polish and Microfiber Restoration
- Apply a dime-sized amount of specialized plastic restorer, such as Meguiar’s PlastX, to a clean foam applicator pad.
- Rub the product firmly into the scratch using overlapping circular motions for roughly two minutes.
- Buff away the remaining hazy residue immediately with a clean, dry microfiber cloth before it dries out.
- Inspect the area under direct lighting and repeat the polishing cycle if faint traces of the scratch remain.
What If It Still Doesn’t Work? Advanced Restoration and Replacement Options
When superficial DIY techniques fail to eliminate deep gouges, the structural integrity of the cabin component may be compromised. Industry data shows that severe structural gouges exceeding 1mm in depth cannot be safely buffed out without thinning the surrounding panel.
- Professional Vinyl and Plastic Repair: Hire a mobile interior specialist to use heat-cured grain-matching fillers. Professional technicians can recreate factory textures using specialized grain pads, with typical service costs ranging from $150 to $300 per panel.
- Vinyl-Safe Spray Dye: For persistent discoloration inside deep scratches, apply an OEM-matched aerosol interior dye. Ensure you mask off surrounding leather and glass components carefully before spraying.
- Component Replacement: If the trim piece is cracked or structurally weakened, source an OEM replacement part from a certified dealership parts department or a reputable online automotive recycler. Replacement trim costs vary drastically by make and model, usually running between $75 and $500 depending on labor complexity.
Conclusion
Removing unsightly scratches from a vehicle’s interior transforms the cabin aesthetic and protects long-term resale value. Whether deploying a controlled heat source for minor scuffs or applying professional-grade polymer polish, restoring cabin trim requires patience and the correct chemical agents. According to verified research and expert sources from leading automotive detailing associations, maintaining your interior plastics proactively prevents permanent UV degradation. Take your next step today by inspecting your vehicle’s trim types and gathering the appropriate microfiber and restoration products before starting your DIY project.
❓ Frequently Asked Questions
What is the safest way to clean plastic before removing scratches?
Always start by wiping down the area with a microfiber towel and a mild interior cleaner or soapy water. Removing all dirt and grit ensures you do not grind abrasive particles back into the plastic while working on the scratch.
Why shouldn’t I use harsh abrasives on soft-touch plastics?
Soft-touch plastics feature a rubberized or textured coating over a rigid base. Using harsh pads or aggressive compounds will strip this coating completely, leaving an unsightly, shiny spot that cannot be easily reversed.
How does a heat gun actually remove scratches?
A heat gun gently warms the outer layer of textured plastic, causing the material to expand slightly and flow back together. This effectively smooths out the edges of shallow scratches and restores the dark original color.
Can deep gouges in a dashboard be fully repaired?
Deep gouges usually cannot be buffed out because too much material is missing. In these cases, a vinyl and plastic repair kit with color-matching filler is required to rebuild the damaged surface.
What household items can temporarily hide interior scratches?
Items like a small dab of olive oil, petroleum jelly, or mineral oil can darken the exposed white lines of a scratch. Keep in mind this is only a temporary cosmetic fix that washes off during routine cleaning.
How do professional detailers handle scratched car interiors?
Professionals use specialized rotary polishers with fine finishing pads, dedicated plastic restorers, and precise heat application. They carefully match the gloss level of the surrounding area to ensure an invisible repair.